Pxier's Sales and Catering Software
Creation of a Contract for an Event
To add a new reservation,you can either click on the date and room you are intrested in directly on the event planner
Or click on the 'Add Contract' button at the top of your screen.

The contract creation page opens
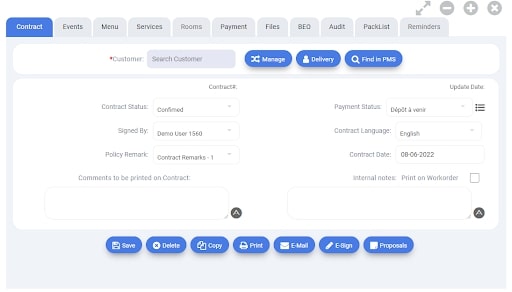
In this page several categories are represented by tabs.
By default, the contract tab is the one on which we will make changes in the first place.
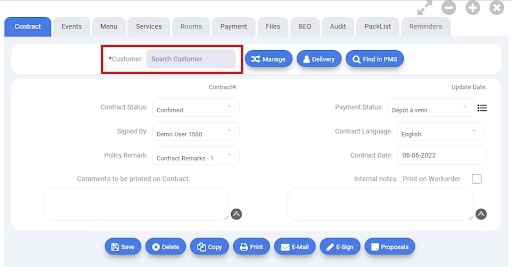
First, you must associate a customer with the contract you want to create, to do so two scenarios exists:
Creating a Client
If your customer is not yet in our system, you will have to create from the beginning to be able to continue.
To do this, start by clicking on the “Manage” button.

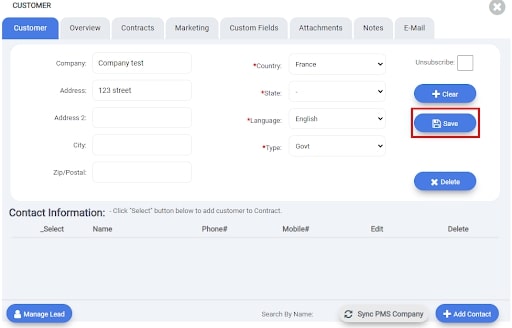
The customer page will open
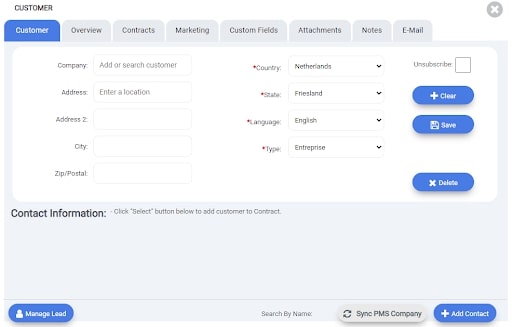
Here, fill in the different information specific to this new customer, make sure to fill in the mandatory fields indicated by a star.
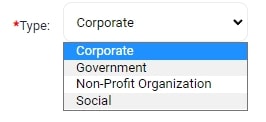
This is especially important when choosing the type of client.
In addition to be important for identifying the right type of customer to target for your marketing campaigns, the type will also determine whether this customer will be charged certain taxes.
To see the different client types, please use the drop-down menu to the right of the choices.
Thereafter, select the “Save” button to save the information.
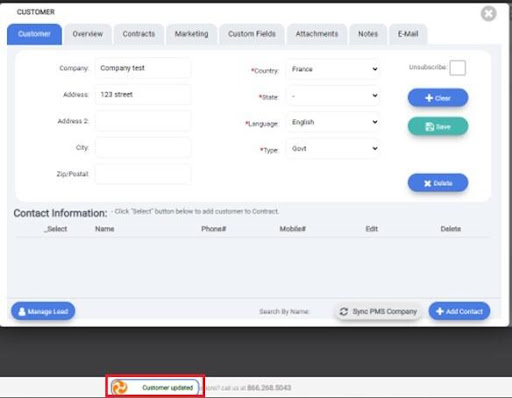
You will have confirmation that the information entered in the system has been updated
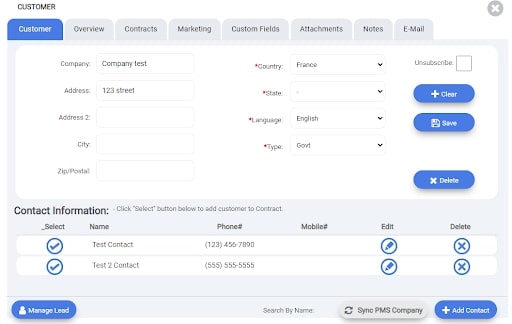
For each customer created into the system, you can create multiple contacts to be associated with.
To do so, select the ''Add a contact'' button.

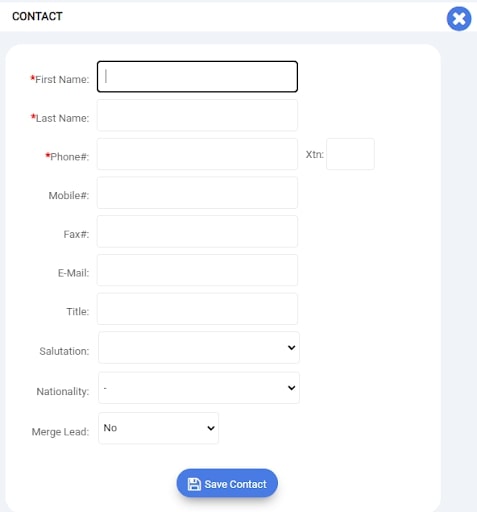
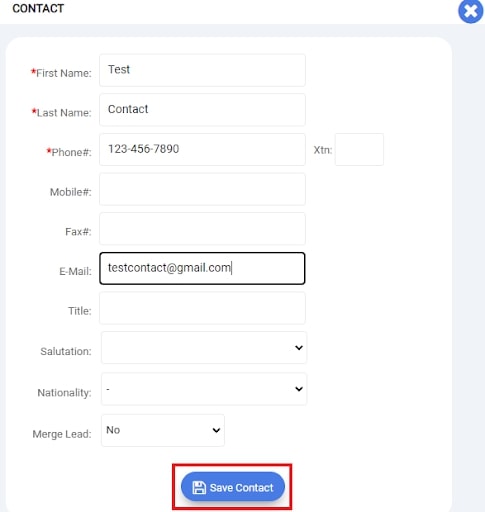
The ''Contact'' page will open
The ''Contact'' page will open
Please fill in the necessary information and then select the ''Save contact'' button.
This contact will now appear at the bottom of your Customer section.
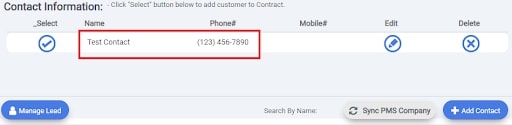
Multiple contacts can then be added by following this procedure
Now that you are done adding contact to your customer, turn your attention to the different sub tabs visible in this page:

a)The Overview tab:
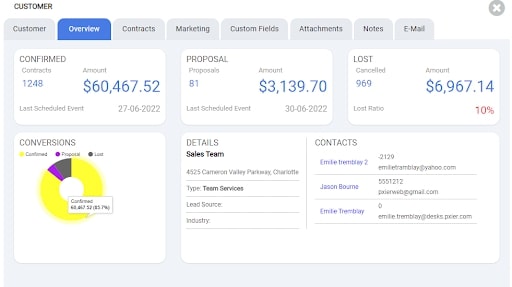
This sub section allows you to see the number of contracts you have with this customer, as well as the different statuses of these contracts (confirmed, in proposal, lost contracts), and your conversion rate.
b)Contracts tab:
Allows you to see each of the contracts in detail.
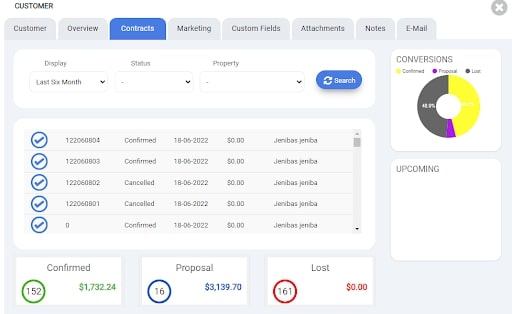
Additionally, by clicking on the check mark next to each contract, you will be able to open them directly from here.
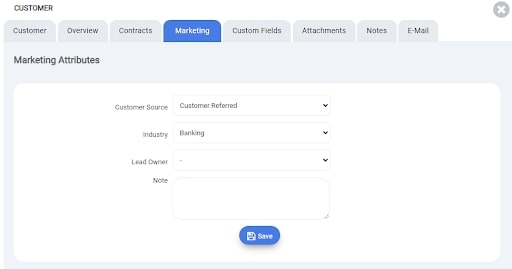
c)Marketing:
Allows you to define how this client heard about you, their field of activity and even add specific comments.
d)Attachments:
This part represents a virtual folder in which you can centralize and download the various documents that you wish to keep in the customer file, for example documents that the customer has sent to you.
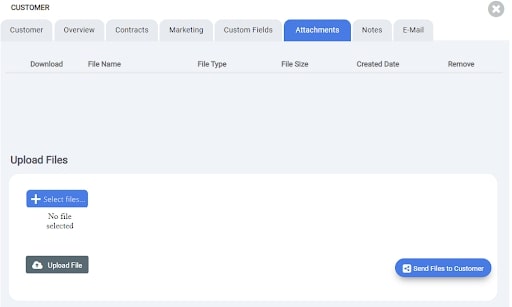
From here you also have the possibility to send a link to your client to share new documents.
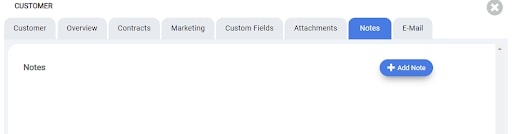
e)The Notes tab:
Allows you to add specific comments to this customer, you can indicate if it is a regular customer or its origin, etc.
This tab serves as a comment area for you and your teams.
Once you have saved all the changes made to these different tabs, click on the cross at the top right to return to your main contract tab.
Importing an Existing Client
If the customer for whom you wish to create this contract has already been created in our system you must indicate his name in the box "Customer – Search Customer".
By indicating the first letters of the person's name, a window with the names in your database that correspond to these letters will open
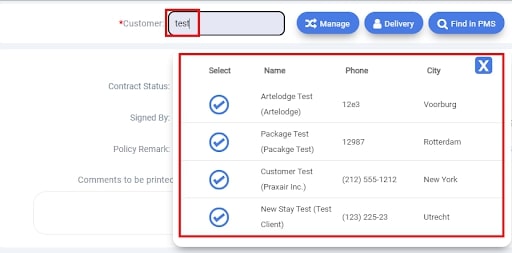
If the client you’re looking for corresponds to one of these names, then click on the ''Select'' icon.
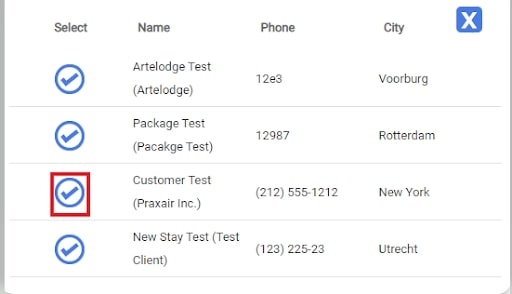
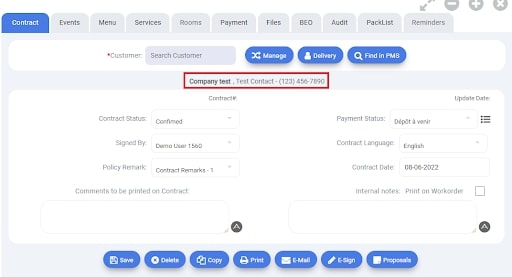
The contract you are about to create will now be associated with this customer.

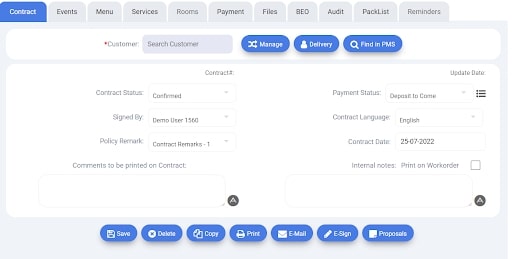
Contract Settings
Now that a customer has been assigned to the contract, we need to now configure the contract itself.
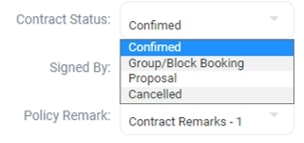
a)Contract Status:
In the first place, you need to choose the contract status by selecting the drop-down button:
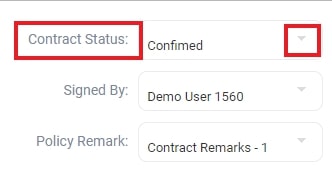
The different contract statuses visible here are determined by your admin team.
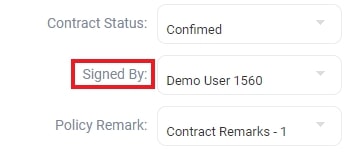
b)Assign the contract to an employee
In the drop-down menu below, entitled ‘Signed by’, you can choose who is the person in charge of this contract by selecting their name.
By default, your username will be assigned at the creation.
c)Define Terms and Conditions of the Contract
Then in the Policy Remark section, choose the terms and conditions of this contract.
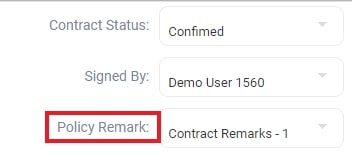
Depending on your type of contract, you may have different terms and conditions.
You can have up to 10 terms and conditions and name them separately.
These terms have been set up beforehand by your administrator and can be modified at any time.
d)Set the Payment status
In this drop-down menu, you could select the Payment status for you event.
Those statuses have been configured by your system administrator and can be modified at any time. They are important when it comes to filter sales reports according to payment status.
e)Contract Language
In this section, you get to choose the language in which this contract will be displayed for your client, the different languages are tailored for each of our client according to their need.
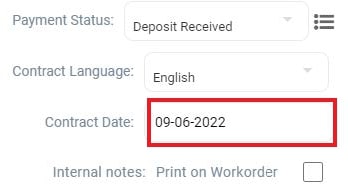
f)Contract Date
The contract date is automatically displayed with the date the contract was created.
If you want to change the date of the contract, for example to change the date to a different fiscal period, just click on the date icon
A calendar appears,
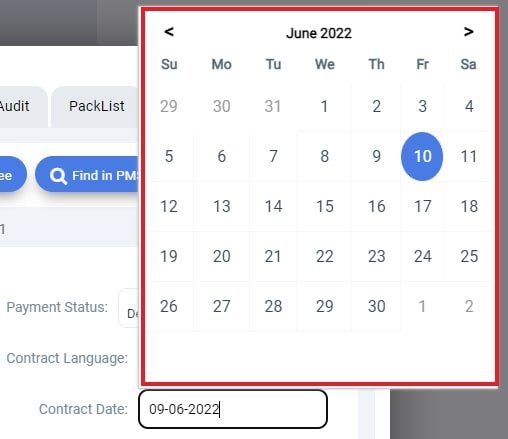
You can change the date by selecting it in the calendar or you can also enter a new date directly in the "Contract Date" box.
g)Comments to be printed on the contract
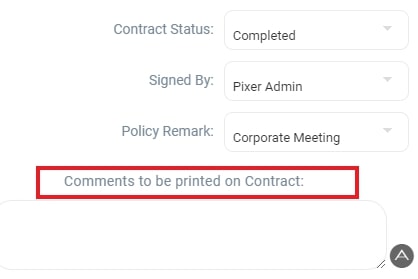
If desired, you can add notes/comments to the contract.
To do so, please indicate the desired information in the box provided for this purpose.
For example:
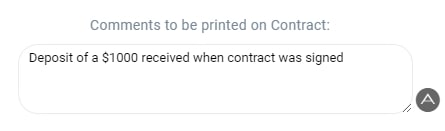
This information will be displayed on the contract when printed.
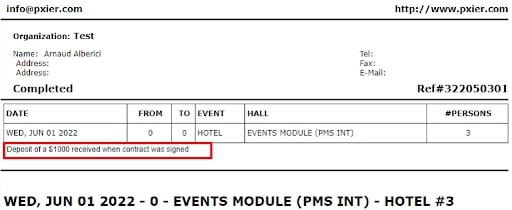
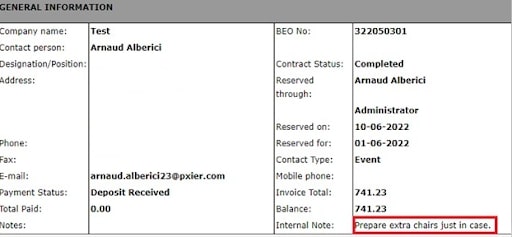
h)Internal Notes (to appear on Function sheet / B.E.O)
If desired, you can add notes/comments on the work order also called Banquet Event Order (BEO) for your team.
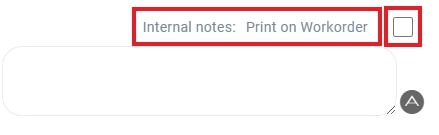
To do so, please indicate the desired information in the box provided for this purpose and don’t forget to tick the box on the right side.
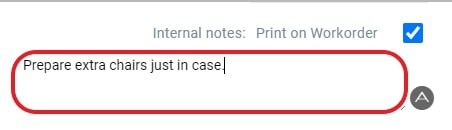
You will then be able to see this information displayed:
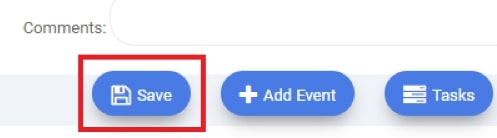
After completing entering all the information in this page, click the "Save" button to save the information and finalize your contract.
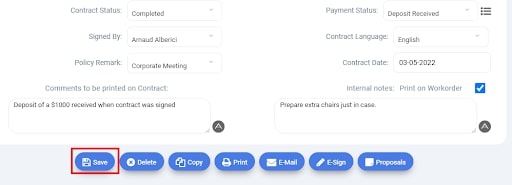
A contract number will then appear to confirm that your contract has now been created in the system.

Note:
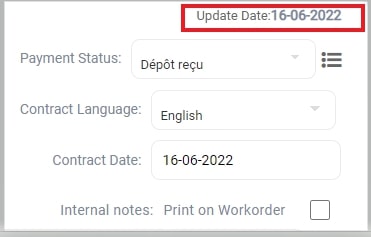
The section “Update date” is the date on which there was the last modification on the contract. This value cannot be changed manually.
After making one or more changes to the contract and after saving the changes, the date will automatically update with the current day's date.
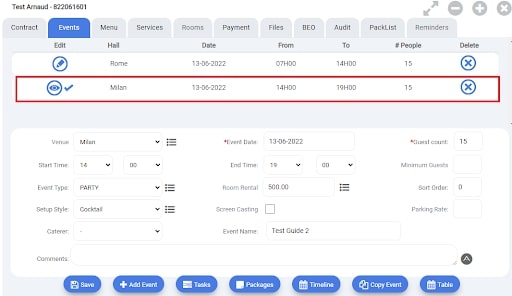
Once the creation of your contract is complete, you can now create the event associated with it.
You can have multiple events under one contract, either on the same day or on different days.
To create your event, select the events tab.
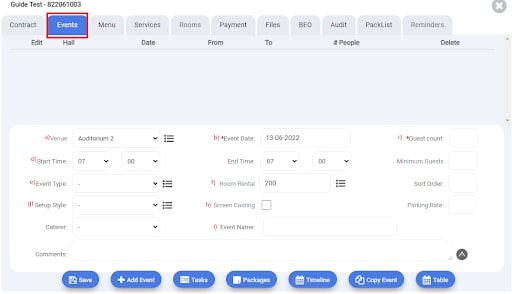
a)Select a room/venue
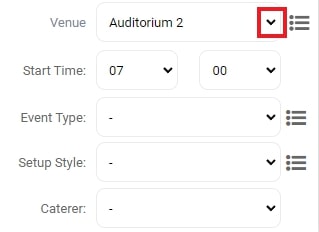
First, click on the ‘Venue/Room’ drop-down menu to choose where your event is going to take place.
The list of your rooms will be displayed on the screen
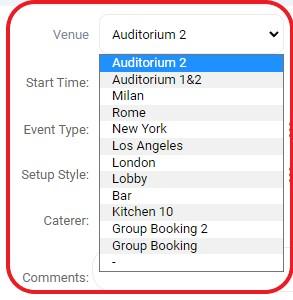
Select the room for which you wish to make the reservation
NoteThose rooms have been configured by your administrator beforehand and can be modified at any time.
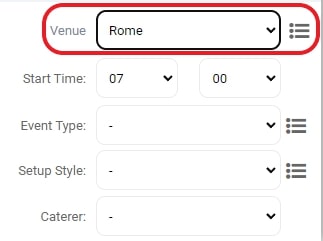
b)Select a date for the event
Now choose the date on which the event will take place by clicking on the 'Date' Section

A calendar will appear and allow you to click on the desired date.

Noteyou can also manually enter the desired date in the Event Date box.
c)Adding the number of guests.
In the box called ‘Guest Count’, indicate the number of people who will attend this

NoteDepending on some of your account settings, the number of menus and services attached to this event will be calculated based on this number.
d)Selecting a starting and ending time

Then, don’t forget to indicate the start and end time for your event, this will allow the system to generate an accurate BEO.
e)Select a type of event
Then indicate the type of event. The event type comes from your database configured by the administrator.

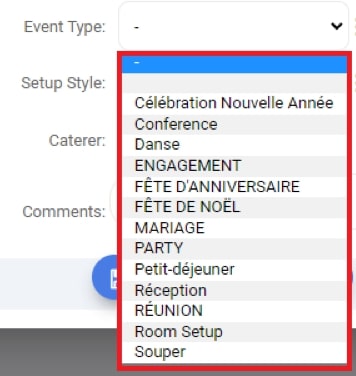
Among that list, select the type you are interested in:
Note
- Those type of events have been established by your administrator and can be modified at any time.
- They allow search by event type while editing/printing sales reports.
f)Set or modify the room price
As for the room rate, this rate comes from the account setup for that room.

If you have several different rates for the room, please select the icon next to the rate.

A page with the different rates available for that room will open.
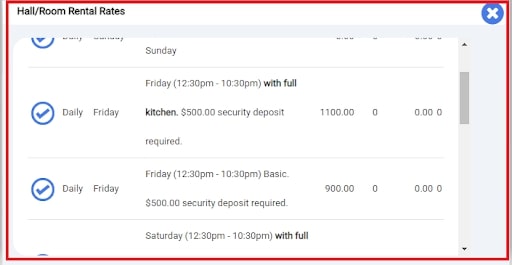
Select the desired rate

It will now be selected

In addition, you can simply modify the price manually, for example if you want to indicate a price that has been negotiated with the customer of this contract.
To do this, you simply have to enter the price manually in the 'Room price' box.
Note: The price that will be listed will be for this contract specifically, there will be no change in your database.
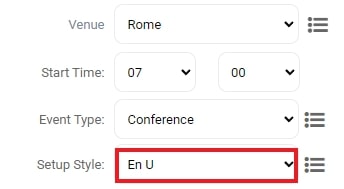
g)The Setup Style.
This section is used to select the type of room arrangement.

To see the different types of configuration saved in the system by your administrator team, select the drop-down menu.
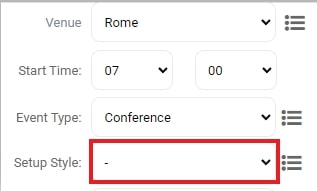
The list of possible configurations is displayed on the screen
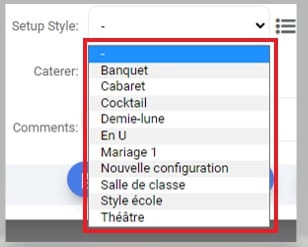
Select the desired configuration style
Note
- the different styles have been created by your administrator and are fully customizable
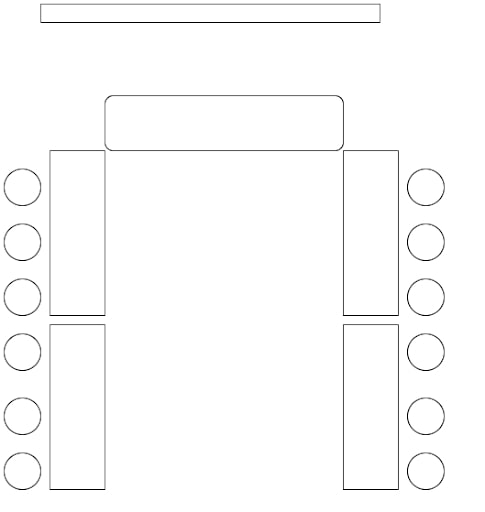
- If you possess our Room Layout module, you will have the ability to design your own floor plans and configurations yourself (as shown below)
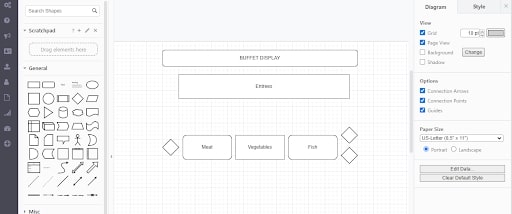
If you wish to know more about this feature, refer yourself to the Section called Manage Floor Layout.
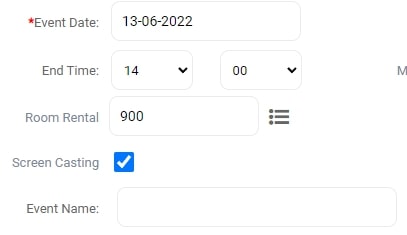
h)Screen Casting
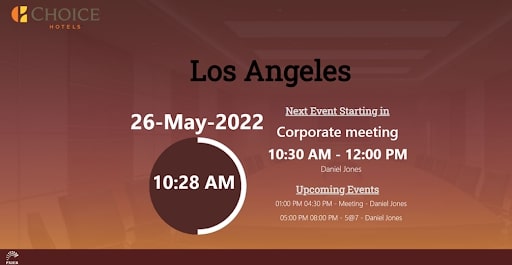
If you are using our digital display feature, you will need to select the box next to digital display section, to have this event displayed on your screens
Here is an example of what the casting could look like:

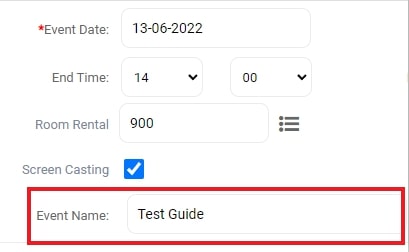
i)Give a name to your event
Finally, select a name for your event.
It is important to name your event distinctly since a contract can have multiple events.
Optional and Customizable Fields
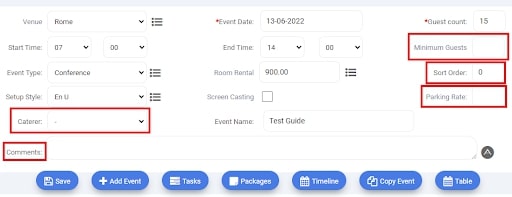
- Caterer
is used if your company used an off-site catering company for its events.
Please see the Catering Section for more information.
- Minimum Guest / Parking rate
are customizable fields. The management team and your system administrator can modify the names of these 2 fields to meet your needs.
- Sort order
This button is used if you have multiple event and want them to be displayed / printed in a specific order on your BEO/contract/invoice.
- Comment Section
this section allows you to add some specific notes for this event, those will then be displayed on your Contract and BEO.
After completing the information, please select the "Save" button to save the information.
You can then see that your event has been created and now appears in the list at the top of this window.

The event will now be associated with this specific contract.
a)Adding another event to the Contract
It is possible for you to have several events associated with a contract. To do so, please select the “Add Event” button.

The fields are back to blank, from there you just need to repeat the previous procedure to configure another event.
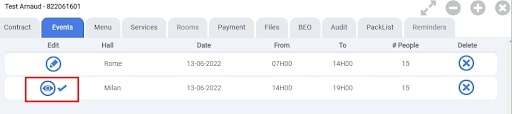
When you have several events associated with a contract, you can easily know which event is displayed on the screen by the symbol located beside the room name.
By default, events appear in chronological order, unless you specify a sort order.
b)Repeating the same event on multiple days.
You finally have the possibility of repeating this event on several consecutive days, for that click on copy event.

A window then opens, from this page select the number of days you want your event to be repeated, in the drop-down menu.
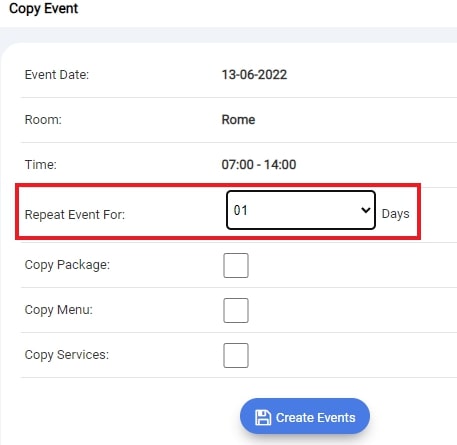
You can also choose to repeat the packages, menus and services already attached to your initial event by checking them in their respective boxes.
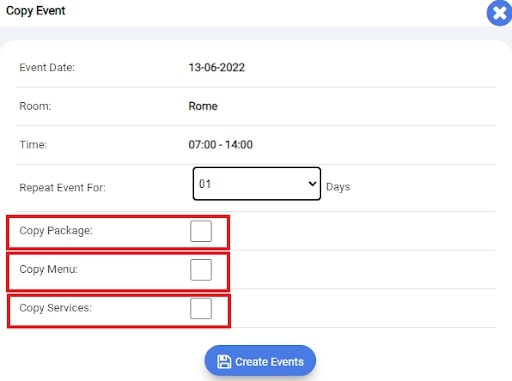
Click the Create Events button to finish the repetition.
Assigning a task to your staff.
Before the event takes place, you have the option of assigning staff to certain tasks. This can range from preparing the room, setting up cutlery, or installing electronic equipment, etc.
To do this from the Event tab, click the Tasks button

A new window will then open.

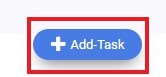
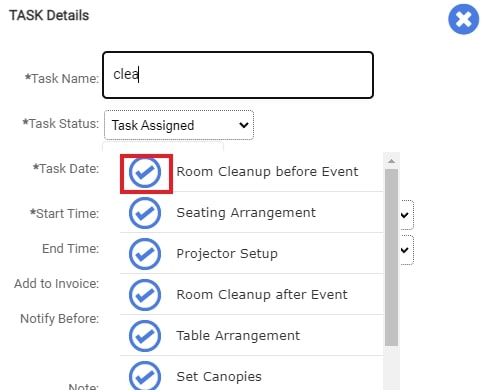
From there now click on 'Add a task' to configure your first task.
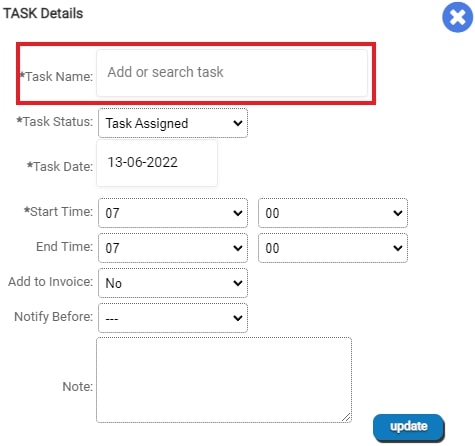
In this new window, in the task name section, start typing the first few letters of the task you are looking for.
A list of pre-saved tasks then appears.
Note These tasks can be saved and customized at any time in the system.
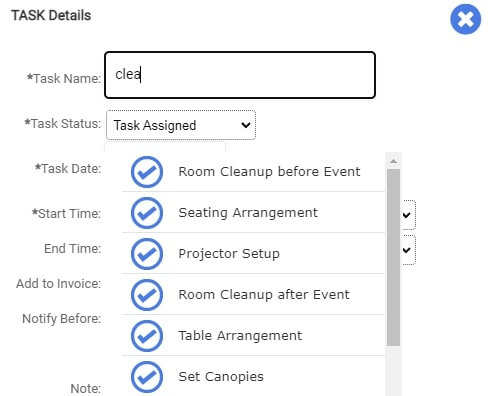
Click on the blue symbol to select the task that interests you.
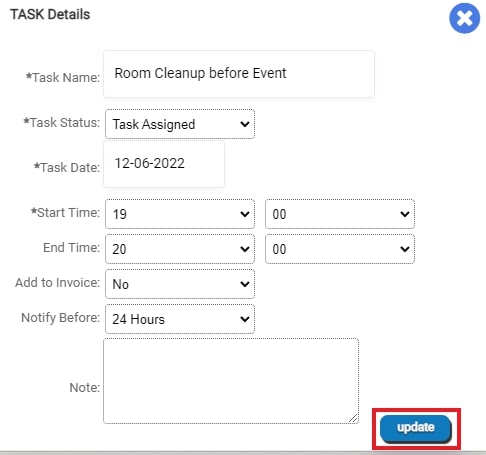
Then select a status for this task.
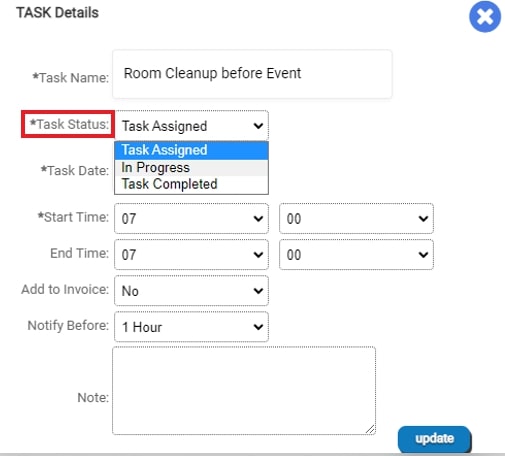
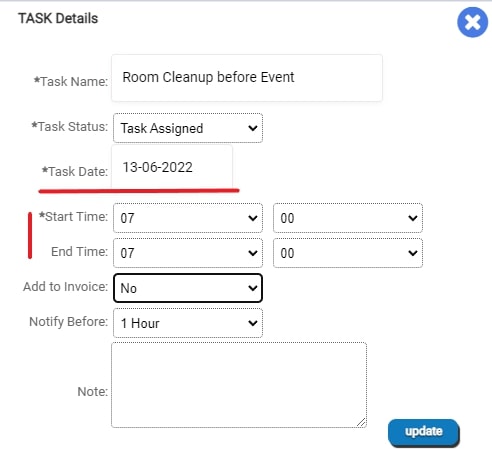
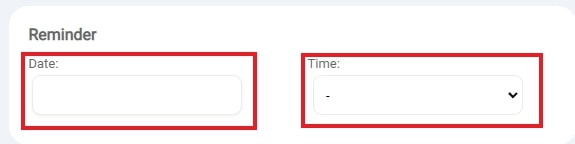
Then set the day and time for which you want this task to be performed.
Finally, you can ask the system to send a reminder when starting this task.
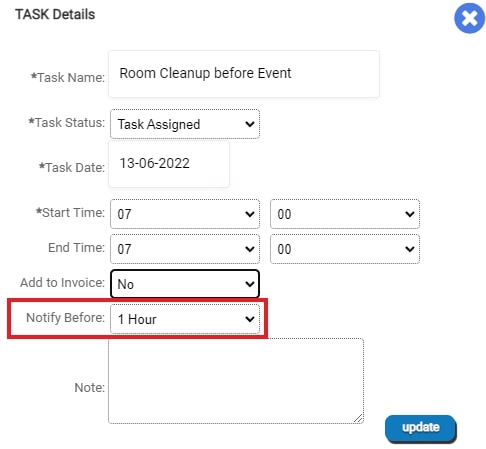
Then click on Update to finish setting up that task.
This new task now appears in the list.

Once the task has been configured, you can decide to assign one or more employees to it.
To do this, click on the icon in blue: assign to.

A list of available employees available is displayed.
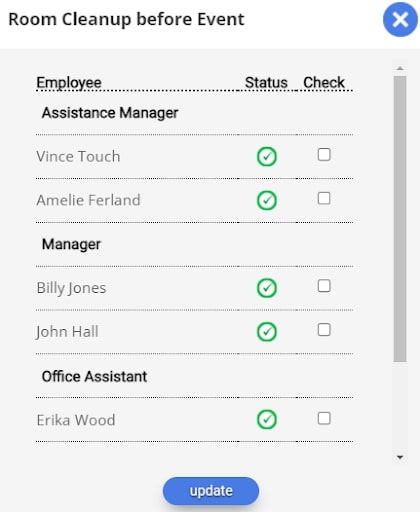
On this page you can see if some employees are already assigned to other task the day of this task, if their status is green then you are free to select them for this specific task.
Select the employees you want to assign to this job and click Update.
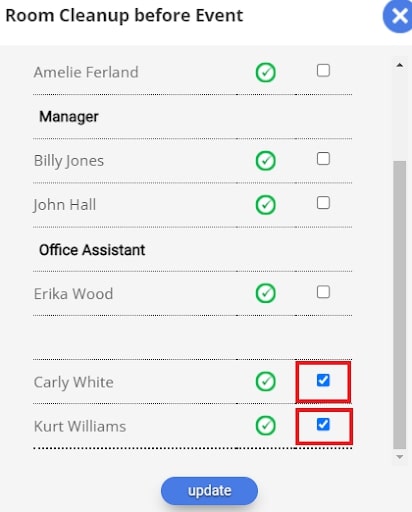
You can now see that the employees selected now show up as assigned to this task.

Now that you have created a task and assigned employees to it, you can click on the close button at the top right of this page, to return to your event.

Adding Packages to your Event.
If your company has packages, you can configure these packages in the system and attach them directly to your events.
A package is a combination of menu items and services.
To do this from the Event tab, select the 'Packages' button

The Manage Packages window opens.
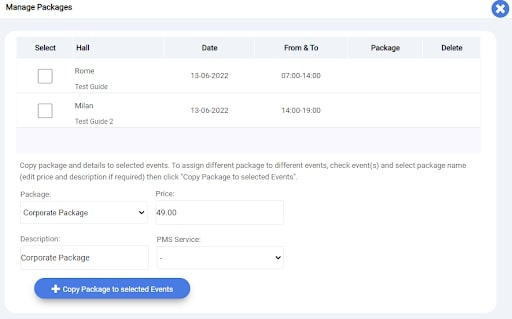
As you can see on top of this new page the different events of this contract are displayed.
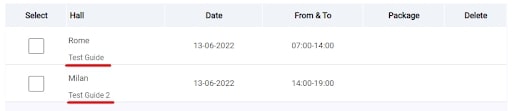
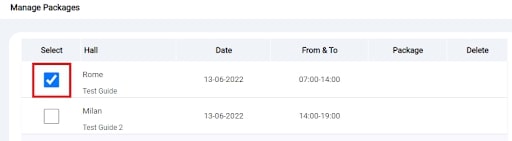
First you need to select the event you want to add the package to.
Then in the 'packages' drop-down menu select the package you want to add.
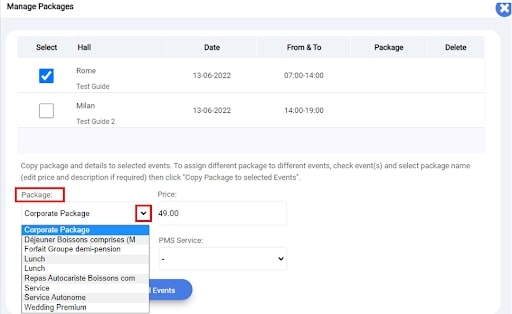
Note: Those Packages have been pre-configured in the system by your administrator and can be modified at any time.
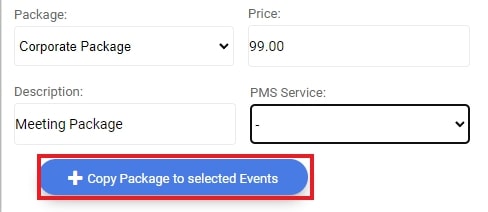
Once your package has been selected you can modify the name or the price of it for this event.
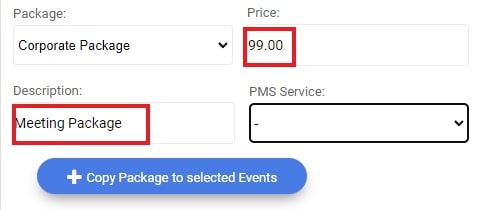
Note: Changes will not affect the name or price of this package as defined in the system, but only for this event.
Click 'Copy package to selected events' to finish adding this package to your selected event.
A window will then ask you to confirm the addition of this plan.
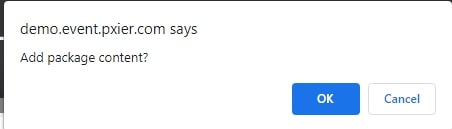
Click OK to add this package or cancel if you need to go back to the manage package window.
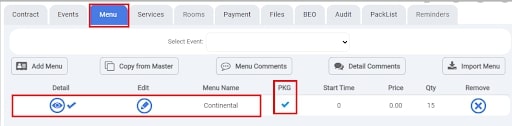
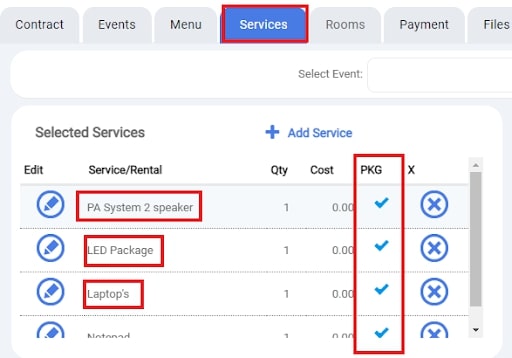
You can see that this package has now been attached to the selected event

The price of this package for this event as well as its name have been adjusted if you decided to modify them.
Note: It is important to know that only one package can be added per event.
Finally, click on the cross on the right to return to the event tab.
From there if you go to the Menu Tab or the Services Tab, you will see the items comprised in the package selected previously have automatically added to your event, saving you some time.
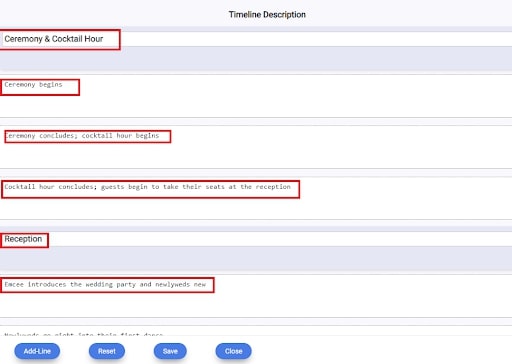
Creating a Timeline for your Event
If you want to establish a timeline or organize the progress of an event step by step first the Timeline button

A new window opens.
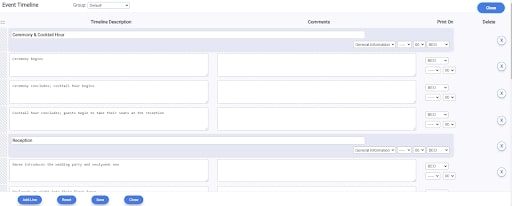
This fully customizable and interchangeable interface allows you to configure step by step the flow of your event.
Several timeline templates can be pre-configured in the system.Select the desired template is in the ‘Group’ drop down Menu

From there you can then make changes to any subsection.
You can modify their name and content
You can also select which part of your BEO that section belongs to, to organise your staff accordingly.
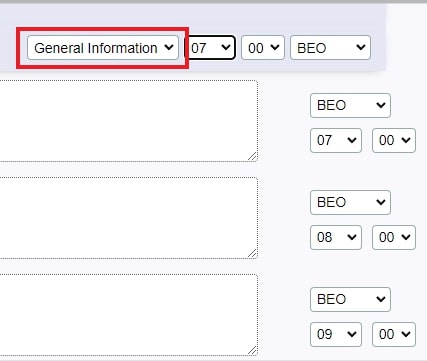
You can also decide on a time interval for a specific part of your event:
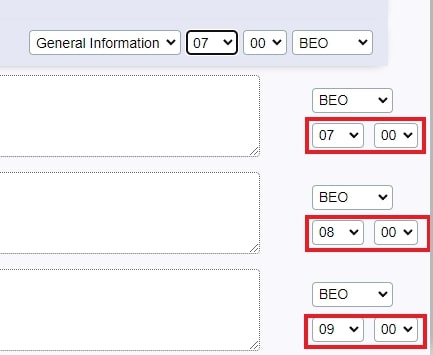
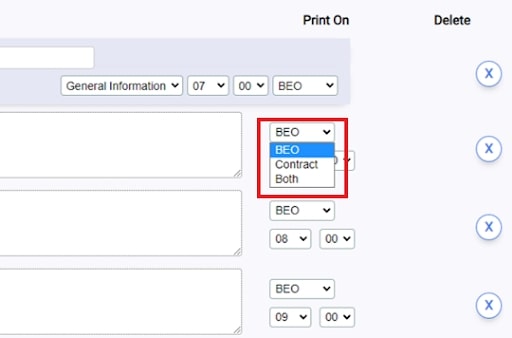
If you would like certain parts of the process to appear on your BEO or on your contract or even on both, choose the appropriate option in the drop-down menu on the right side of the event subsection.
Finally, if you need to add sections, by clicking on the “add a line” button.

And on the X symbol to delete the unwanted sections.

Once you've made your changes, simply click on the Save button.

If you wish to return to your Event tab, simply click on the Close button on the top right corner of the page.

Tables Module (if you possess a restaurant) (UNDER CREATION)
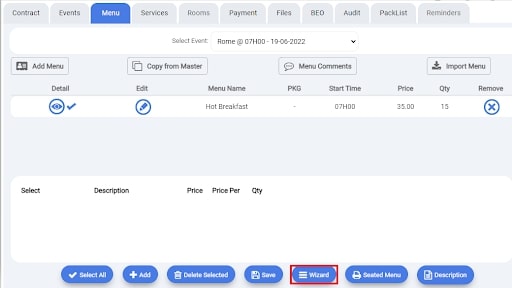
ADDING A MENU
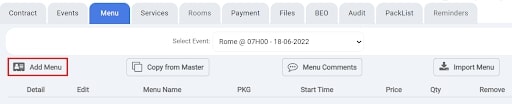
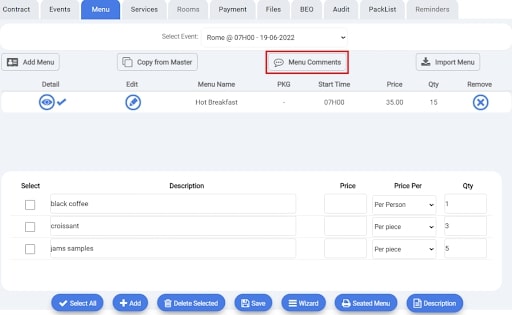
From the Contract window, now select the Menu tab.
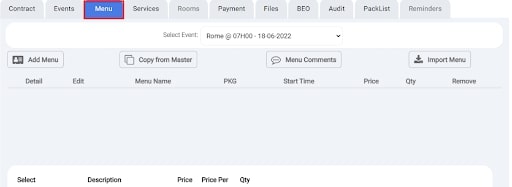
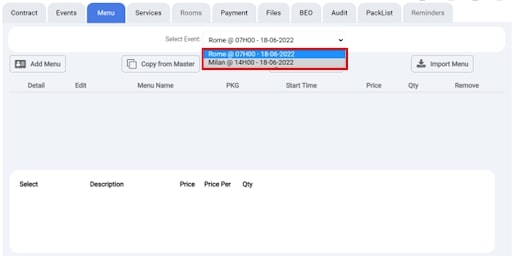
In this tab, first click on ‘select event’
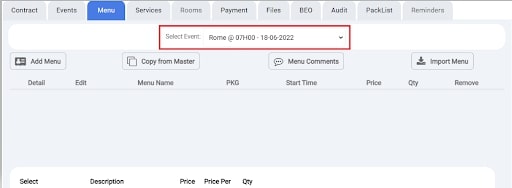
Now choose which event you want to add this menu to by using the drop-down bar.
Once the event is selected, you now have several ways to attach a menu to it.
Copy your Menu from the System. (Recommended way)
To attach a menu to your event is to click on the 'Copy from Main Menu' button.

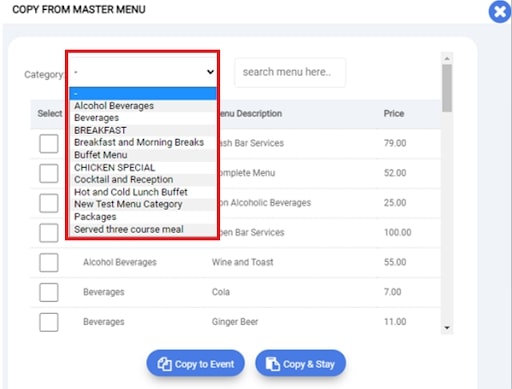
Here you see a list containing all the menus configured in the system by your administrators.
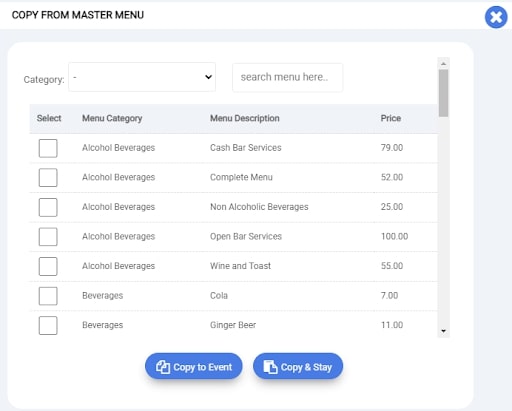
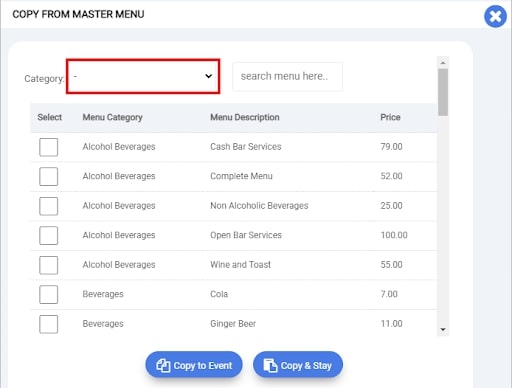
On this window, you can search for the menu by its category.
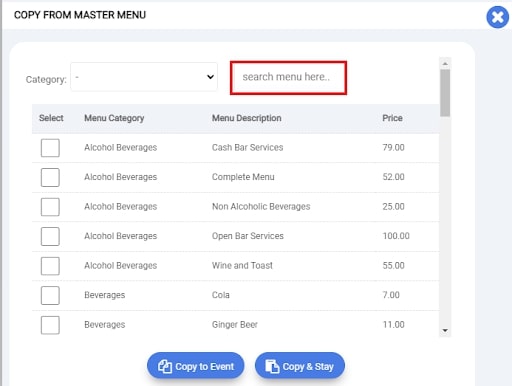
You can also simply type the first letter of the menu name in the search bar.
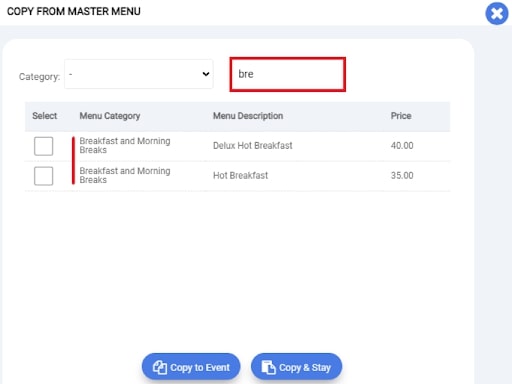
Select the item you are interest in:
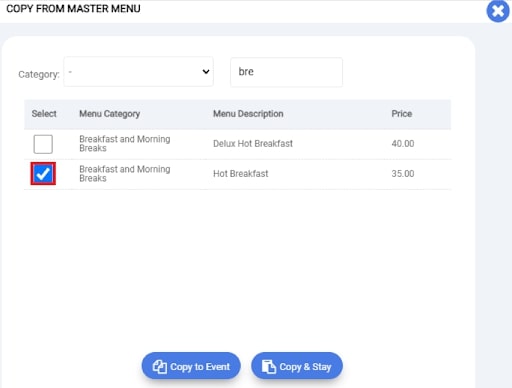
Then click on the button ‘copy to event.’ to add this item to your event.
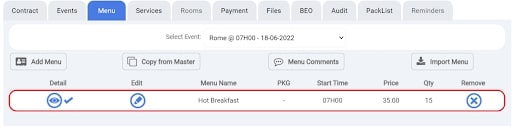
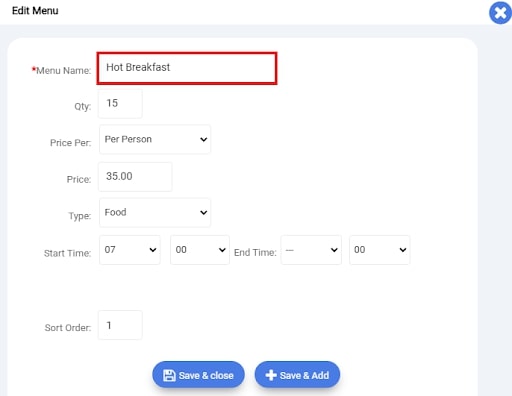
Now that this item has been added to the event you could modify it if you want.
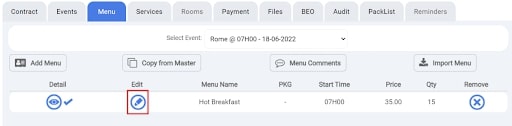
To do this, click on the pencil icon next to this menu.
In this new window, you can modify:
-the name of the menu:

-The quantity of this item needed:

Note: depending on the settings configured by your administrator, some items will automatically be link to the amount entered in the guest count part of the contract, for example here 15.
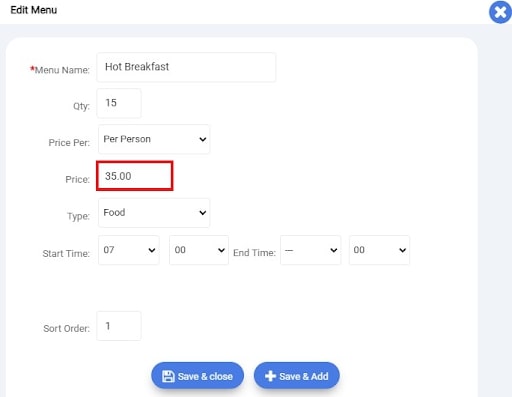
-How you would like to charge this item:

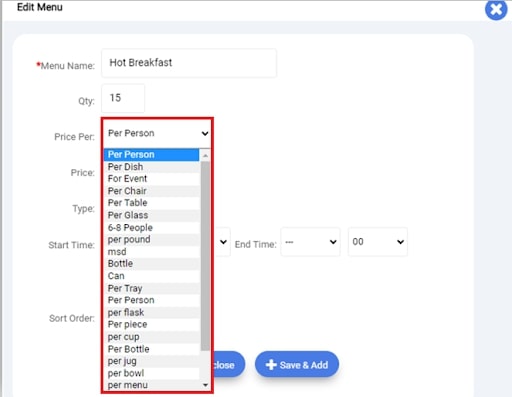
-The menu price:

Note: changing the price here will not change anything defined in the system, it only affects this event.
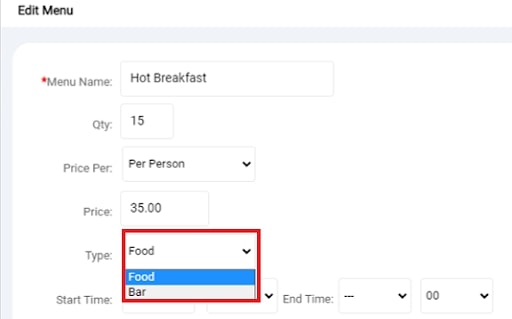
-The menu type:
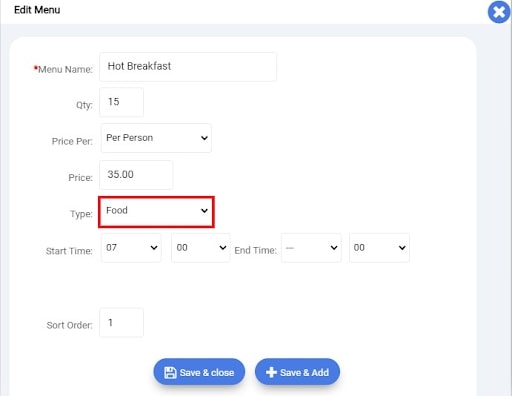

Note: changing the type for this item will could impact the way taxes are calculated (if food and bar taxes are not identical) but will also impact the location this item appears on your BEO.
-The time of service for this item:
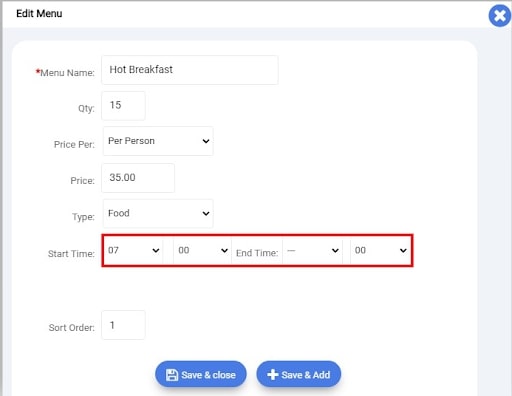
Note: This time will be displayed on your BEO.
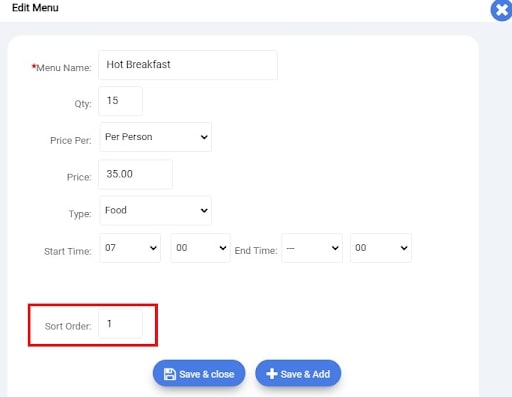
-The order your menu will appear in the menu tab:

Once you have made changes click on the button 'save and close' to go back to the Menu Tab.

You have just configured a menu for this event.
All the information added in this window will then appear once the menu is printed.
Repeat this procedure if you want to add another menu for this event.
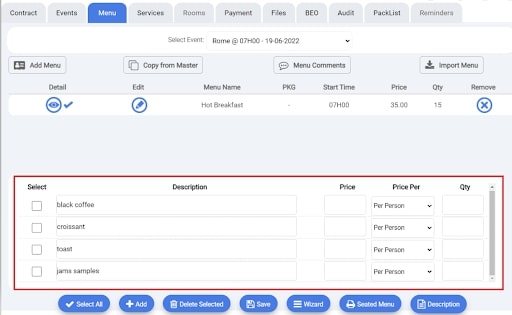
Adding a Menu Manually
This option is used if the Menu you’re looking to add to this event has not been created in the system beforehand.
To do so, click on the button Add Menu
A new page then opens.
In this new window, filled the different fields to create your menu:
- the name of the menu:
- The quantity of this item needed:

Note: depending on the settings configured by your administrator, some items will automatically be link to the amount entered in the guest count part of the contract, for example here 15.
- How you would like to charge this item:


- The menu price:
Note: changing the price here will not change anything defined in the system, it only affects this event.
- The menu type:

Note:changing the type for this item will could impact the way taxes are calculated (if food and bar taxes are not identical) but will also impact the location this item appears on your BEO.
- The time of service for this item:

Note:This time will be displayed on your BEO.
- The order your menu will appear in the menu tab:
Once you have filled all the filed click on the button 'save and close' to go back to the Menu Tab.

You have manually created a menu.
Note: the menu item you have been created has only been created for this event, you will have to give the details of this menu to your administrator so they could create it in the system if you wish to re-use this menu for further events.
Our software also has a feature called Wizard.
This wizard will help you to create menu details from text format. If you have menu information in word document or text format, this will help you to avoid re-typing information.
Note: This only work with menu details thus make sure you have created a menu name and saved before trying this option.
To do this, click on the WIZARD button.
A new window opens.
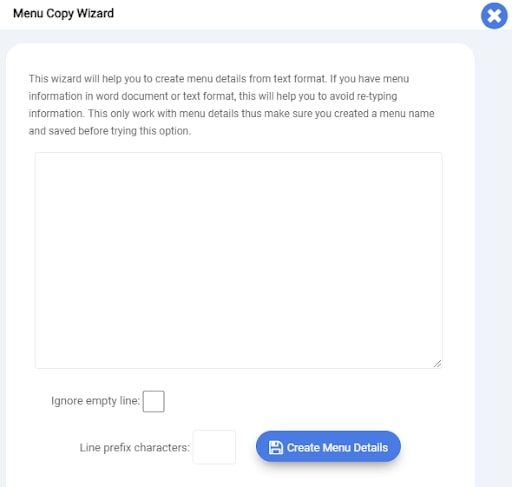
Here, copy the text from a Word or other document.
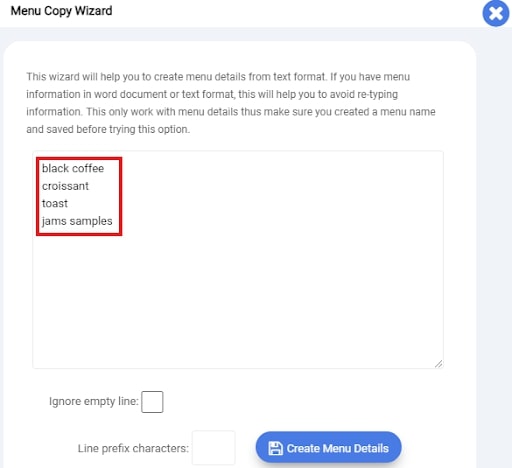
Once the text has been copied, click on ‘ignore empty line’
Then click on finally on the Create Menu Details button.
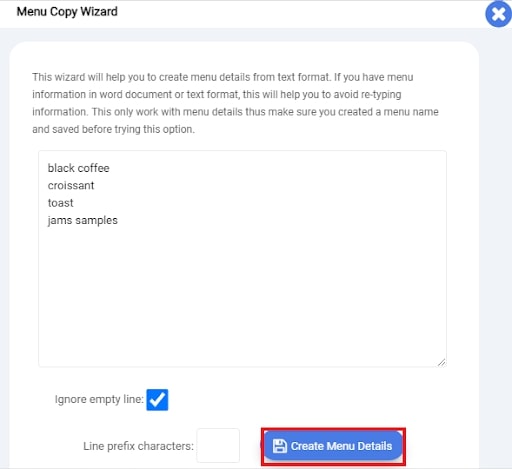
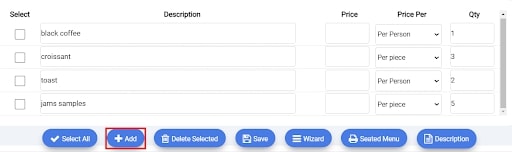
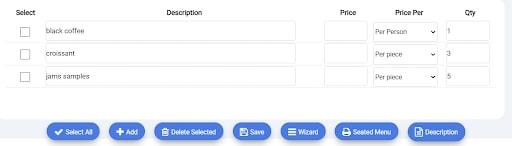
Back at the Menu Tab screen you can now see the text you copied as separate items.
From there you can customize each of the item individually, you can change the price, the way the system will calculate how to charge them and their quantity for this menu.
Once the changes have been done, click on the save button to make sure all your changes have been saved in the system.
If you wish to add another item to this menu from this window, simply click on the Add button
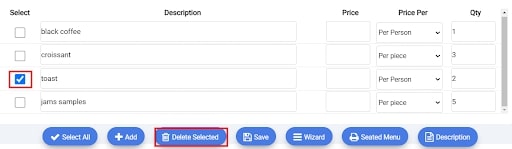
If now you wish to remove one item from this menu, click on the select space near the line you want to delete.
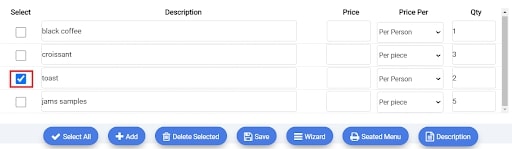
And click on the Delete Selected button.
Adding Comments for your Menu
In the system you also have the option to add some comments, they will be displayed on your BEO.
To do so, simply click on the Menu Comments button.
A new window appear,
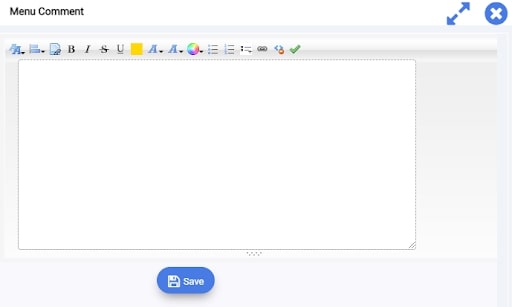
From there you can write your comments and even choose a color, a different size or distinct font for it.
Click on the save button when you want to go back to the Menu tab.
Seated Menu (UNDER CREATION)
ADDING SERVICES
The same way, you added menu items to your event you have the possibility to now add Services to it.
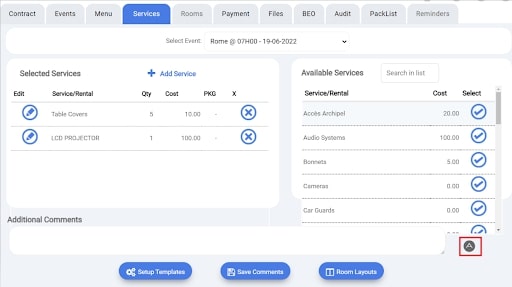
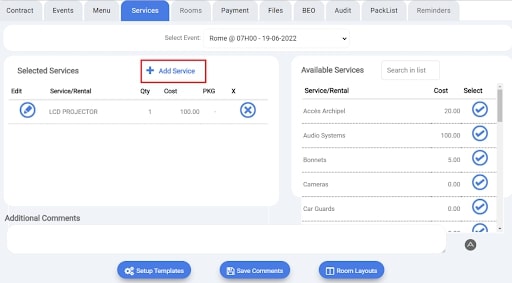
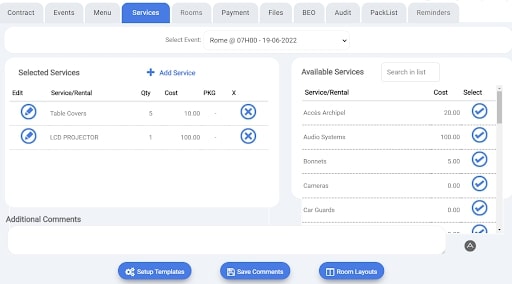
To do so from the Contract window select the Services tab.

You arrive on a new window
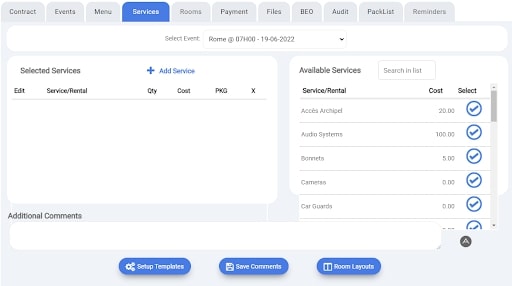
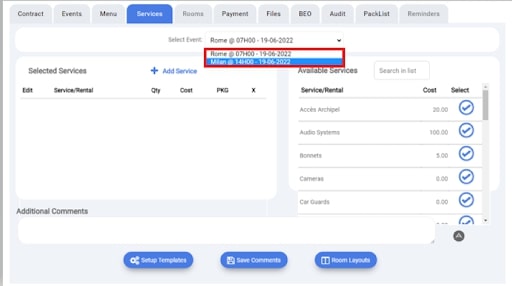
To begin with, you mush select the event you are interested in, in the Select Event drop down menu.
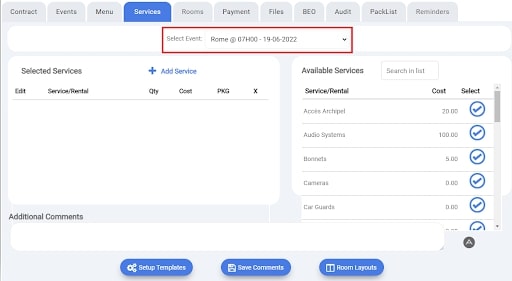
Now that your event has been selected, you can assign services to it.
Adding a Service already configured in the system
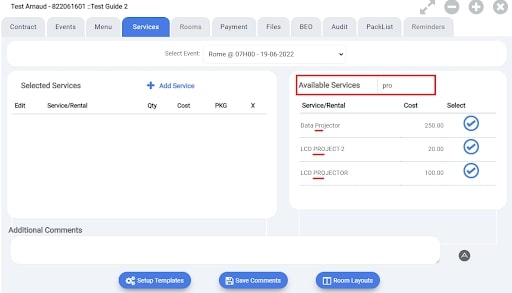
On the right side of this screen, you will see a list of all the services available.

Those services were previously added to the system by your administrators as inventory items.
To search for a particular service, simply type the first letter of the service you’re looking for in search bar.
If you now want to add this service to your event, click on the select check mark button to the right of the service
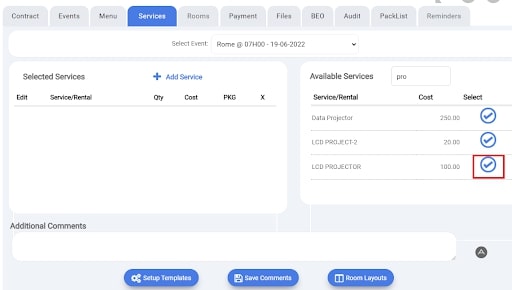
The service now appears on the left as well.
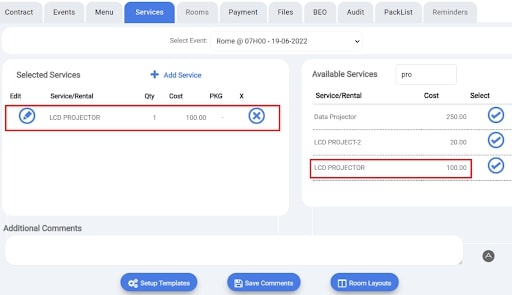
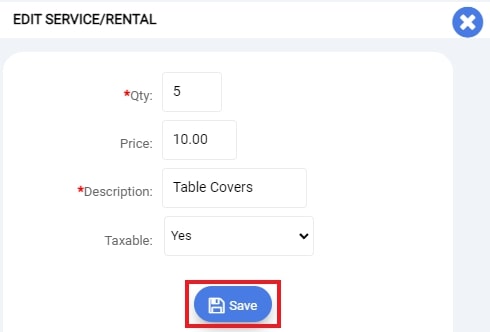
From here you can make changes to this service, by clicking on the pencil icon.
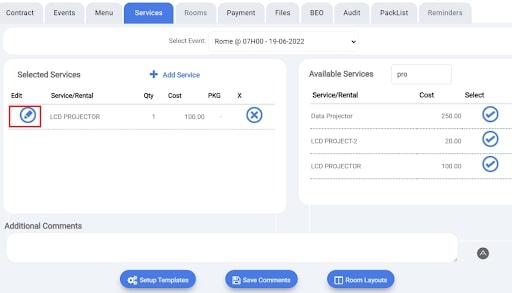
A new window opens:
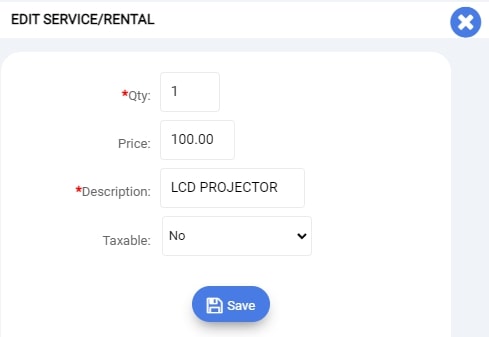
From here you can change:
-the quantity needed

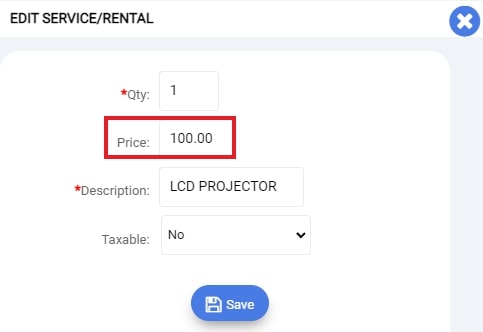
-the price
-the name of the service
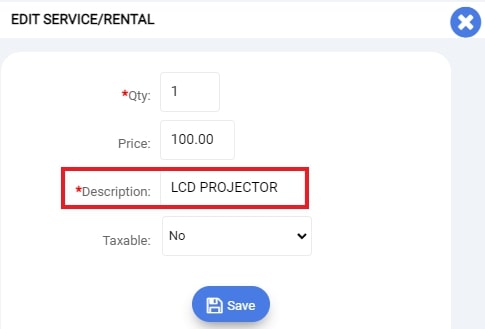
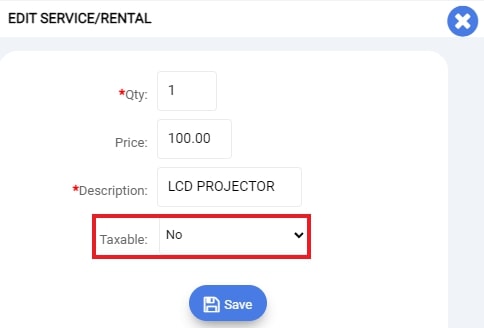
-the type of tax associated with this service. (Taxable or not)
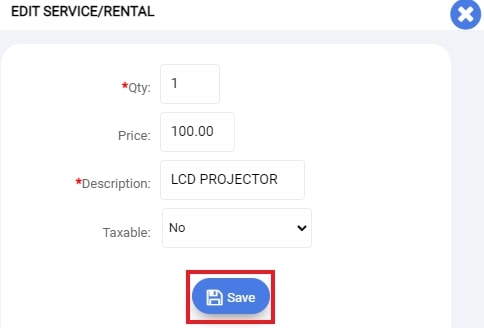
Finally, click Save to confirm your changes.
Note: Any changes made in this window will only change your service for that specific event, without changing it in the system.
Back at the Services tab, repeat this process to add as many services as you need.
If you now wish to cancel a selected service, simply click on the cross to the right of this service to remove it from your event.

The system will ask you to confirm the deletion of this service,

Click on OK to proceed and delete the service from this event or on Cancel to go back to the Service Tab window.
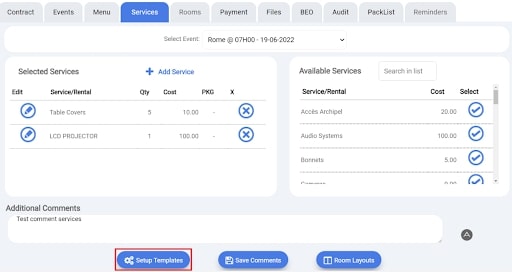
Once your services have been selected, you can now add comments concerning your services.
To do so, click on the A button
A new window will appear:
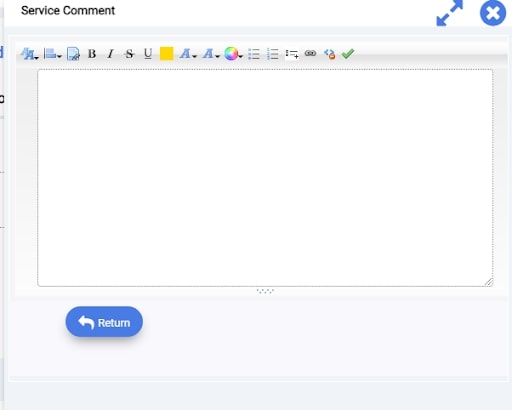
Here you can write anything you need (from notes for your staff to room layout instructions) From this window, you can format your comment (highlight, color, etc.) to make them stand out if you wish.
Once you are done, click the Return button
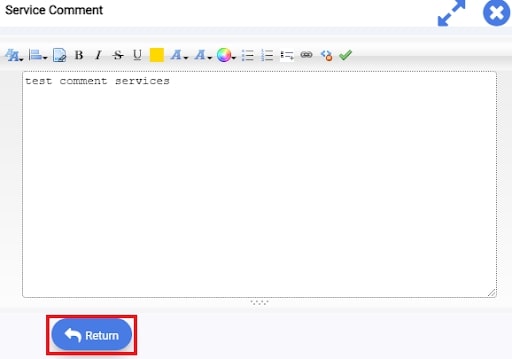
Your comments will then appear in the Additional comment section.
They will also be printed on your BEO for your staff.

To save those comments don’t forget to click on the Save Comments Button below.

Note: you can also add comments directly into this section, but you won’t be able to change the format of it. (font, color, etc.)
Add Manually a Service non created in the system
If the service you’re looking for is not appearing in the available services list, you can manually create it.
To do so just click on the «add a service" button.
A new blank window appear
From here, enters the different information into all the fields displayed and click Save to add it to your event.
You can now see that this service appear with the others.
If you now wish to cancel a selected service, simply click on the cross to the right of this service to remove it from your event.

The system will ask you to confirm if you want to remove this service,
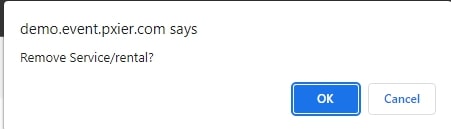
Click on OK to proceed and delete the service from this event or on Cancel to go back to the Service Tab window.
Once your services have been selected, you can now add comments concerning your services.
To do so, click on the A button

A new window will appear:

Here you can write anything you need (from notes for your staff to room layout instructions) From this window, you can format your comment (highlight, color, etc.) to make them stand out if you wish.
Once you are done, click the Return button

Your comments will then appear in the Additional comment section.They will also be printed on your BEO for your staff.

To save those comments don’t forget to click on the Save Comments Button below.

Note: you can also add comments directly into this section, but you won’t be able to change the format of it. (font, color, etc.)
Setup Templates
In the system it is possible to create template of text to import for some event.
When you click on the button Setup Templates.
A list of those pre-existing templates appear
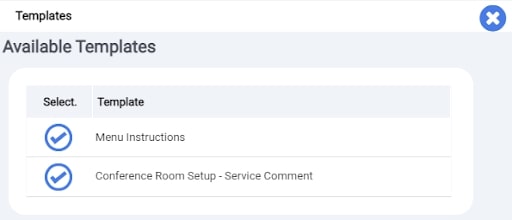
Choose the one you are interested to import, by clicking the check mark beside its name.
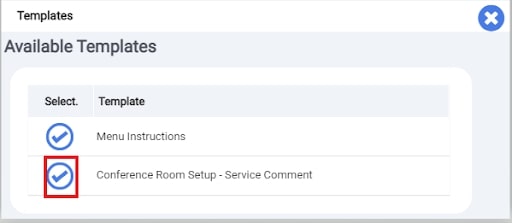
The text will automatically appear in the comment section.

Room Layout (optional module)
This optional feature allows you to attach a floor plan of your event to your contract and BEO.
First, click on the Room Layout button.

A new window appears.
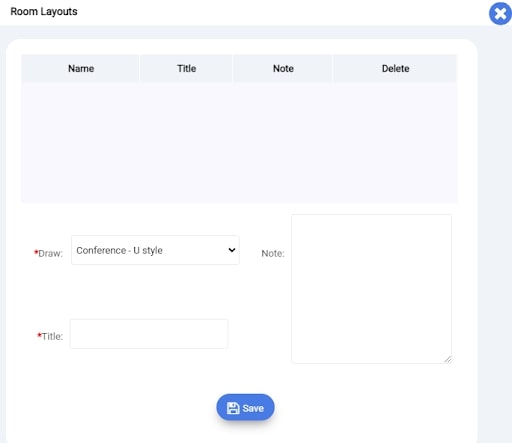
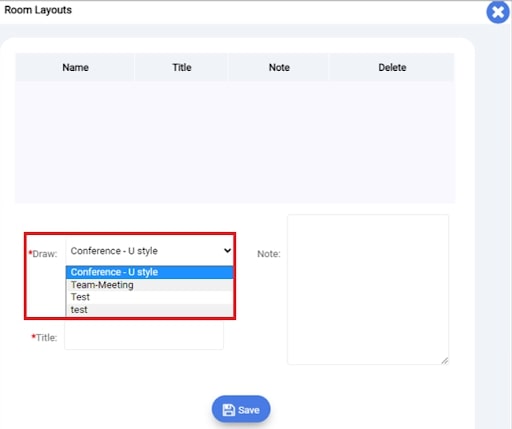
First, select the floor plan created by your administrator through the Floor Plan Module by clicking the Draw drop down menu :
Then give a name to your attached file
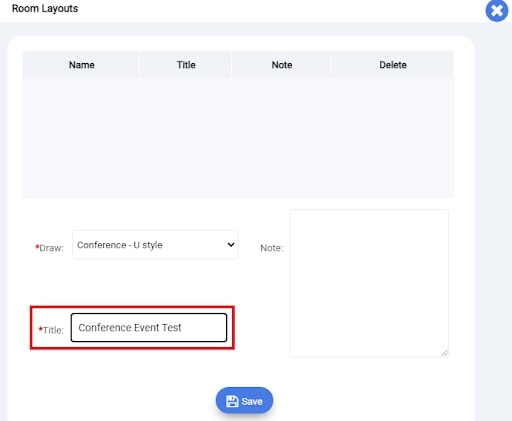
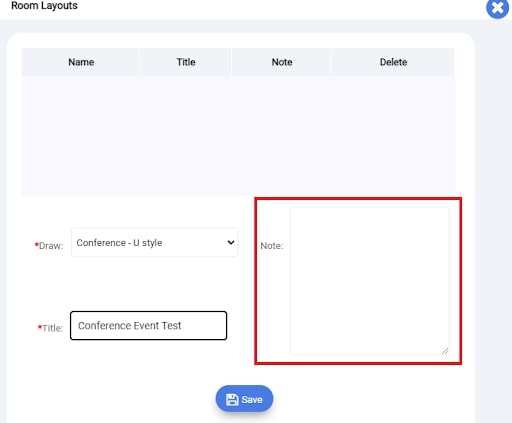
You can also add notes to this file.
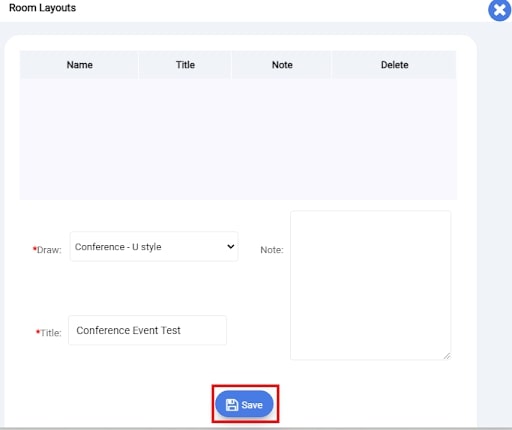
Once you have followed those step click on Save.
You can now see this attachment has been added to your Room layout menu.
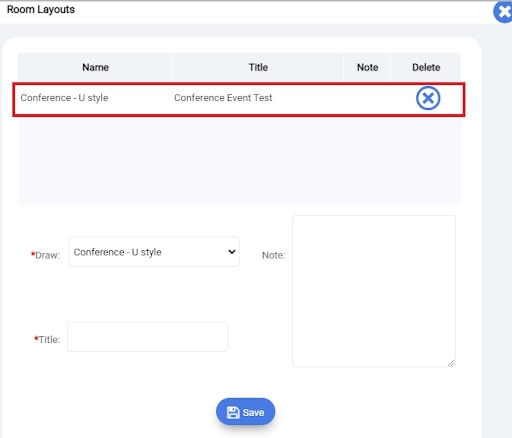
Click on the X button on the top right corner of this window to go back to the Services Tab.
MANAGING YOUR INVOICE DIRECTLY
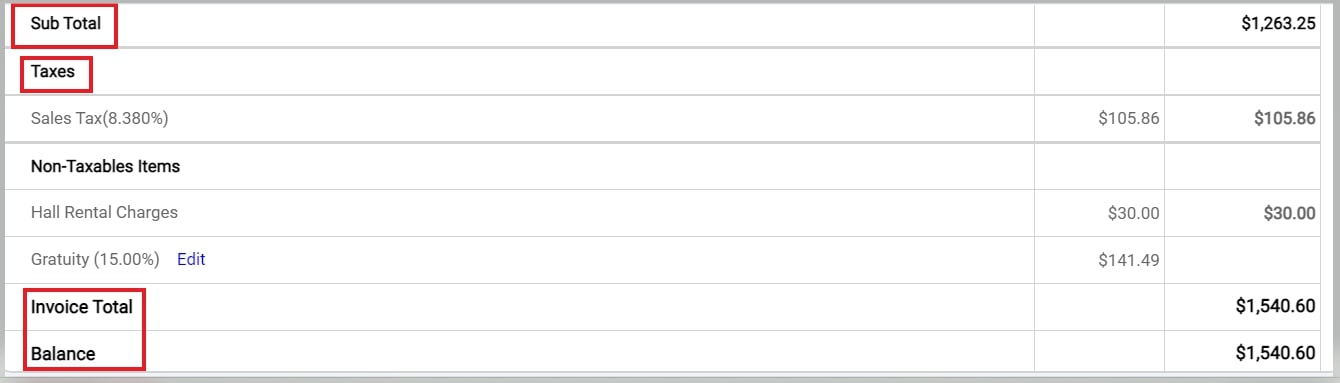
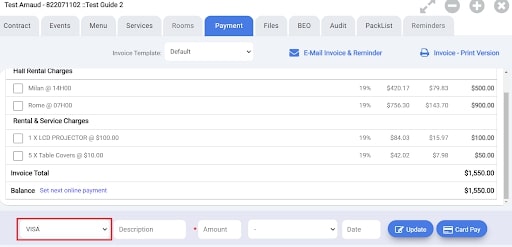
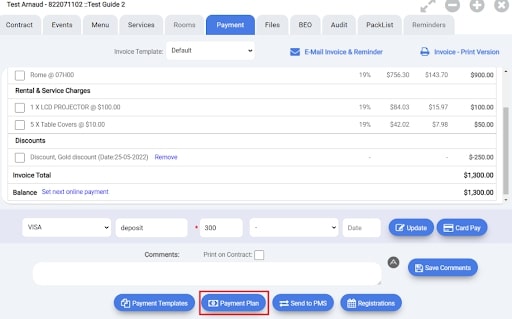
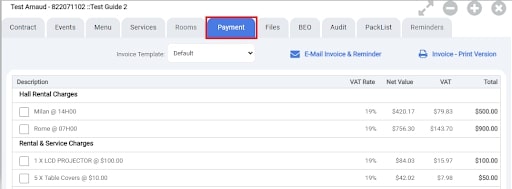
Now you have completed your event and added both menus and services, you can now select the Payment tab to view the invoice the system has generated for this event.
In this window, you can see the total bill for your event.
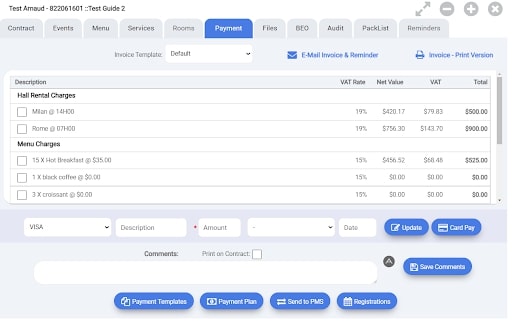
Firstly, from here you can choose your invoice template.

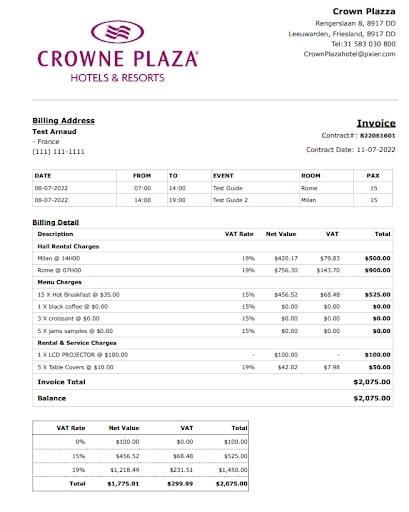
Our system offers a default invoice template that will look like this:
However, if you are used to a certain type of invoice, our technical team can create custom template that will match your existing invoices.
Adding a payment and / or Charges
Now that you have verified that your invoice is complete you might wish to add a separate charge (like discount and or a service fee) or even a payment/ deposit to it.
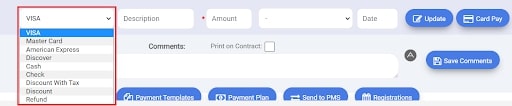
If you want to enter a charge or a payment select the following drop-down menu:
By clicking on it you will now see all the different charges, fees and method of payment currently configured in your system.
Then select the item that you want to add to your invoice and add a description if you wish.
For example, if it is a deposit or part of the payment plan.

Now enter its amount along with a date.

Once your charge or payment is set up, click the Update button to add it to your invoice.

You can now see that the charge/payment you created has been added and the balance has been adjusted accordingly.
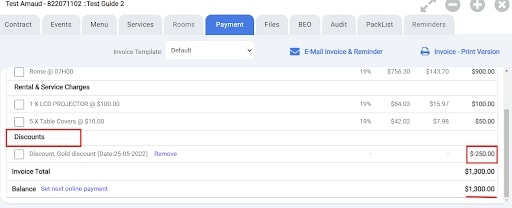
IMPORTANT: When entering a charge like a refund or a discount always enter the amount as a positive amount, it is the type of charge/payment and how it has been configured in your system that will determine if the system need to add it or subtract it to/from the invoice.
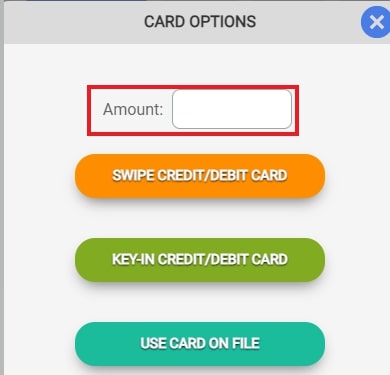
Make a payment directly. (3 options)
If you have sent your preliminary invoice to your client and they got in contact with and provided you with to credit card for the payment of the invoice.
You have the option to enter the payment in real time directly into the system to connect it to your banking terminal.
To do so click on the button Card Pay

A payment interface will then open, presenting you 3 choices:
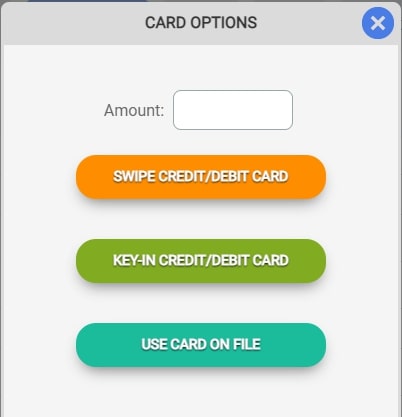
First, choose how you want to make the payment.
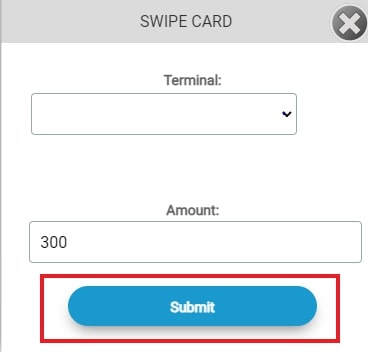
a)By swiping the card in a terminal
Indicated the amount you wish to pay in the amount field
Then click on SWIPE CREDIT/DEBIT CARD, a new window connected to your banking terminals open.
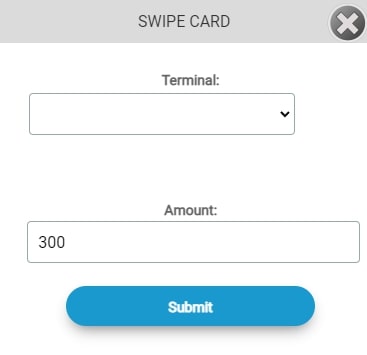
Please select the banking terminal you wish to process the payment from

Finally enter the amount of the payment
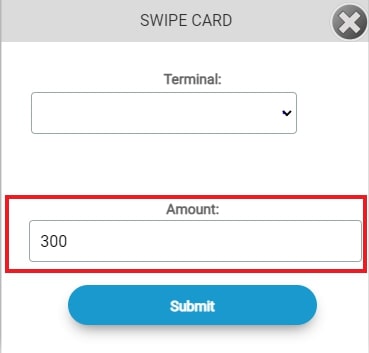
Click the Submit button to finalize the payment.
b)y entering the card number manually.
c) using a pre-registered card.
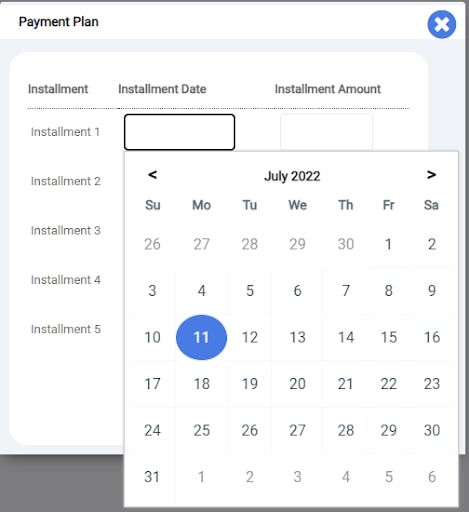
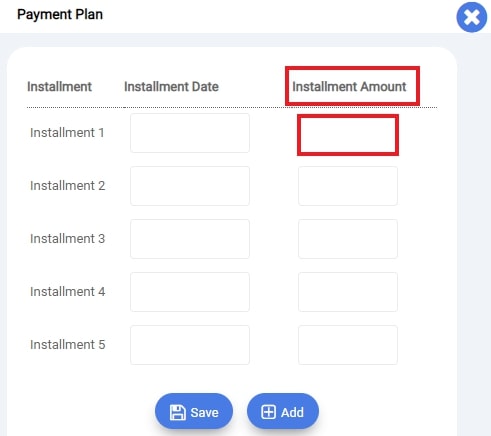
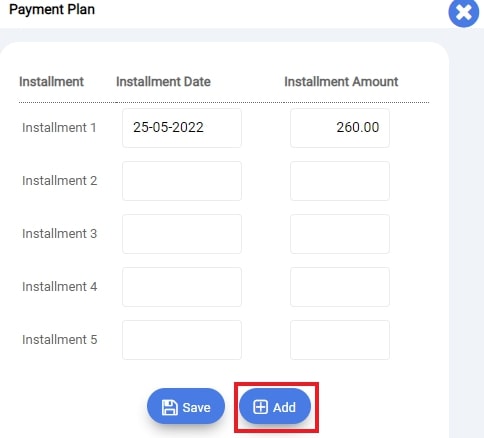
Payment Plan
In the system you have the ability to set up payment plans for your clients.
To do so first click on the Payment plan button
A new page opens.
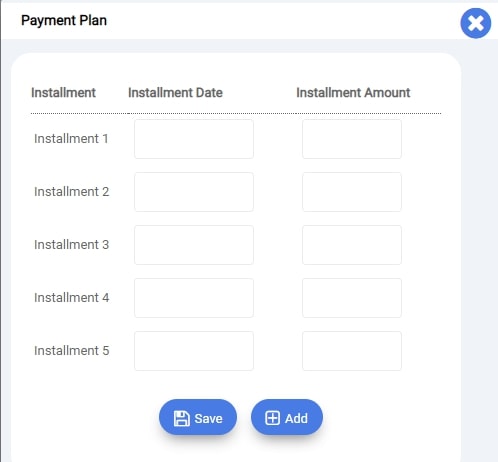
Then click in the Installment date section

and select the date of the first payment in the calendar that appears.
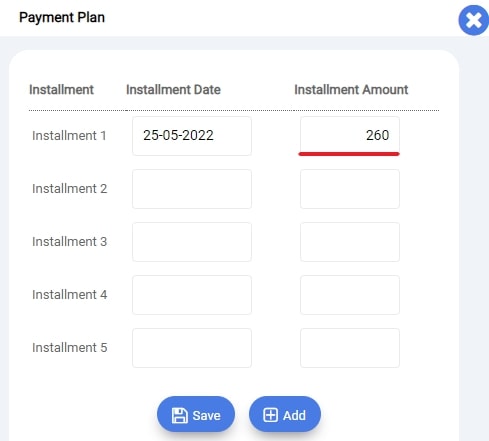
Once you have selected a date for the first payment installment, enter the amount of this payment in the section ‘Amount of payment’.
Or you can enter a percentage.
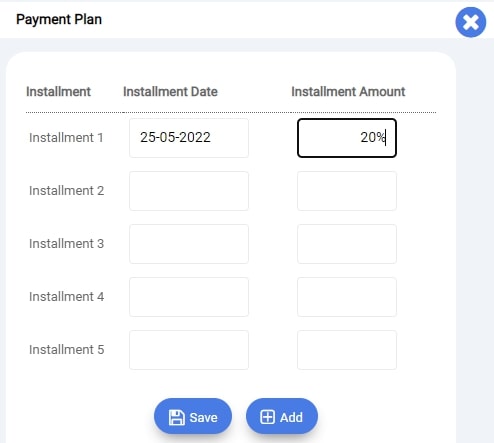
By indicating a percentage amount, the system will automatically convert it into a plain amount.
Repeat this process for each installment and click Save.
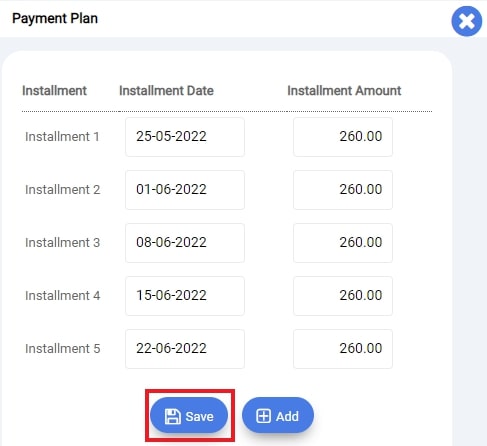
Note: If you wish to create more than the default installment, simply click on the Add button to add another line.
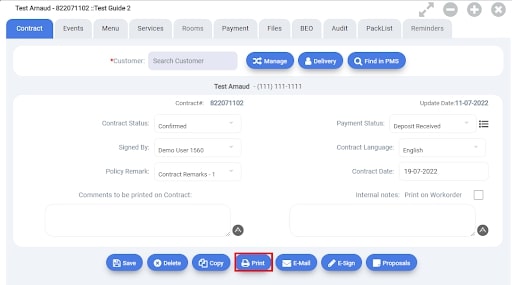
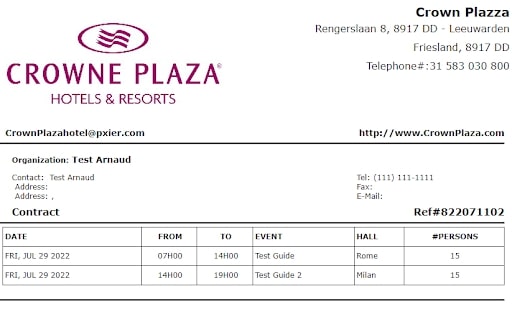
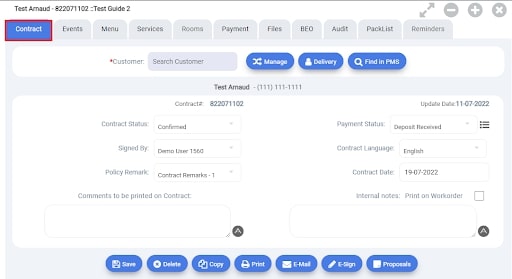
CONTRACT
A)Print your Contract
If you wish to print your contract on paper, head to the Contract tab

Then click on the button Print
A new window opens,
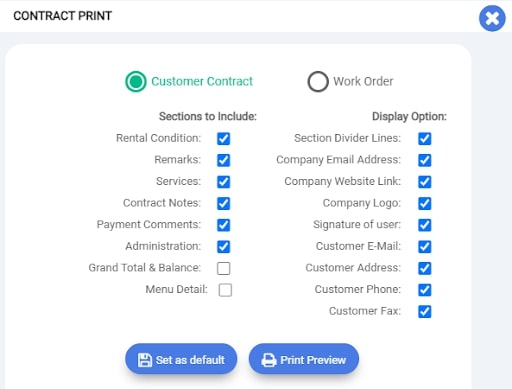
From here, first select if you wish to print this contract:
- as a work order for your team.
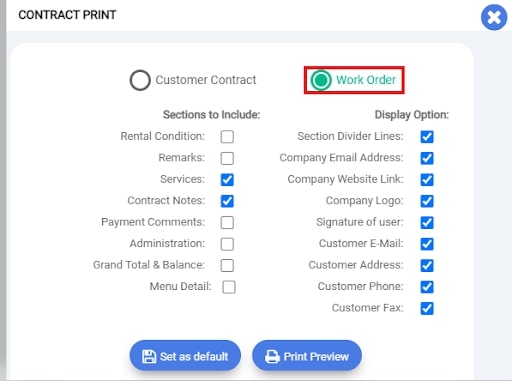
- for your customer
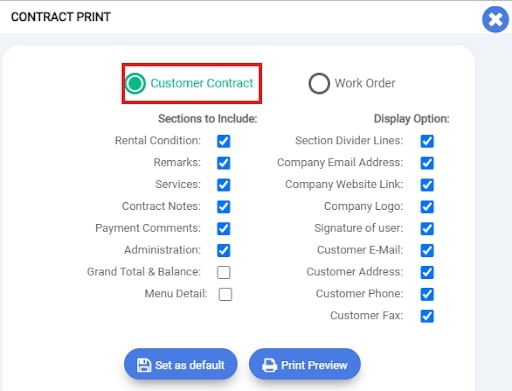
Depending on your choice, some section to be printed are pre-selected.
If you wish to add more section to be printed, simply select the one you need and click on it.
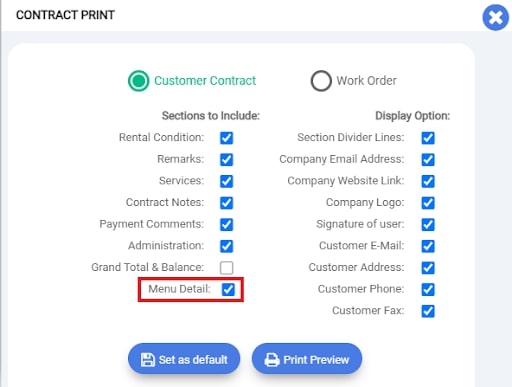
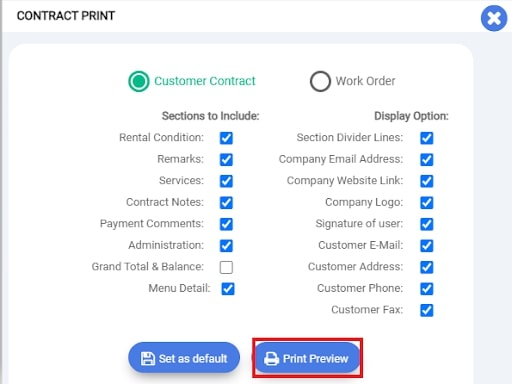
Once you have made the changes, you can set this selection to be the one by default by clicking on the Set as Default button.

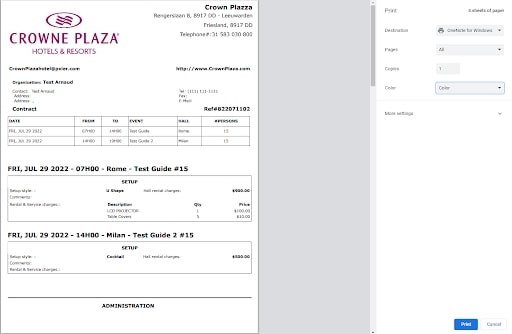
Finally, click on the Print Preview button to visualize your contract.
Your contract appear
As you can see all the information you have entered or recovered from the system have automatically been formatted into this document.
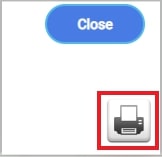
Once you have verified that everything is correct and appears as you wish, simply click on the printer button:
Your printer preview page then opens:
Finalize the process by following your printer instructions.
B)Email a copy of your Contract
If you wish to send a copy of this contract by E-mail you can do it directly through the system.
To do so, head to the Contract tab
Then select the E-Mail button:
A new window opens:
In this window you can see that an email has already been created by the system for you to send to your client.
Note: That email template is entirely customizable in the system.
In the Template field of this email, you can select what information you wish to share with your client:
Once your email is ready, simply click on the Send E-mail button.
Your client will then receive an email looking like this:

To return to your contract simply click on the X button on the top right corner of this email window.

PROPOSAL
Once you have configured every section of your contract and event(s), you have the option to send all those information in a form of a unique proposal.
This proposal can be designed by our team according to your specifications.
A)Print a version of the Proposal
B)E-mail a version of the Proposal
INVOICE
Once you have configured every section of your contract and event(s), you have the option to send all those information in a form of a unique proposal.
This proposal can be designed by our team according to your specifications.
A)Print your invoice
If you wish to send a copy of your invoice by E-mail you can do it directly through the system.
To do so, head to the Payment tab
Once you have selected the template of your invoice, you can now print it by clicking on the Invoice- Print Version button.

Your invoice will then be displayed in its entirety for you to review.
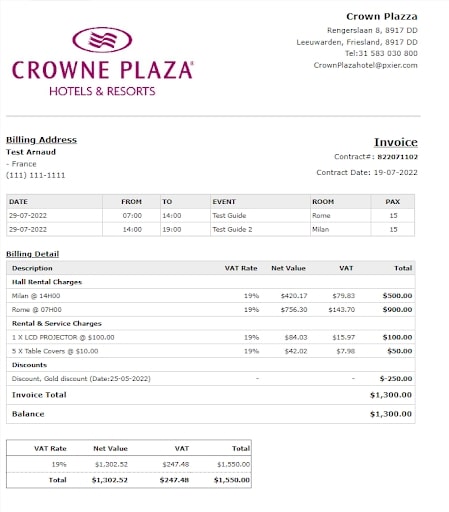
Once you have verified that everything is accurate, simply click on the printer icon.

Your printer preview page opens,
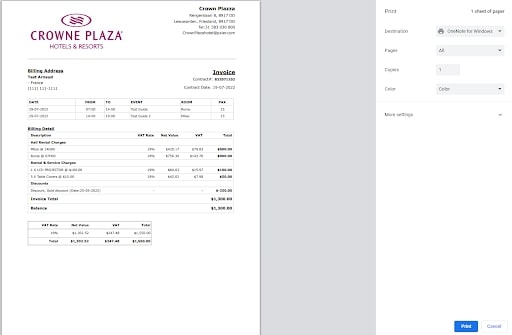
Follow the instructions and proceed to printing the invoice.
B)Email your invoice
Once you have selected the template for your invoice you can send it by email to your client directly through the system.
To do so, simply click on the E-Mail Invoice and Reminder button:

A new window opens,
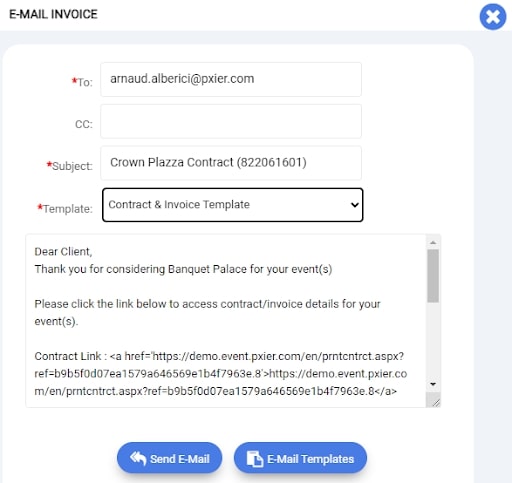
In this window you can see that an email has already been created by the system and summarize your event for you to send to your client.
Note: That email template is entirely customizable in the system.
In the Template field of this email, you can select what information you wish to share with your client:
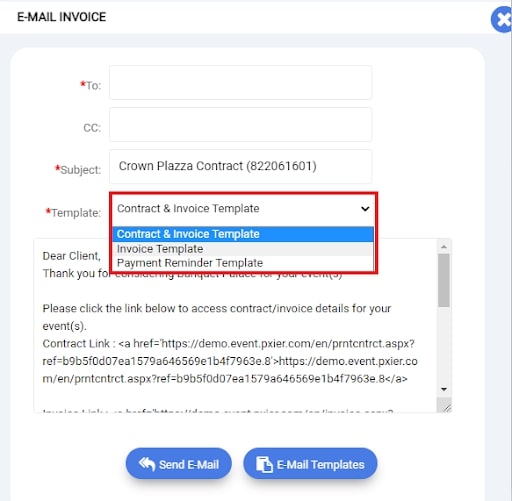
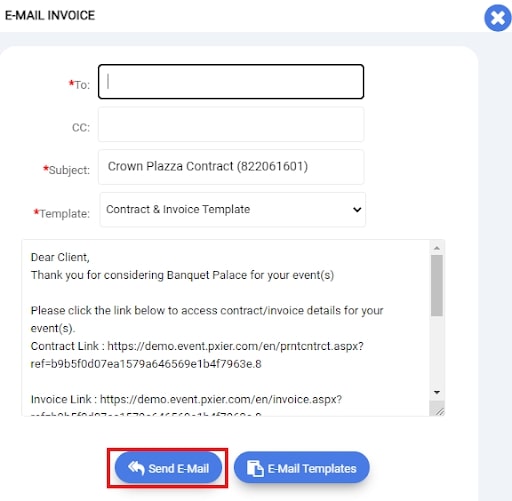
Once your email is ready, simply click on the Send E-mail button.
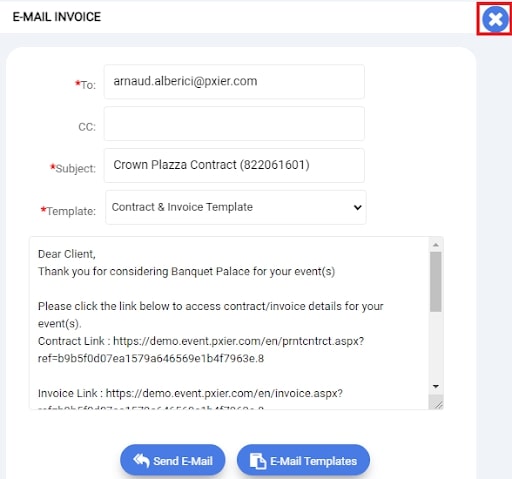
Your client will then receive an email looking like this:

To return to your invoice simply click on the X button on the top right corner of this email window.
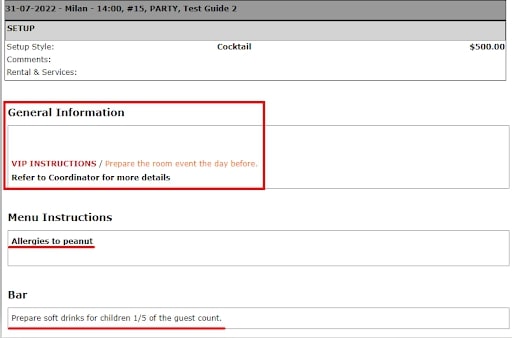
BANQUET EVENT ORDER (B.E.O) / FUNCTION SHEET
The Banquet Event Order (B.E.O) also known as Function Sheet, is a document that contains all the information relative to your event.
It serves as a guideline for your teams and allows you to execute the tasks relative to the event and coordinate your teams efficiently.
It is generally used for internal purposes; however, the system also allows you to share it with your customers if you wish.
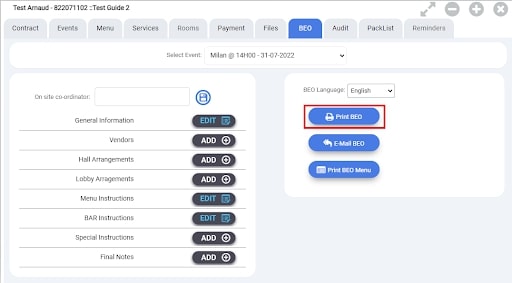
To create a B.E.O for your event, from the Contract window, select the BEO tab:
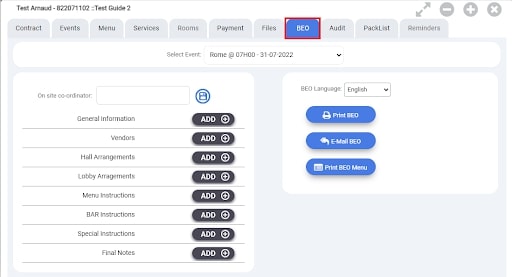
From this tab you can customize all aspects of your B E O
First, select the event you are interested in from the drop-down bar.
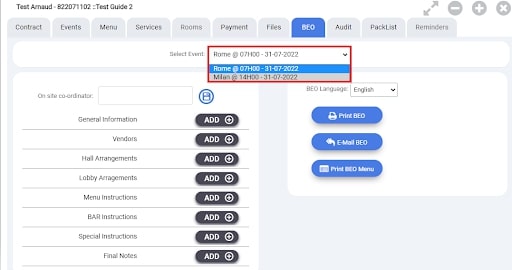
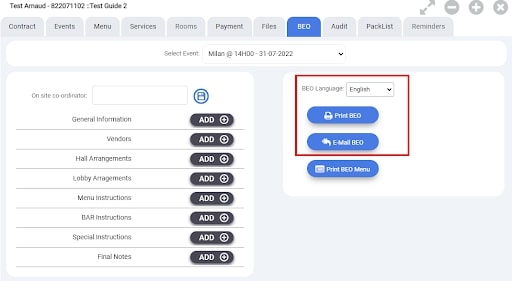
On the right, multiple options are displayed, you can select the language of your B E O, print it directly or send it by e-mail.
You also have the option of printing a B E O specific to your catering department
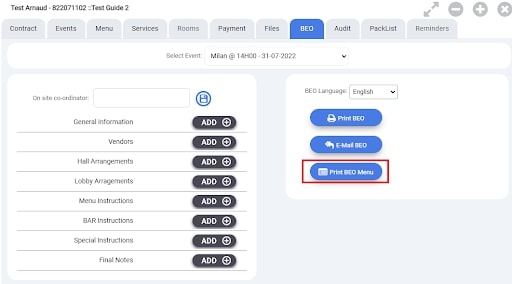
This document will indicate to your kitchen team the different menus needed for that event and various comments added in the MENU tab. For example, if there are specific allergies to be aware of, a certain presentation requested by the client, etc.
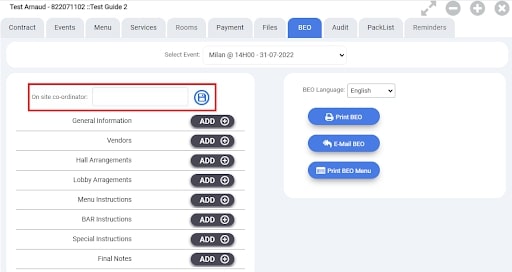
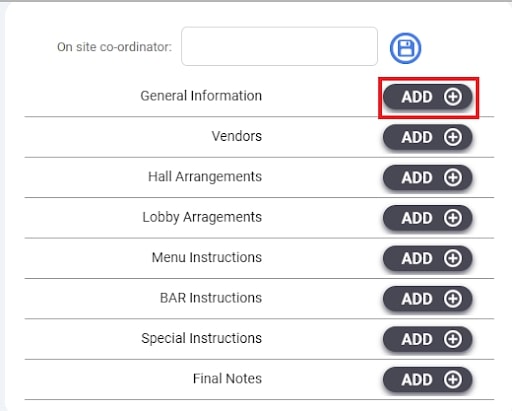
On the left side, you can define a coordinator for this event who will act as the reference person.
Below you can see the different sections of your B E O
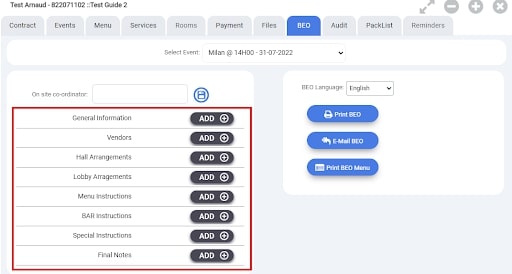
These sections have been pre-defined in the system and can be changed at any time.
If you want to add details or comment to a particular section, just click on the ADD button.
A page will then open.
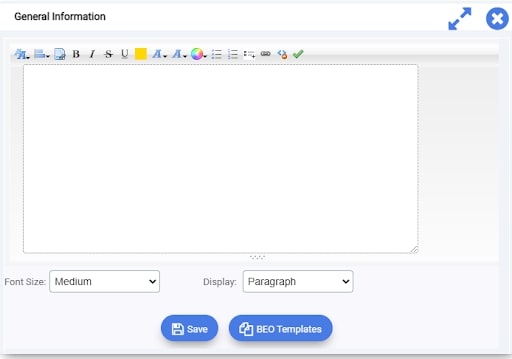
From this page, you can import predefined templates, such as VIP messages, special instructions, etc.
To do this, click on the B E O Templates button and choose the template you want to import.

A list of all your available BEO template appears,
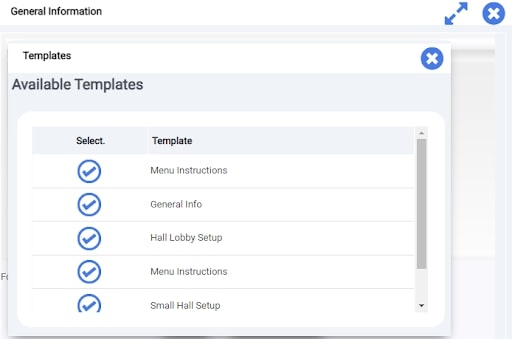
From here simply select the one you want, and the system will automatically copy it into the comment window.
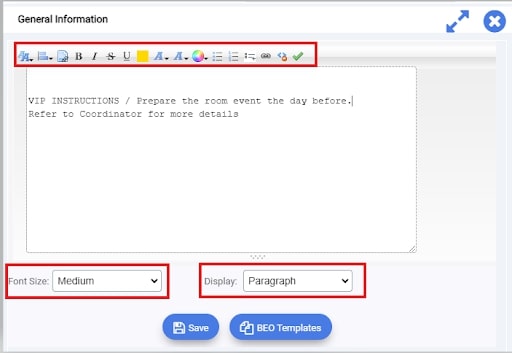
If you don't have a template created in the system, simply write the text in this window
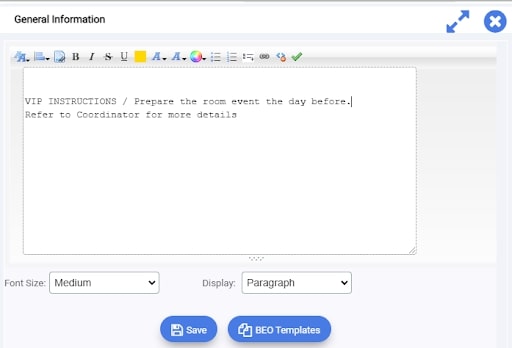
You can then change the format (underline, bold, etc.), choose the font size and the type of display of this text. (in paragraph or in list).
Back at the BEO section, you can notice that the button has changed from Add to Edit.

This allows you to easily identify which sections of the B E O have changed.
Finally repeat this process for each section.
Now that you have completed your BEO with additional information, you can visualize those changes by previewing your BEO.
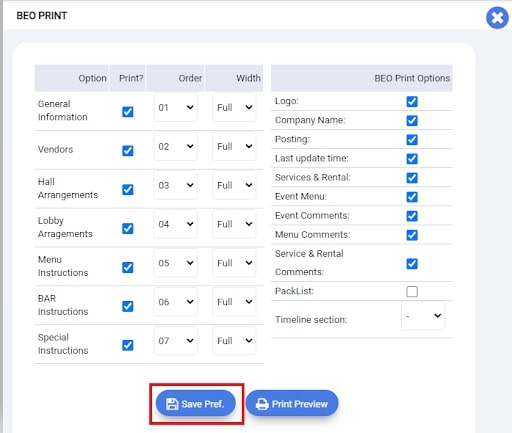
To do so click on Print B.E.O.
Then select the section you wish to have displayed / printed.
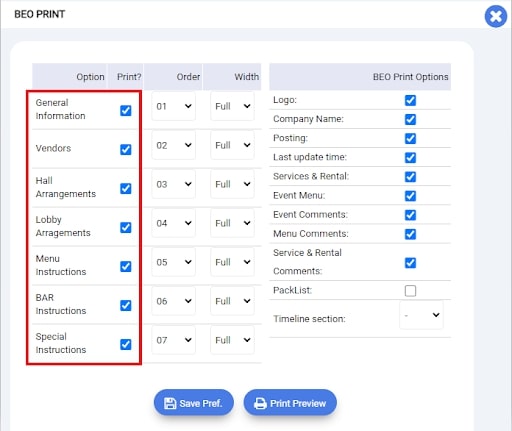
You can also change the order those sections will be displayed.
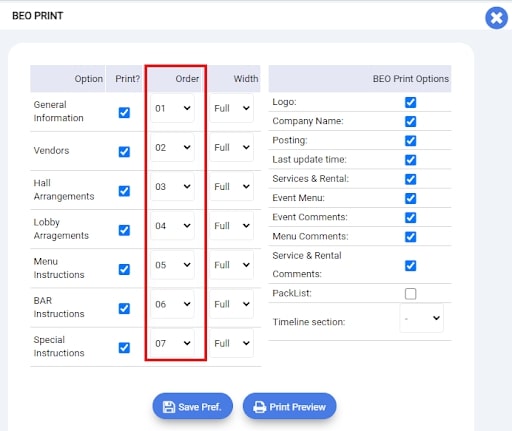
Then click on the Save Preferences, if you have made changes to have them saved for the next time you open this page.
Then click sur Print Preview to display your B.E.O.
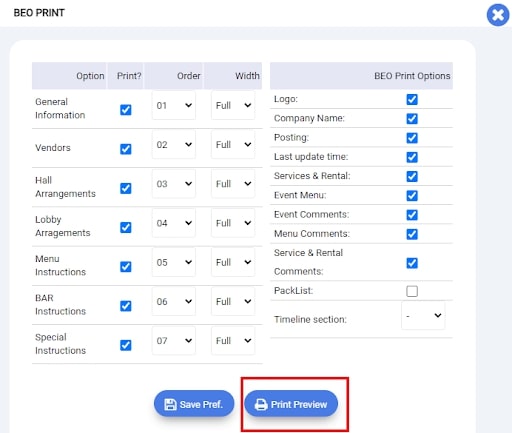
As you can see this document regroup all the information about your events
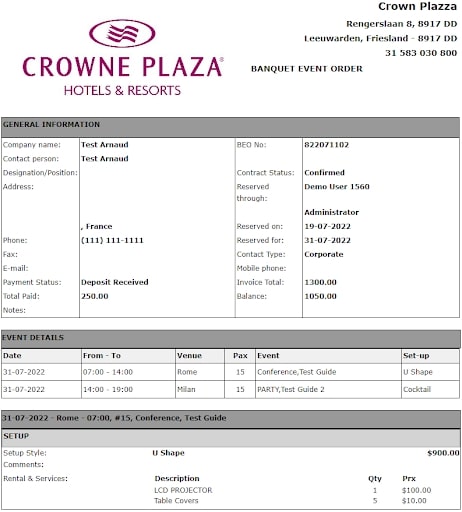
And if you have added comments in some sections they will be now displayed as such:
INTERFACE
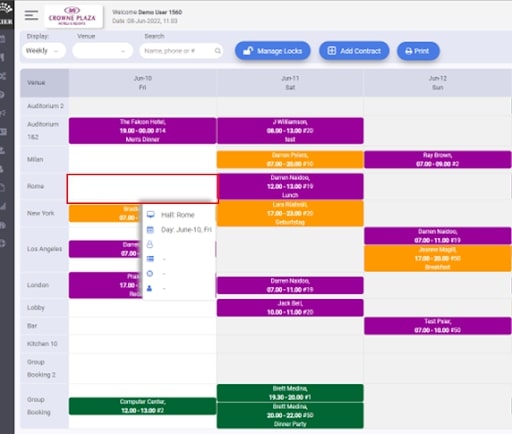
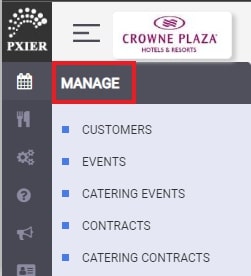
To access the event planner, you must select the 'Manage' icon from the left menu.
Then select “Events”
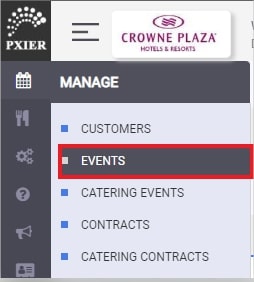
Your event planner will open
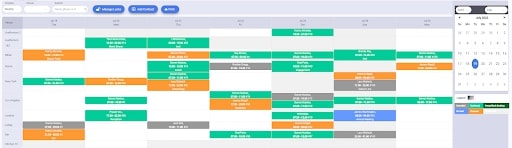
Different information are displayed on this page.
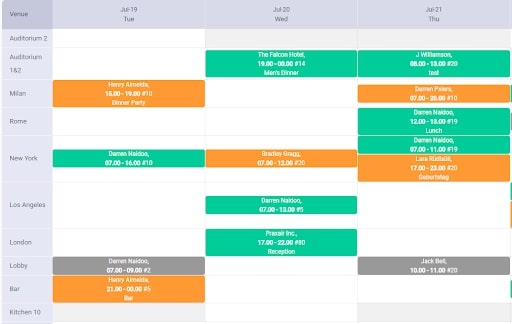
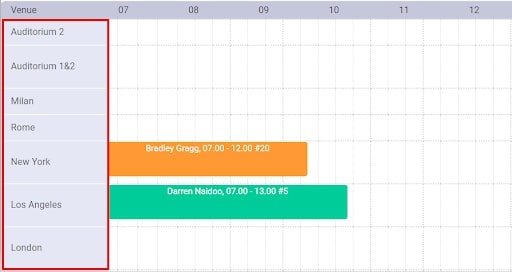
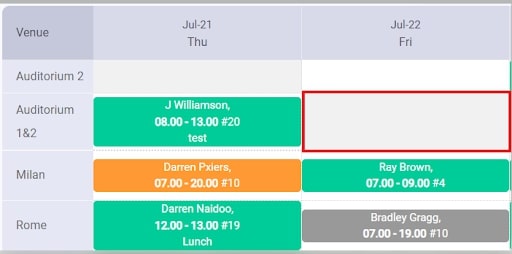
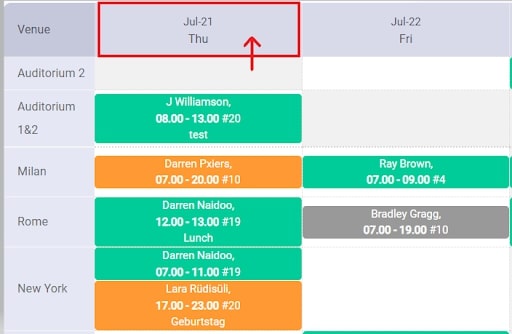
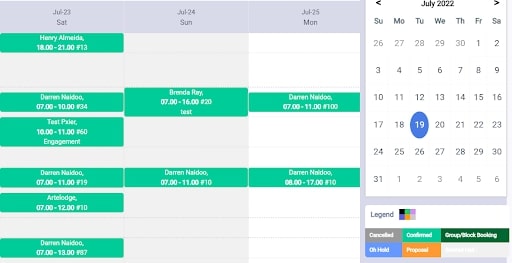
The event planner will open with the week ahead view, with the current day as the start date.
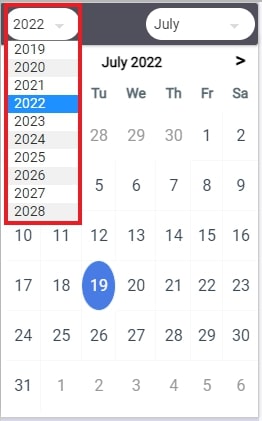
You can also choose the date, month, and year for which you want the event planner to appear.
In the week view, you have the days on the top line
and the list of your rooms in the left column
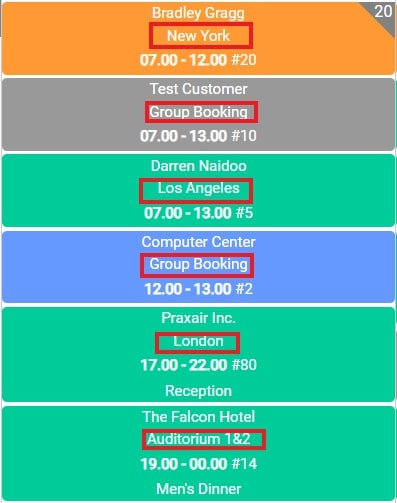
So, you can see all the events for each day in each of the different rooms.
You can also see the name of the customer who is on the contract
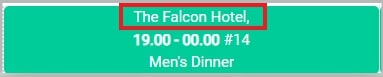
The start and end time of the event

The number of guests:

As well as the name of the event:

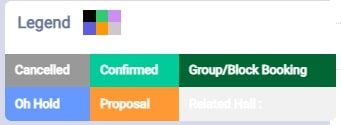
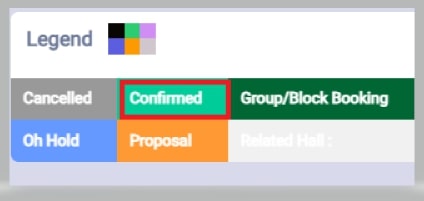
As for the color code used, this represents the status of the contract.
The legend is shown at the bottom right of the screen.
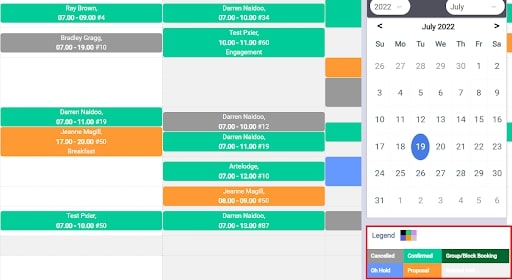
The color code used, as well as the different statuses are customizable to meet the different needs of your establishment.
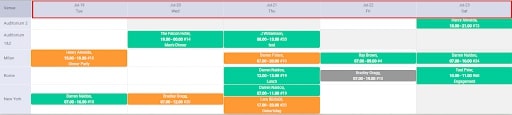
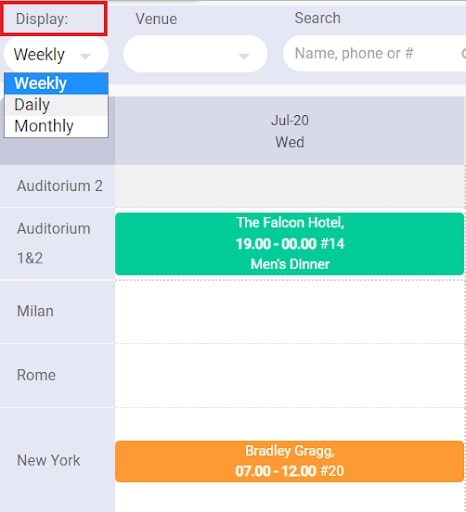
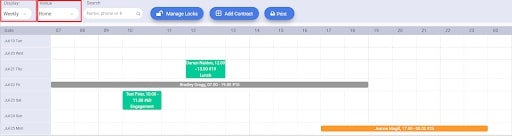
You can change the view of the event planner to either weekly view (default), daily view or monthly view. To do this, select the type of view in via the “Display” box
In the daily view you will have your opening hours at the top of the display

With your halls to the side
You can see the period during which the room is reserved for that day.
The same legend (status and color code) is used as that of the weekly view.
In addition, the same information (customer name, start and end times, number of guests as well as the name of the event) is indicated there.
You can also display a monthly view of the event planner.
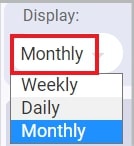
So you will have the full month view

If several events take place on the same day, they will be indicated in chronological order during the day.
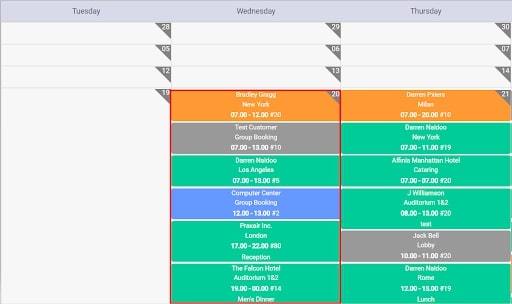
The same legend (status and color code) is used as that of the weekly view.
The same information (customer name, start and end times, number of guests as well as the name of the event) is indicated there.
In addition, the name of the room in which the event takes place is indicated there.
Finally on the event planner you can also see which rooms are not available for booking. They will be shown in light grey.
You will not be able to book this room if it is not available for booking
View event by Room.
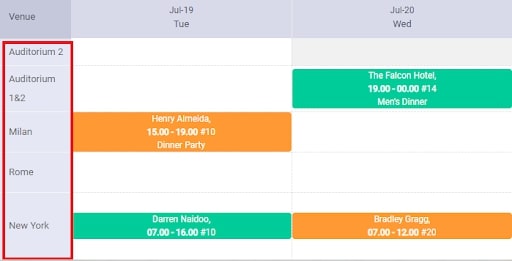
By default, the system shows you the event planner with all the rooms in your establishment.
You can view events happening in a specific room if you wish.
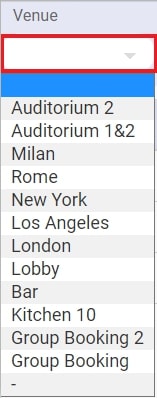
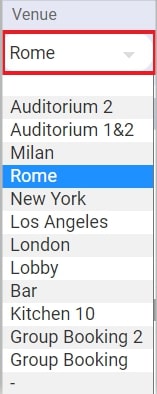
On this view, you will only have reservations for this specific room.
The same information (the name of the client, the start and end times, the number of guests and the name of the event) is indicated there.
View Events for a specific date
By default, the system shows you a completed detailed calendar of your events for the with all the rooms of your establishment and all the days you wish to see.
If you wish to see all the events happening on a specific day you can simply click on that date directly on the calendar.
and a new page will open.

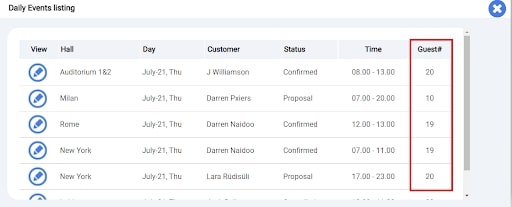
On this new window you have a summary of all the events happening on this specific date.
You can see all the information about each event such as:
- where each event takes place
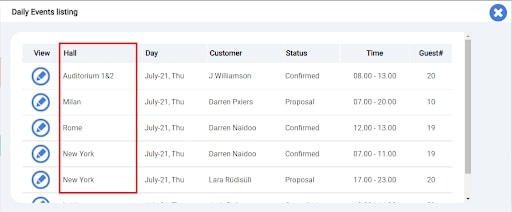
- The customer for each event
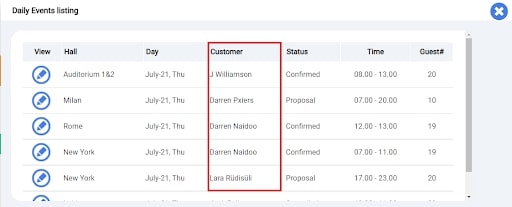
- The different statuses of each event
- Each event’s time frame
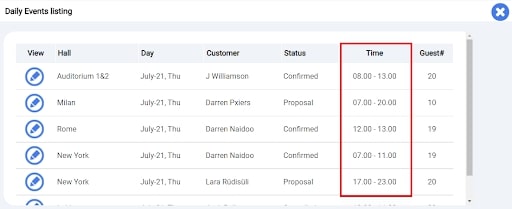
And their guest count
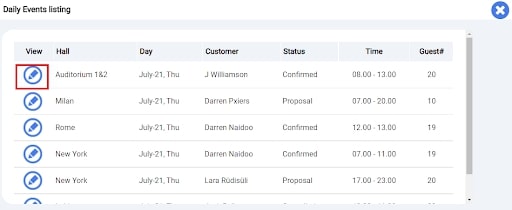
If you wish to see a specific event in detail, simply click on the View Icon:
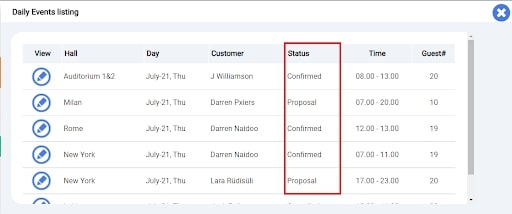
View Events by Status
On your event planner if you wish to see a specific type of Event you can select a view per status.
To do so, on the status legend

Select the status of events you’re interested in.
Your event calendar will now only display the events with the status you selected.
Block a room
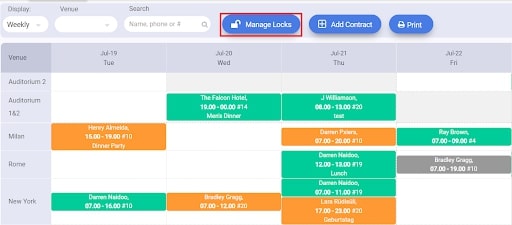
You can block a room without entering all the information necessary to create a contract.
To do this, you must use the "Manage Lock" function.

By selecting this button, a new page called Active Locks, appears and displays all your current locks.
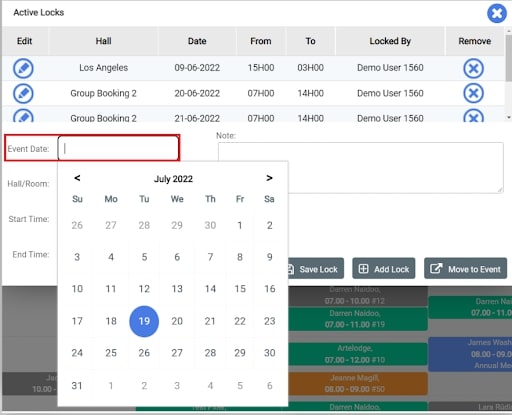
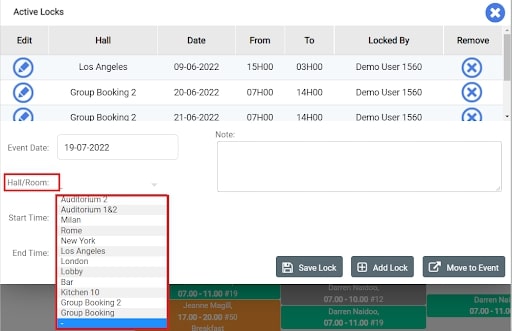
If you wish to add a new room lock, you must first indicate:
- the date for which you wish to have this room blocked
- The room to lock
- and the time period of this lock.
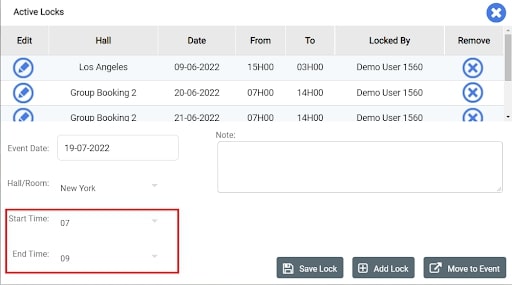
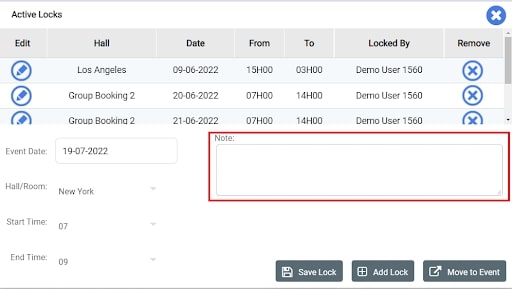
- You can also add notes to remember the reason for this room blocking
- Then select the “Save” button to add this lock to the system

If you wish to add another lock from this window, select the "Add Lock" button and repeat the previous steps.
Once your lock has been saved you can also see that the room is blocked in the event planner.

If you wish to proceed and create a contract you can do it directly from the Active Lock window,
To do this, you can select the "Block the room" button.
The list of blocked rooms will open

Select the lock you wish interact with by clicking on the Edit Icon:
Then, select the “Move to event” button
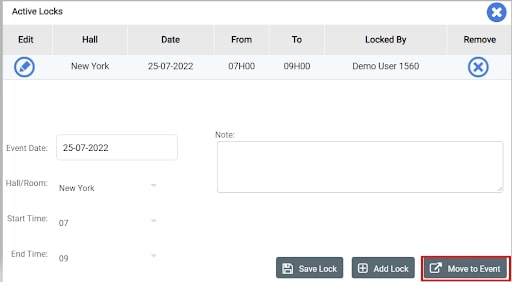
The contract creation page will open.
For more information on how to create a contract, please refer yourself to the Create a Contract section of this guide.
CREATE AUTOMATIC REMINDERS
Here is the procedure to follow to create automatic reminders:
Under ''Setup'' select ''General setting''
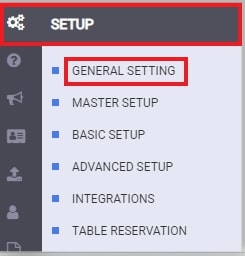
The Settings page will open.
Select "Auto Reminders"
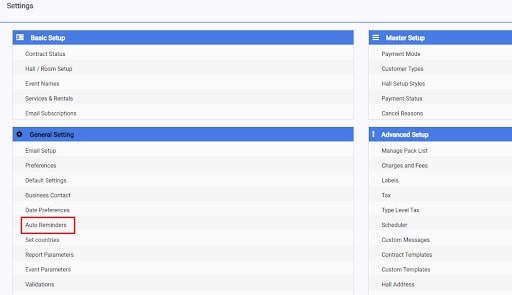
The reminder page will open on the screen.

First, please select "Add Item"

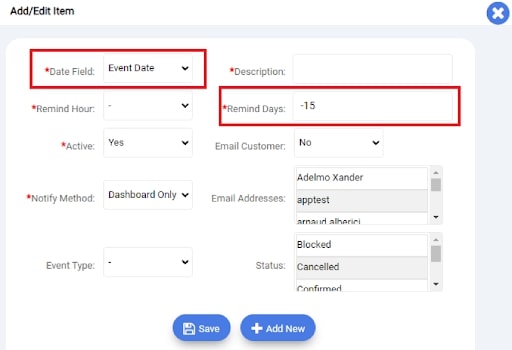
The automatic reminder creation page will open on the screen
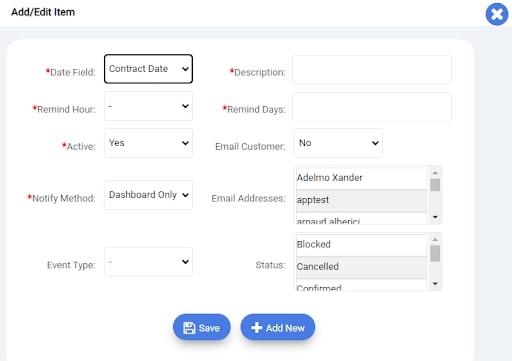
For the Date Field, it is the date from which the reminder will be made.
TYou have 3 options:
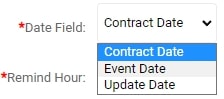
-Contract date: the reminder will be calculated from the date the contract was created
-date: the Event The reminder will be calculated from the date of the event.
It will be important to put the ''-'' sign in front of the number of days in the ''Reminder days'' box if you want to have a reminder before the date of the event.
For example, if you want to have a reminder 15 days before the event you will have to indicate -15
-Update date: the notification will be made from the date of the last modification of the contract.
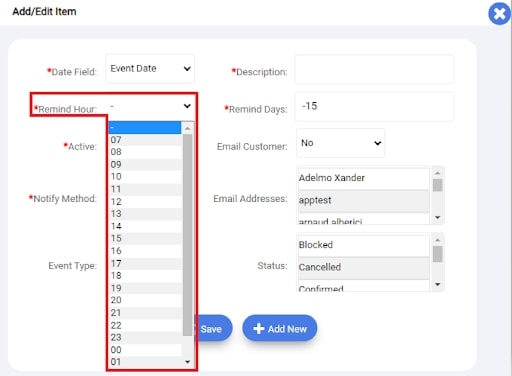
The Remind Hour section is the time you want the reminder to be sent
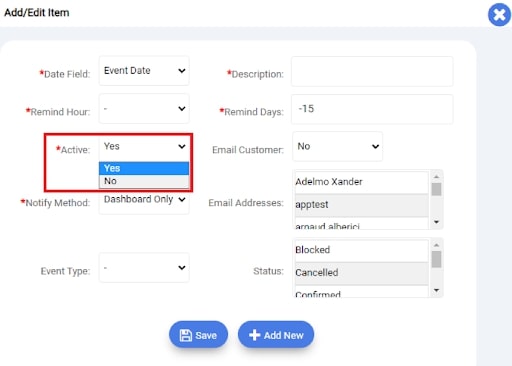
For Active the field, it indicate whether the reminder is active or not.
You can disable and re-enable it as needed
The Notify Method indicate how the user will receive the reminder.
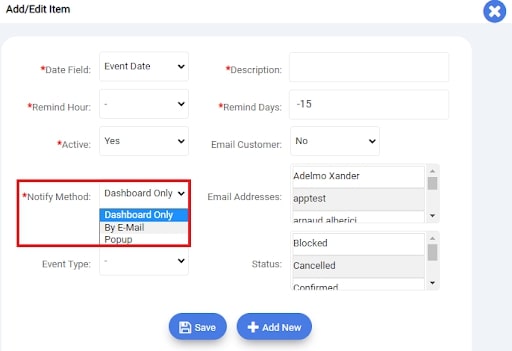
If you selectDashboard Only, selected users will see the reminder on their home page
If you select By E-mail, the selected users will receive an email and the reminder will also appear on their home page.
Next, you can also indicate for which Event Type you wish to have this reminder.
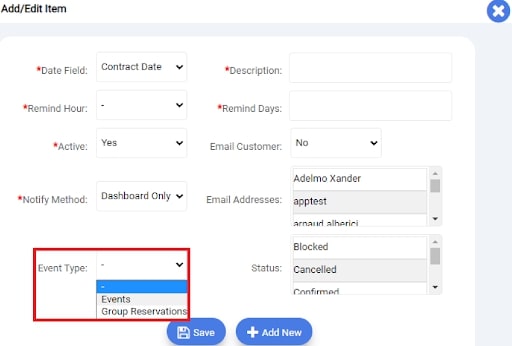
Note: If you do not want to add a specific type of event, leave the choice to ''-'', this way all types of events will be included in the automatic reminder.
Then, you must indicate the Description of the callback
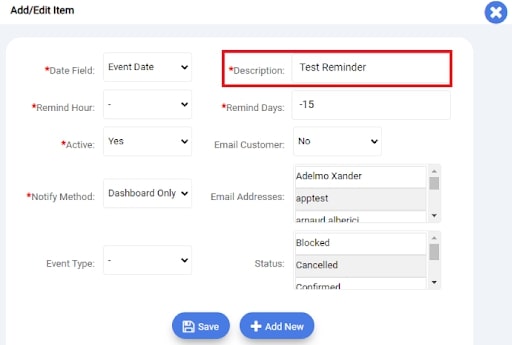
For Reminder Days, this is the number of days that will be calculated from the date you chose in the Date Field to send the reminder.
Note: Do not forget to put the negative sign ''-'' in front of the number if you want the reminder to be sent before the day you selected in the Date Field section
In the the Email Customer field, select Yes if you would like the customer to also receive a reminder email
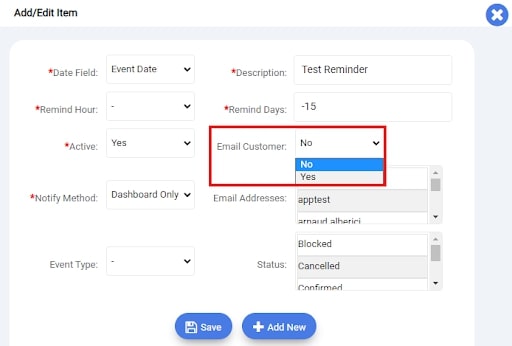
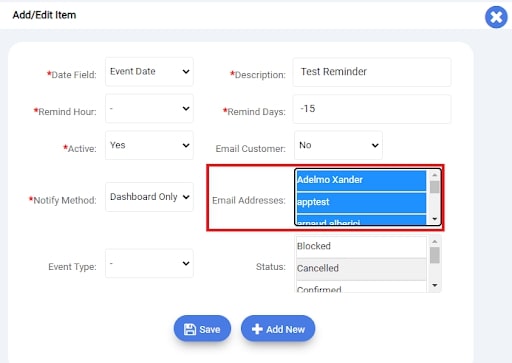
Thereafter, in the Email Adresses section, you need to select the users who should receive the automatic reminders.
If you wish to select several users, please click on the first user and then press the "Ctrl" key on your keyboard and while holding it down click on the next user.
Repeat the procedure for other users.
Then, select the Status(es) of the reservations for which you want to create a reminder.
The status list comes from your database. You can select one or more statuses, to do so, please follow the same procedure as for adding multiple users.
.jpg)
Then click the Save button
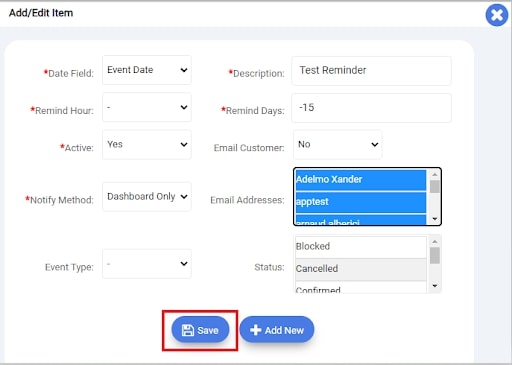
This new reminder is now created

You can now add content to your reminder, to do click on the Mail body section of your reminder.

For the creation of the Email Content you can use the following tags:
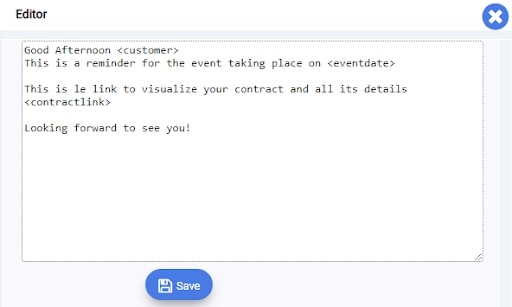
Don't forget to Save
Your automatic reminder is now fully created.
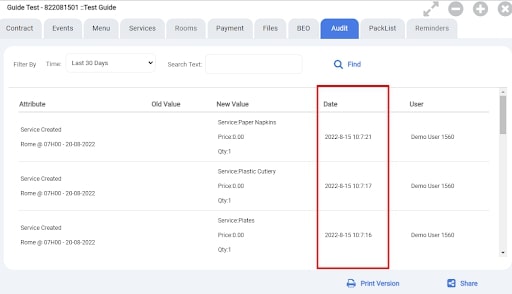
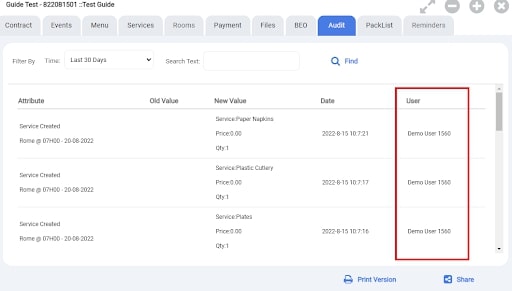
AUDIT
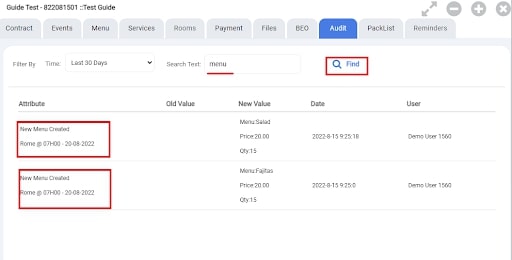
This part of the system allows you to keep track of all the changes made to a contract since its creation.
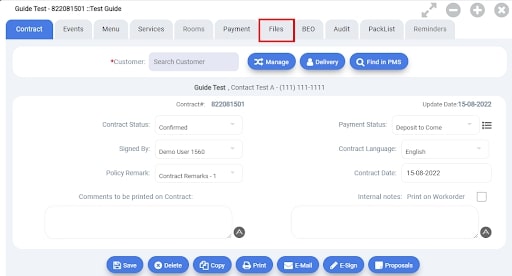
From your Contract page, select the Audit tab.
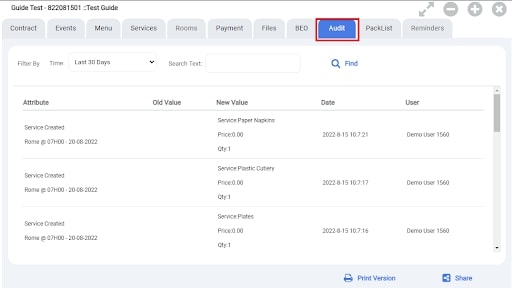
In this window you can see every change made.
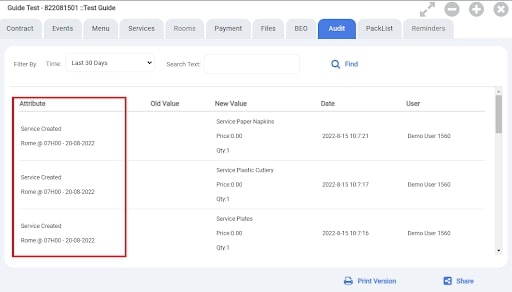
The attribute section represents the type of action performed, such as if the contract status was changed, or if the guest count was updated, or in this case if a service was created in the system.
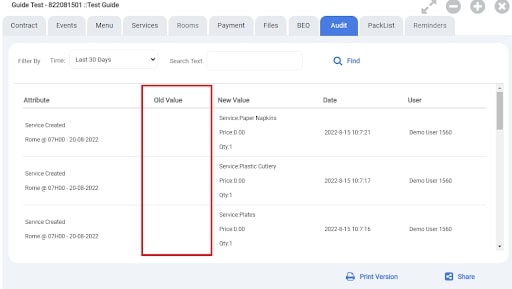
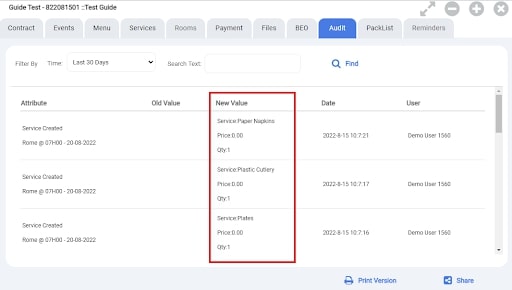
For example, here the service did not exist before so the old value is blank and the new one is the service, its price and its quantity.
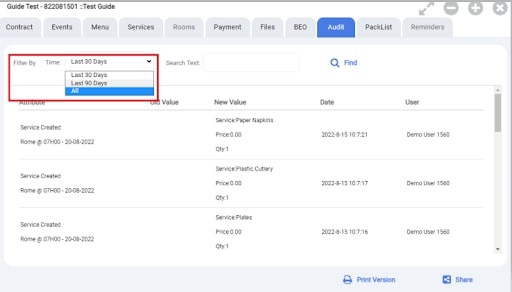
On this page you have the possibility to display the attributes/ actions either over a period of 30 days, 90 or even since the creation of the contract, to do this click this drop-down menu.
If you want to search for an attribute brought to this contract or event, simply type the keyword you are looking for in the 'search text' bar:
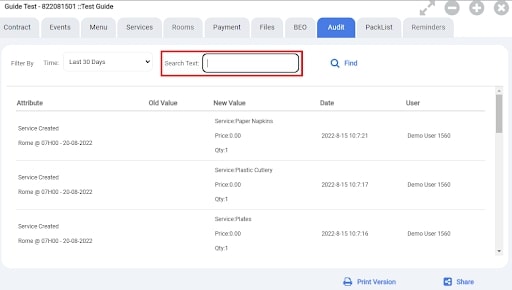
The system will then only display the attributes containing this keyword.
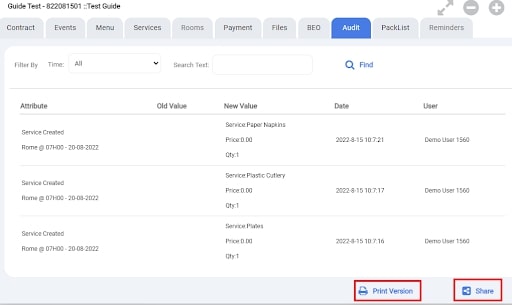
Finally, you have the option to print this audit or share it by email to your co-workers or if asked by the Pxier support team.
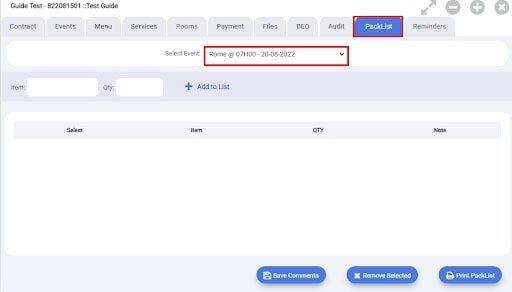
PACKING LIST
This feature is usually used when your business offers off-site catering services.
Where you are required to pack additional items along with the catering items. (Cutlery, napkins, etc.)
This part of the system allows you to provide your team with a Packing List, that indicates if certain packaging items are needed for your event.
These items do not appear on your customer invoice and are strictly for your internal organization.
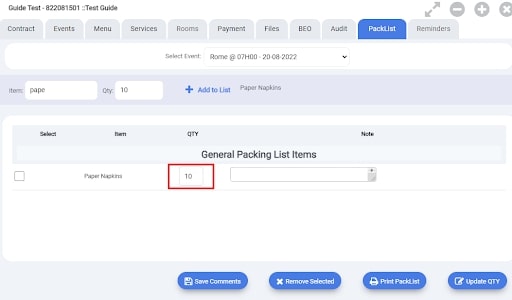
First, in the Pack List Tab, select the event on which you want to work on.
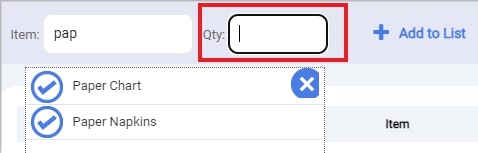
Then, in the Item box, type the first letters of the desired packaging item.
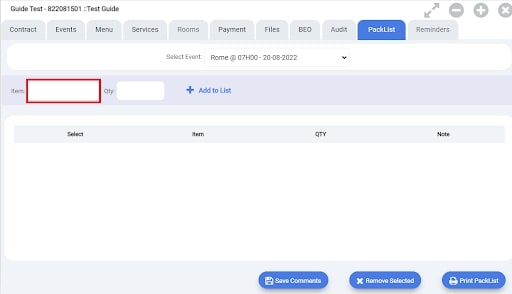
A list of the different items configured in your system then appears,
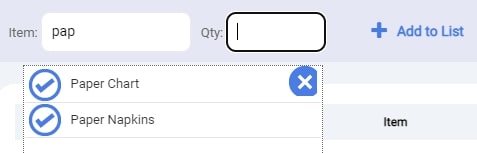
select the one that interests you by clicking on this icon.
Now indicate the quantity of this item required for your event.
Finally, click on the 'add to list' button.
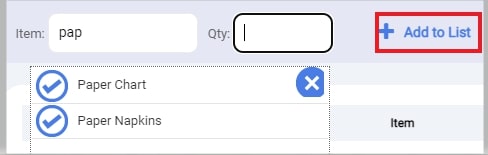
Repeat this process for each item you want to add to your list.
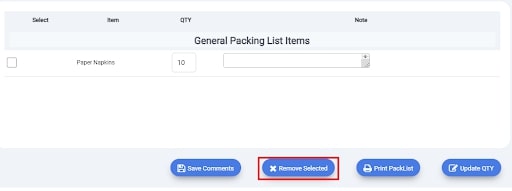
Your item will then appear below in the General Packing List Items.
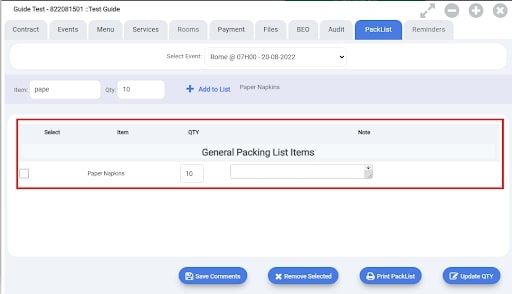
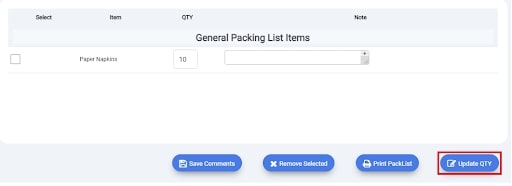
If you want to make changes to this article you can do so directly here.
Note: Do not forget to click on the Update Quantity button to save your changes.
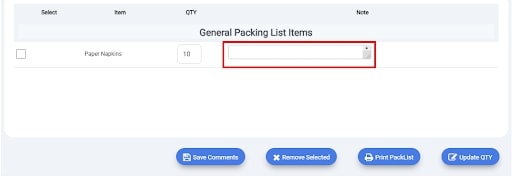
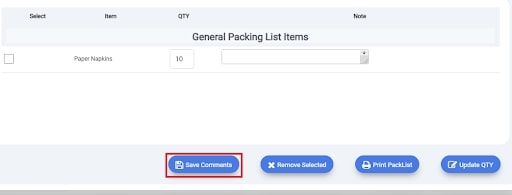
Note: Do not forget to click the Save comments button to save your changes.

Then click on the 'Remove Selected' button at the bottom of this tab.
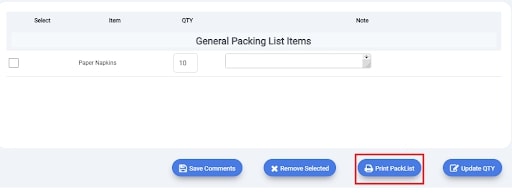
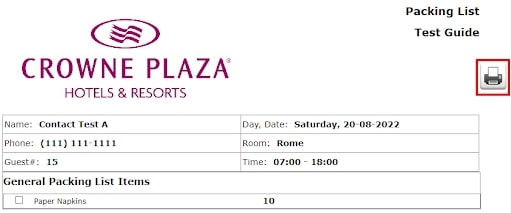
A preview of your list will appear, click on the Printer Icon to finalize the process.
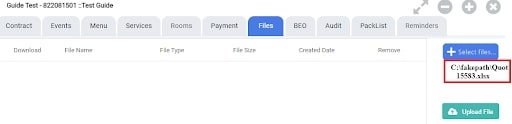
UPLOADING FILES FOR YOUR CLIENTS
When creating your event, your client may want to send you certain documents such as a list of products to avoid for the menu, or special requests on the layout of the room, etc.
To simplify the storage of these files and have access to all of them in one place, you have the option to link them to your event by clicking on the FILES tab,
On this page you can then add various files,
To do this, click on the select file button,
A new window open,
from here selected the document you wish to join to your event.
then once your document has been selected, it now appears in your file Tab
Now click on the Download File button, to upload it.
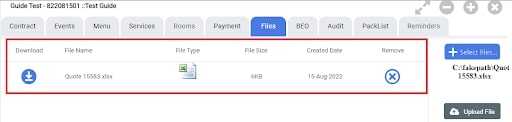
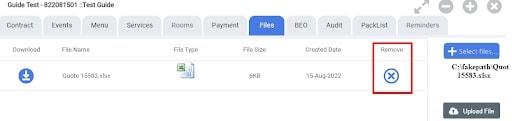
If you wish to remove documents that are no longer relevant or up to date, simply click on the Remove icon.
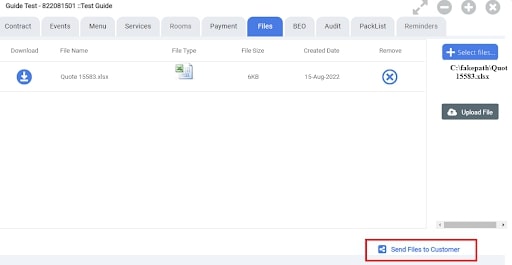
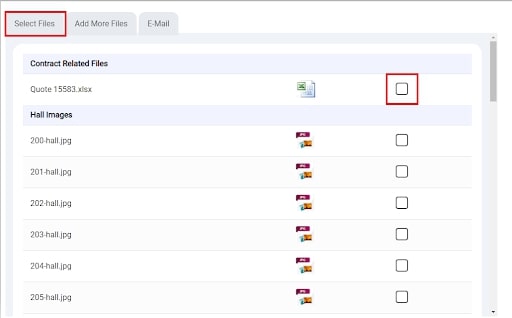
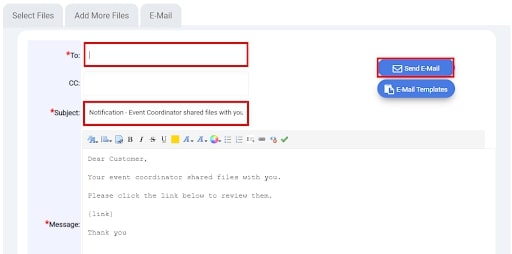
Finally, this window also allows you to share a link with your customers to allow them to consult documents related to the event.
To do this click on the button 'send files to the client
A new window opens,
In the Select Files Tab, click on the documents you want to share.
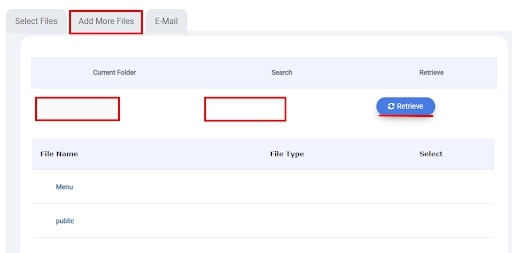
The Add more files tabs, allows you to add documents that are not uploaded in your specific event, by searching them by folder or name.
Finally In the Email section, a pre-set email template appears.
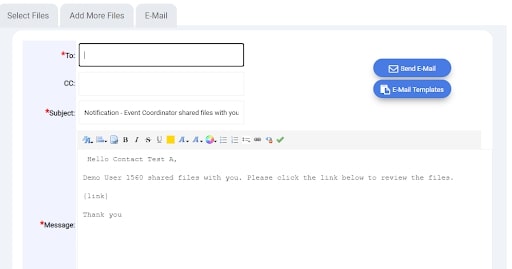
Note: the system allows multiple email templates, if you wish to select another one simply clicks on the E-mail Template button
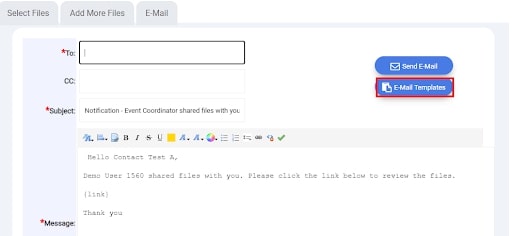
These templates are fully customizable in the system.
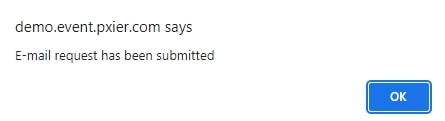
Once you have verified the information displayed, click send email to share this link with your customer.
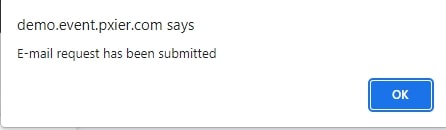
A message will inform you that the E-mail has bee sent
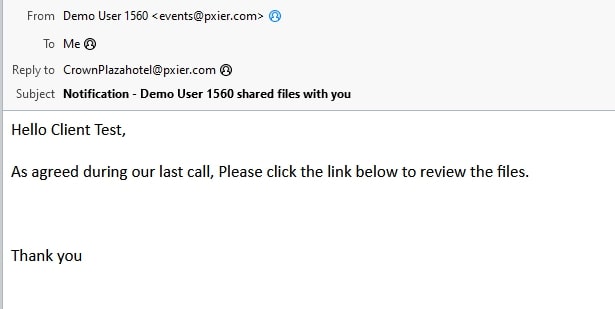
Here is an Example of the email received by the customer
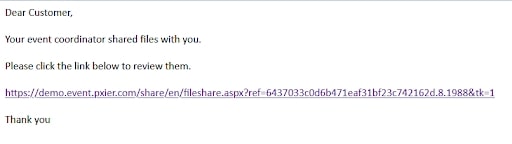
Upon clicking on the link, your customer will be redirected to a platform where your selected document are ready for download.

How to create a system user
This section allows you create one user at a time (e.g. a technical service manager, a sales manager) and give them access to certain features of the system.

By clicking on  ,this window will open:
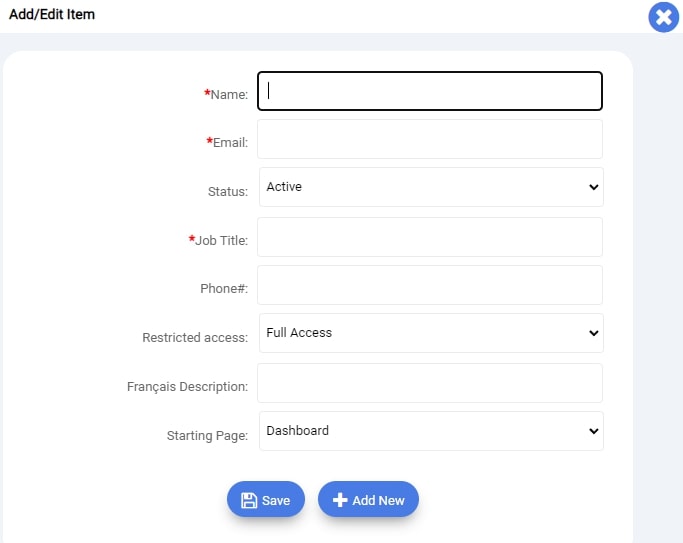
Here just filled the different information you wish to input.
Note: The Restricted Access section defines whether or not your user will be able to connect to the system and our mobile application and from an IP address different from that of a company workstation (e.g. private computer at home)
Click 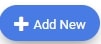 to complete the creation of that user
How to create a user group
Manage all user groups directly in Pxier.
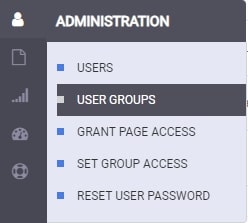
In this window you can have access to each department you have created before.

Click on the icon to be able to create a new group and define the different accesses that people belonging to this group will have.
The following window will appear:
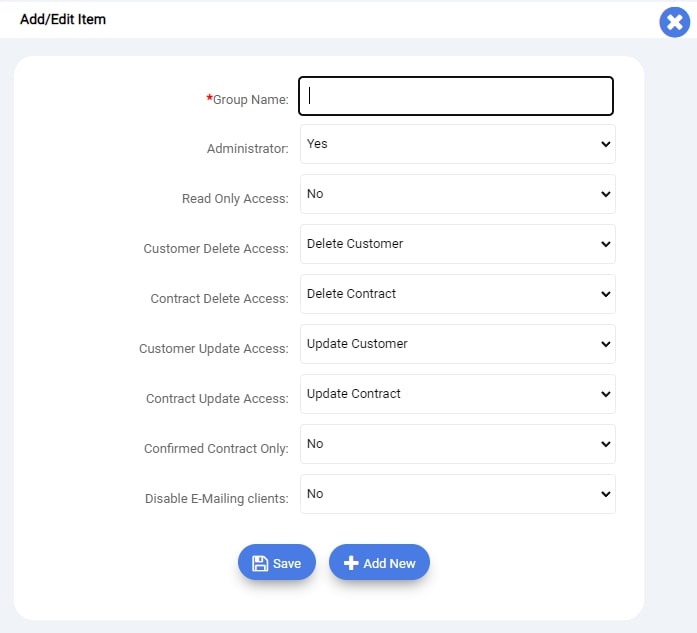
The following settings can be adjusted per user group:
Group Name: Name of previously created department (required)
Administrator : Determines whether the user group has administrator access. Administrator access allows users to configure and make configuration changes to Pxier.
Read-only access : All users who require access to the customer portal will need read-only access. This allows the user to view bookings and create bookings in the customer portal.
Customer Delete Access : Defines whether users belonging to this group can delete departments or only employees within this department or both.
Contract Delete Access : Defines whether users belonging to this group can delete reservations.
Customer Update Access : Defines whether employees in this group can update departments or only employees within this department or neither.
Contract Update Access : Defines whether users/administrators belonging to this group can update reservations.
Confirmed Contract only : Defines whether users in the group have access to the unconfirmed booking status or not. (All bookings are always confirmed by default)
Disable E-Mailing clients : Defines whether users in the group will receive emails confirming their bookings at creation.
Once all of those autorizations have been given, click to finalize the creation of the user group.
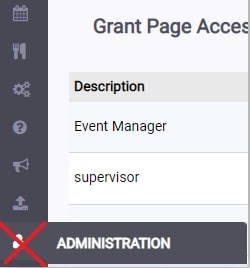
Restrict access to certain parts of the interface.
As a system administrator you can add or restrict access to certain sections of the software interface for your users.
To do this, click on
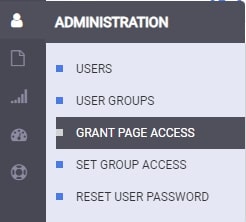
A new window appears:
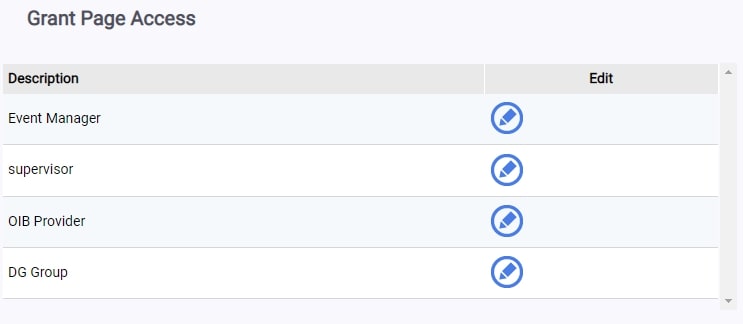
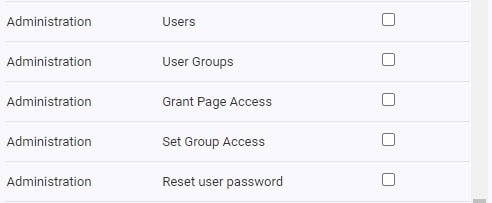
Select the group to which your user belongs to and define which sections of the software will be visible to them, to do this click on the pencil icon next to their group.
A new list appears on the right:
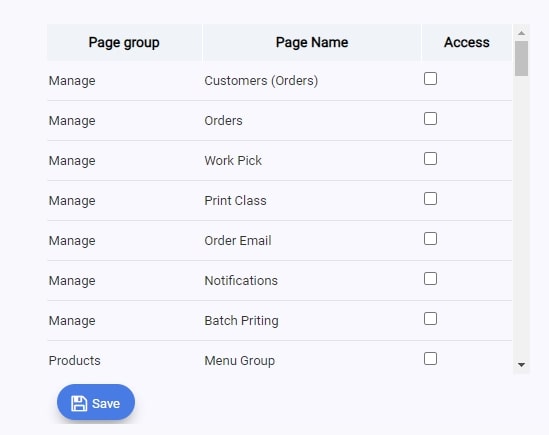
This list tells you which sections this group of users can currently see when they log in.
Simply click Access to add or remove the visibility of each section and Save your changes.
Ex: a salesperson does not need to see or interact with system options, so I will deselect the Administration section so that he/she no longer sees it.
How to assign different access groups to users

Here you can assign each user to a group, so that they have the appropriate permissions.

Select the icon to create a group access or directly on the pencil icon beside the user you want to update, a new page opens:
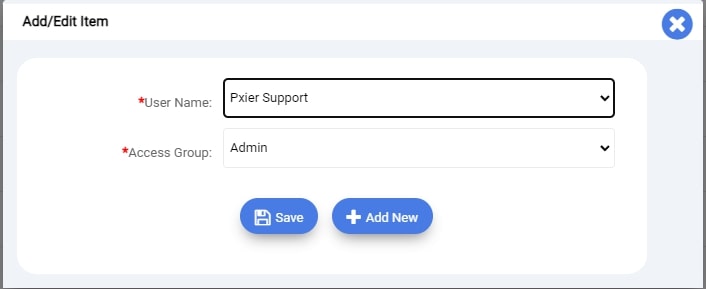
Then select the access group, which is the user group to which they will be assigned.
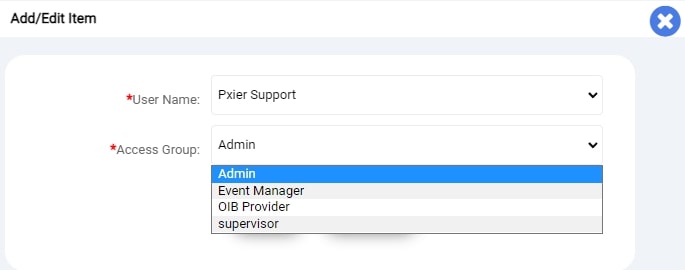
Click the SAVE button, the user is now connected to its user group and benefit from the access determined for this specific group previsouly.
The user's permissions will be determined by the user group to which they have been assigned. That's why it's important to first create the user groups and then assign the users as we did in this guide.
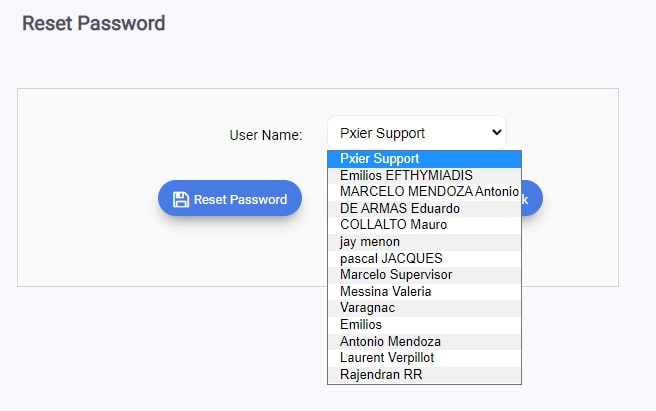
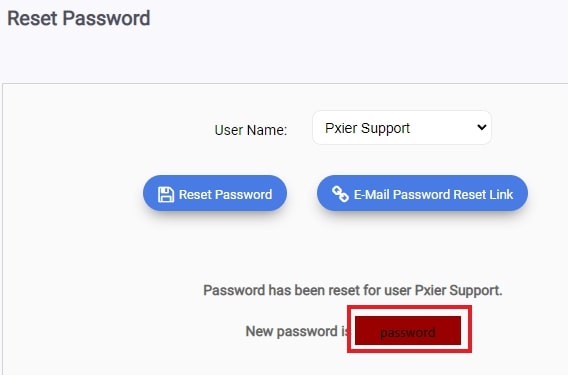
RESET USER PASSWORD
To obtain a new password follow the instructions on this page:
Select the user whose password needs to be changed
- send them an email with instructions on how to reset their password
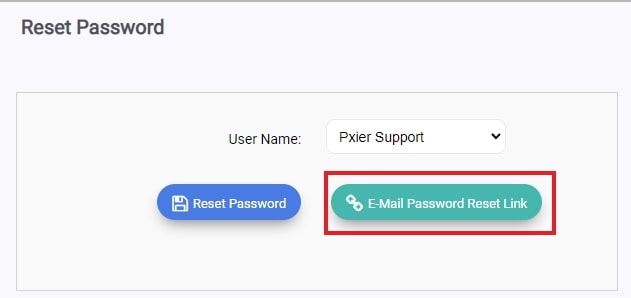
-Give them a temporary password that they will have to change later (more often use when creating and logging in for the first time a user of the system.
LEAD MANAGEMENT
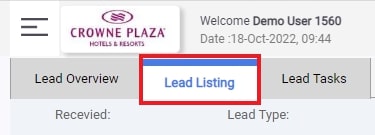
LEAD LISTING
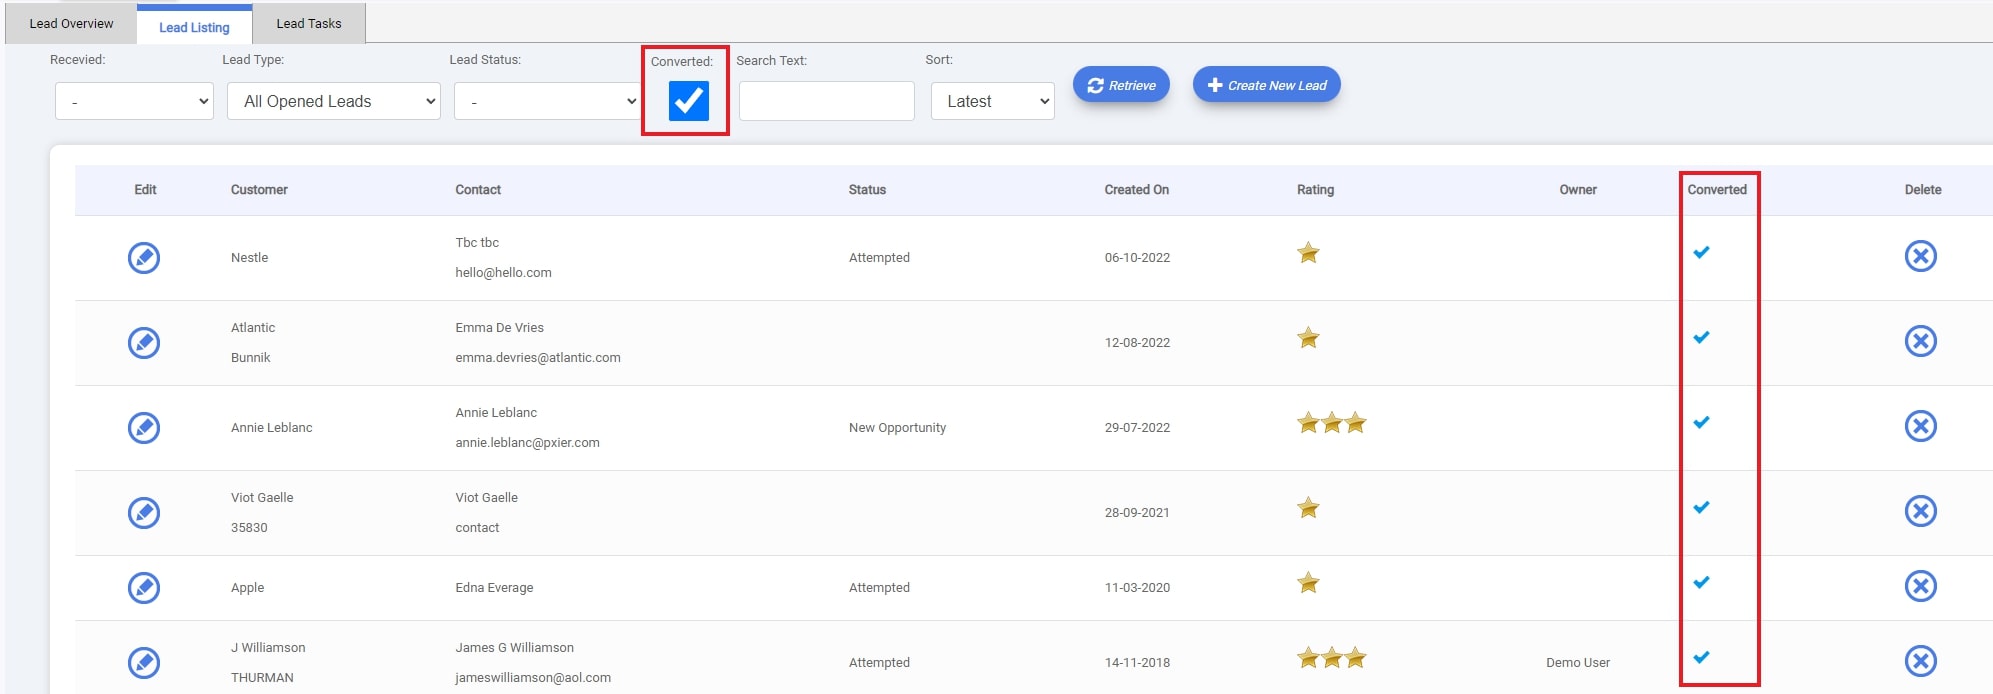
Once in the Lead Section, head over the second tab called Lead Listing to manage your current and coming leads.
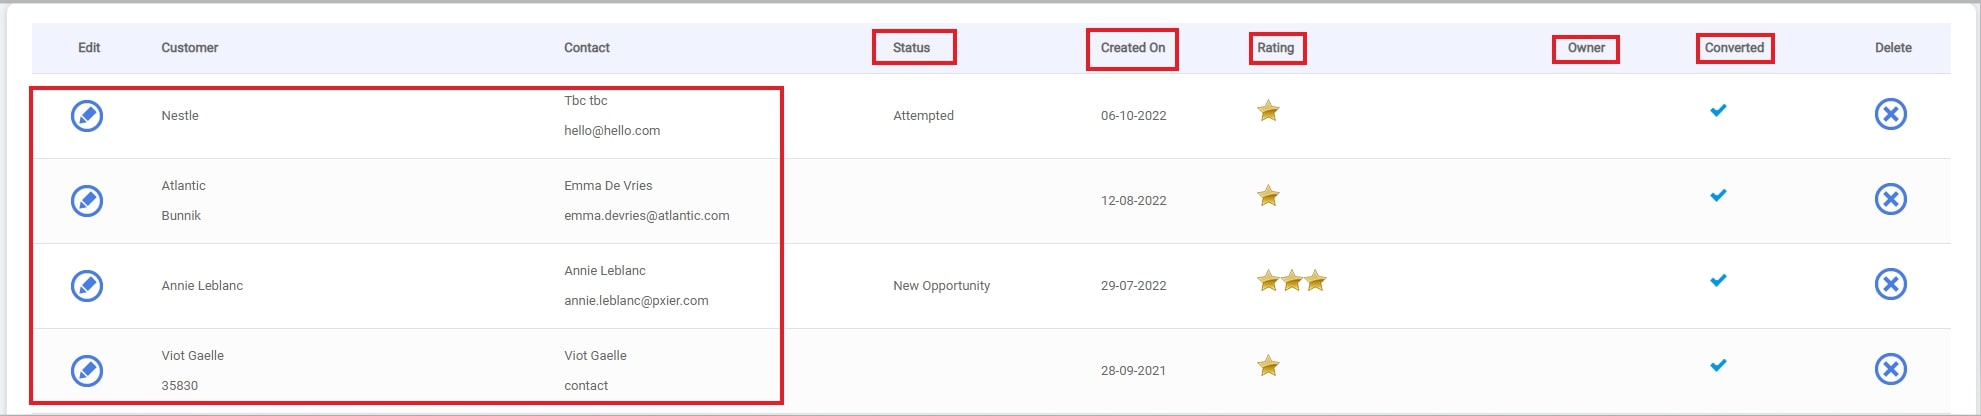
From this window, you can see the entire list of all your current leads, their status, when they were created, their likelyhood of conversion, who is responsible for them, and if they have been converted
INTERFACE
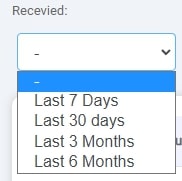
You can filter that list to have more pertinent results.

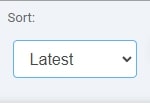
You can sort this list by date of creation :
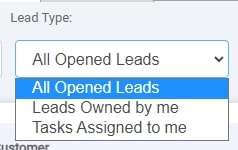
You can also display you own leads or the leads assigned to you by your manager
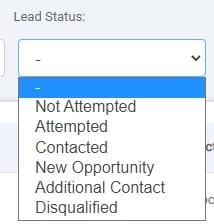
You can also display them according to their current status
You also can choose to only display the converted Leads by selecting this button :
And and finally you can show the differents leads by name or most recent lead created :
Once you have made your choice of filter, select the  button to apply those filters to the system.
LEAD OVERVIEW
In this section of the LEAD MANAGEMENT MODULE, you will have 4 dashboard, that inform you about all the leads in your system.
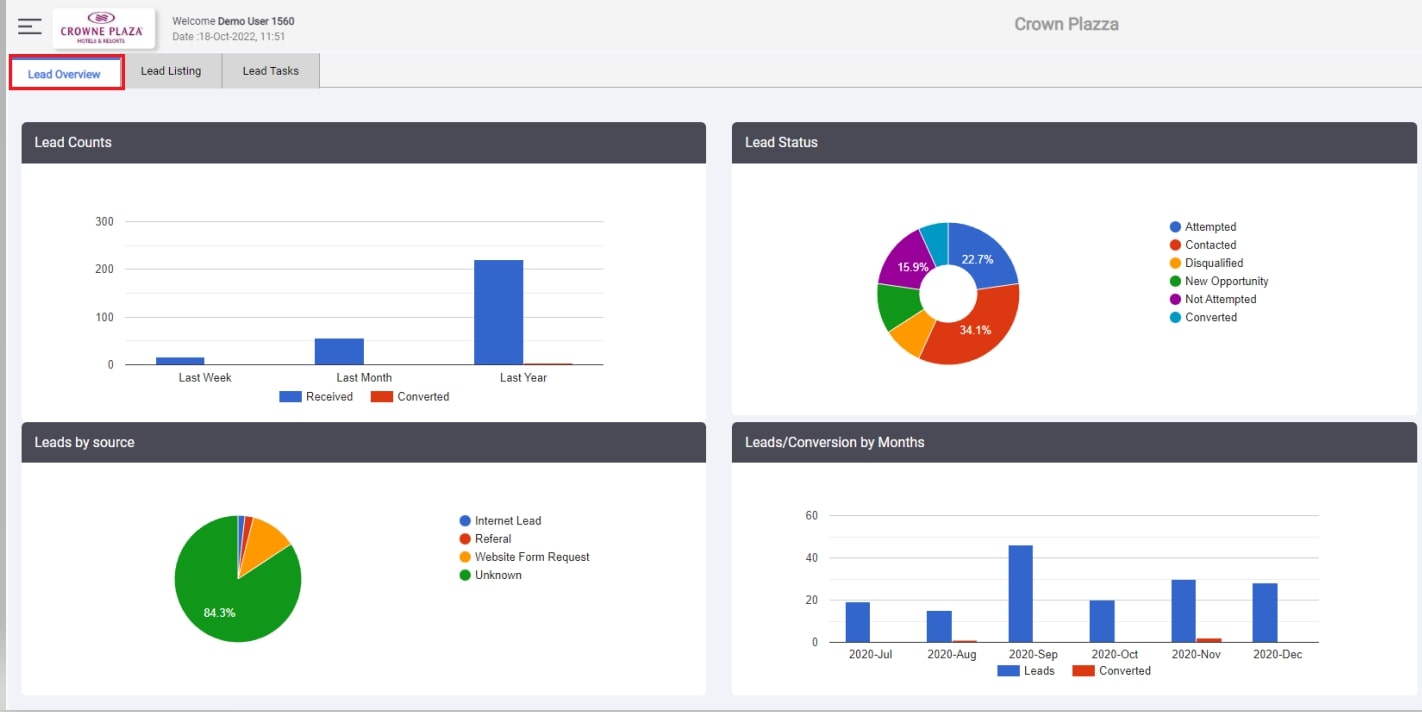
Additionnally the system will also let inform you of any ongoin tasks to perform and of any new leads created in the system recently
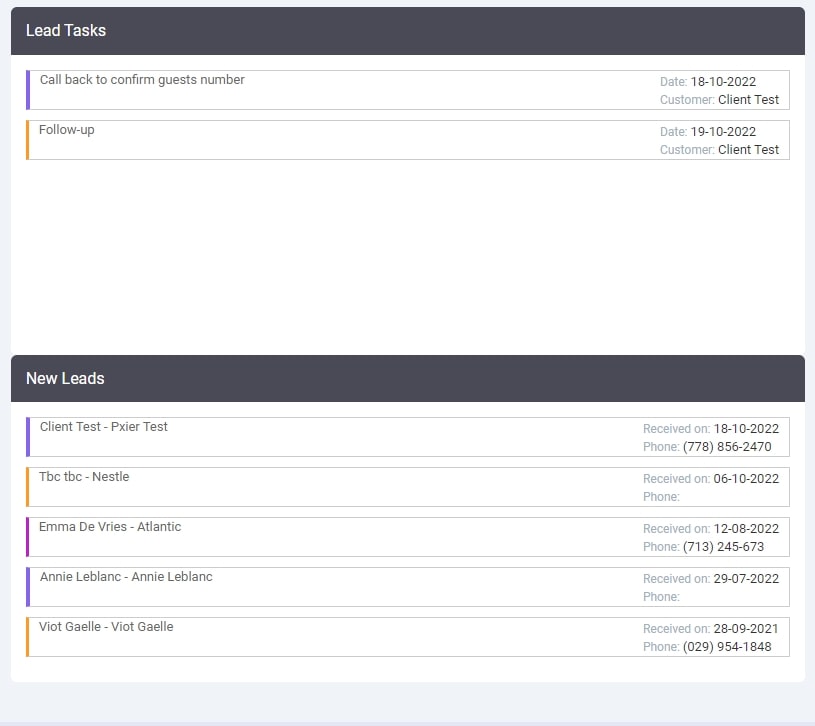
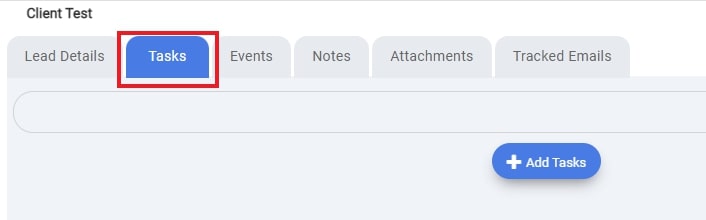
LEAD TASKS
The Section of the LEAD MANAGEMENT MODULE, will compile all the tasks that were created in your system regarding the existing leads.
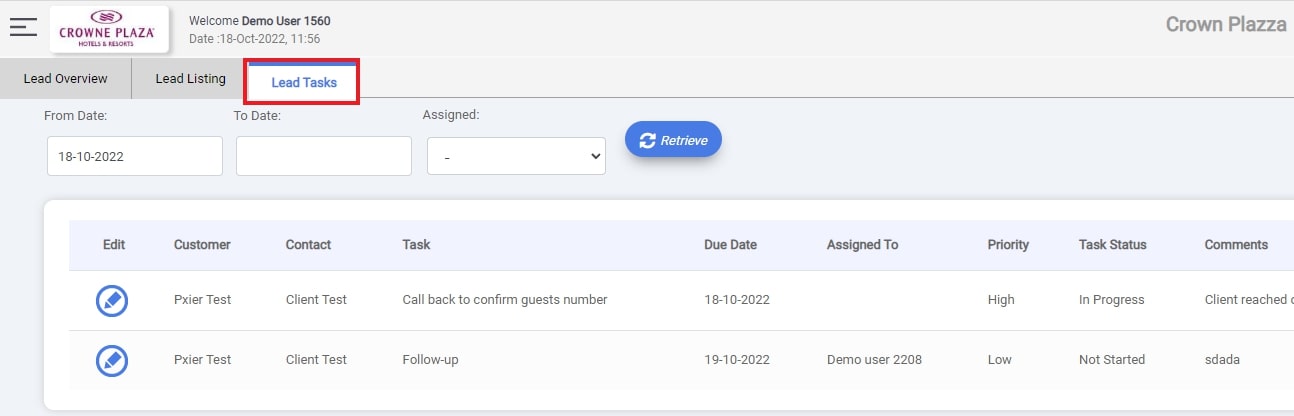
You have the ability to filter this list by time period or even by agent.

From this page you can directly modify a task without having to find the lead it correspon to, by simply clicking on the pencil icon near the task :

Finally you can even directly tell the system that a task had been completed direcly from this page.
Beside the task you will find a little box icon, simply click on this boc to let the system know that this task has been done.

CREATING A NEW LEAD
To create a brand new Lead, simply click on the 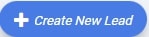 button.
A new page is displayed.
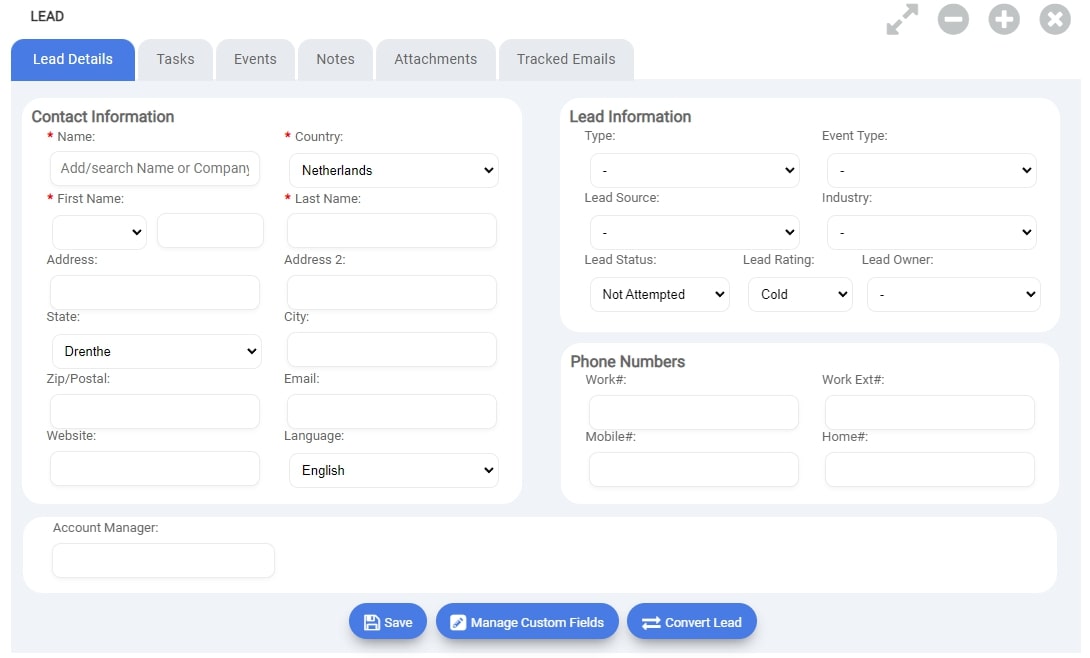
A) LEAD DETAILS
On the left side of this new page, simply fill the different fields that will constitute your client informations.
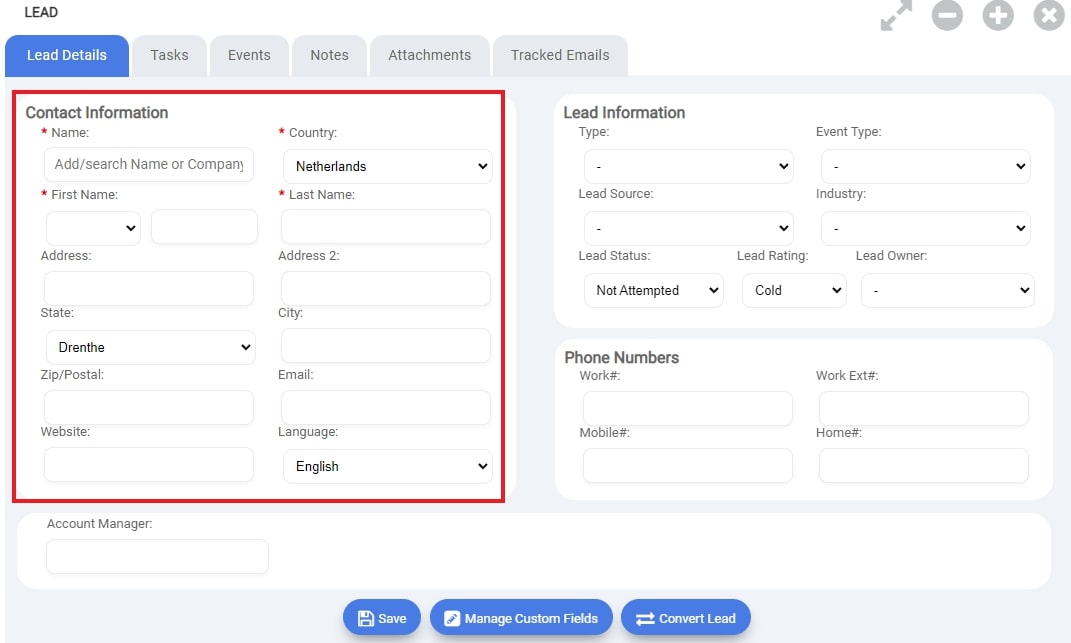
Once you have entered the Client basic information, head over to the right side
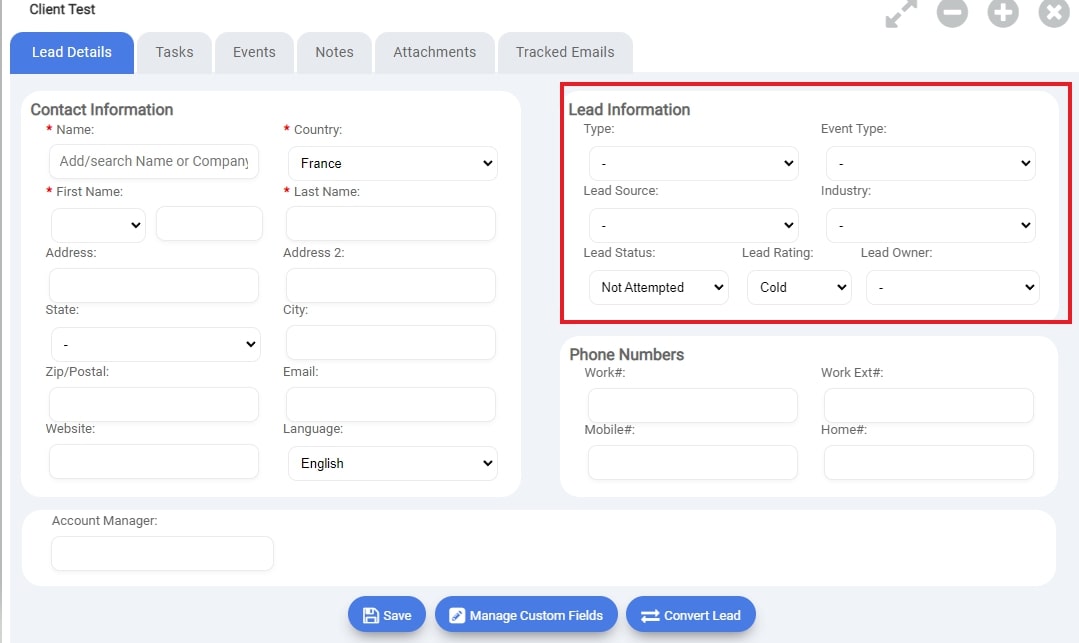
Here you will be able to add event more detailled information regarding your lead, such as :
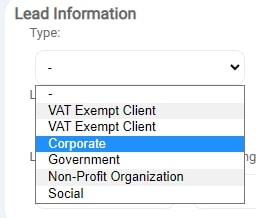
- the type of client this leads represent
- The type of event this person is interested in booking.
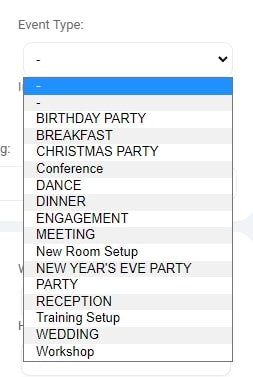
Note: Those different types (client and event type) have been created beforehand by your system administrator.
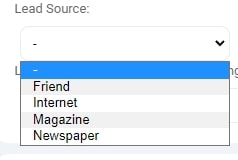
- Their source (how they heard about your company)
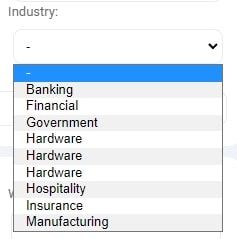
- Their Industry (this information will be helpful for your report and dashboard overview
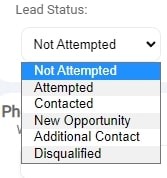
- Thecurrent status of this new lead :
- TheLead rating for this lead (how likely is this lead to be converted into a new client)
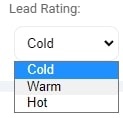
Note: Hot being almost guaranteed conversion and cold a not likely one
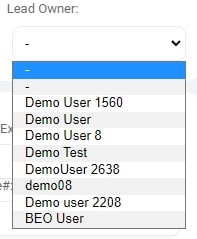
- Finally the Lead Owner (which agent is in charge of this lead, this is section is important if you have a system of comission.)
Once you have filled all of those section, click on the  button to create that new lead in your system.
IMPORTANT : if you wish to convert an existing lead into a confirmed client, simply click on the 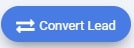 button to create that new lead in your system.
All the information previously entered about this lead with now be trasnfered into the system and create a Client automatically.
No need to re-enter all the information, you are now able to start creating Events for this Client.
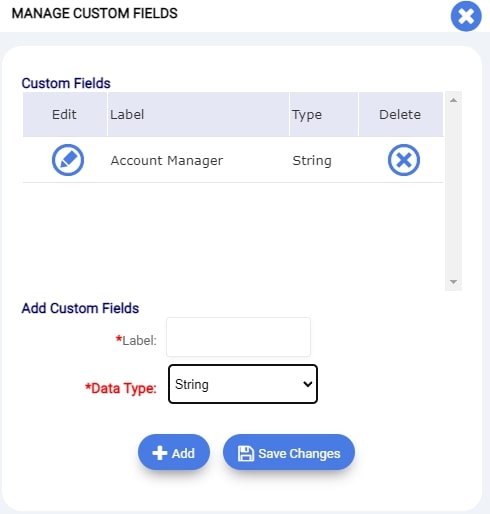
Note:If you wish to add other details that are not displayed in this page you have the option to manage
custom fields and create new ones, simply click on the 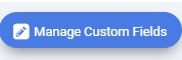 button, from there you can manage new custom fields to enter your additionnal information.
B) TASK SECTION
In this section, you will have the ability to establish a list of different task that are needed to do regarding your lead.
e.i : sending an email, preparing a quote, calling a client back over the phone, etc.
To create a new task for your lead, simply click on the 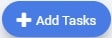 button.
A new page opens:
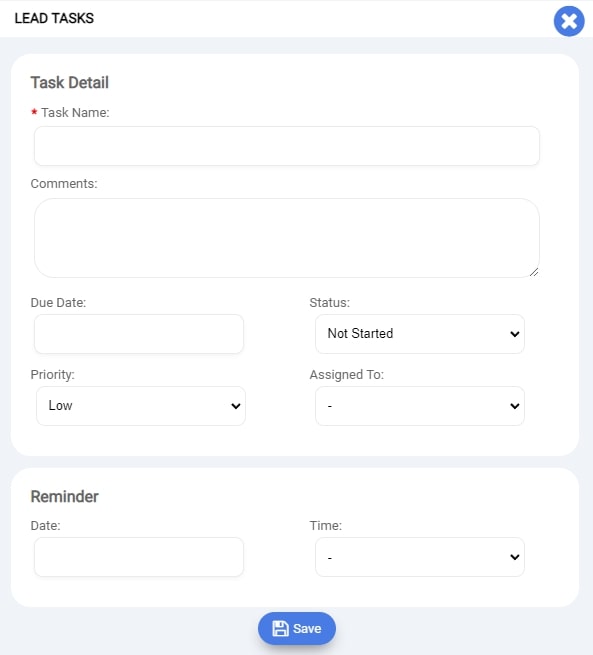
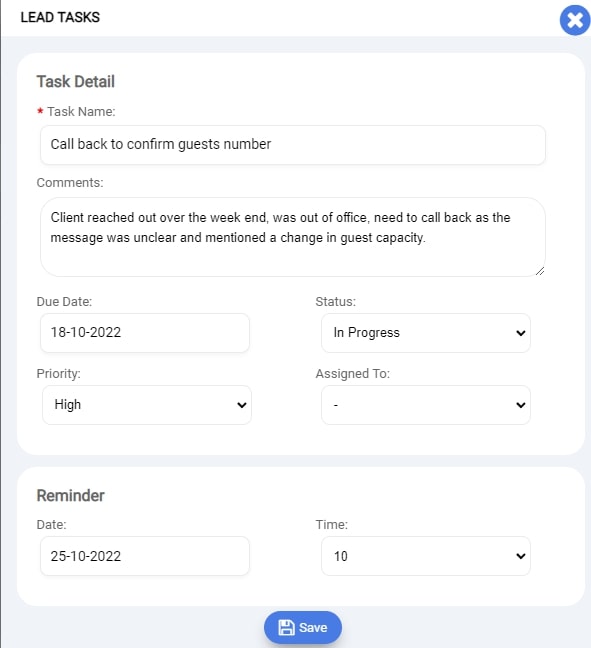
From here,
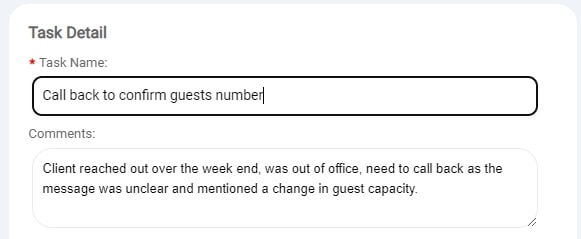
-indicate the name of the task and any information about that task :
Ex :
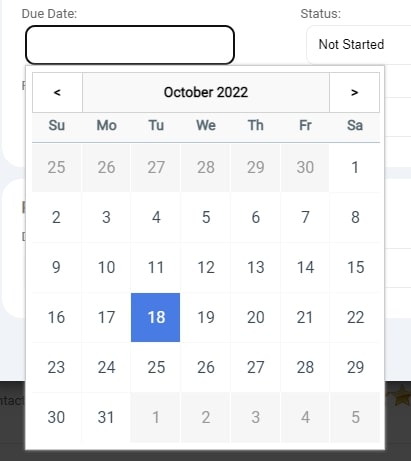
-Select a date, for this date needs to be completed by clicking on the Due date section, a calendar will appear :
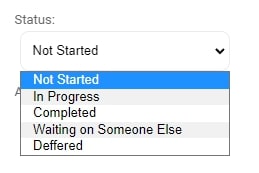
-Indicate a status for this task to keep yourself organized :
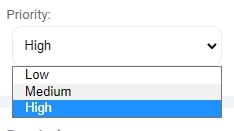
-Set a priority for this specific task :
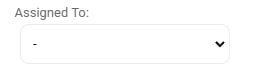
You can even assigned this task to one of your colleague with the ‘Assigned to’ field :
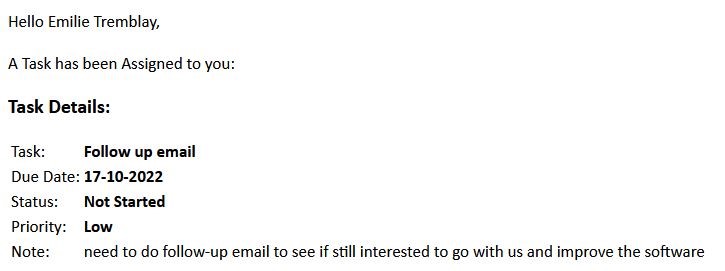
Finally and most importantly, you have the ability to set email reminders for yourself or whoever is assigned to this task. Simply seclect the date of the reminder and the time at which this action needs to be completed.
Here is an example of the reminder email you or colleague would receive :
Once you have completed all the details about your task, click on the Save button to create that task for this lead.
It now appears in the list of task in the TASK SECTION
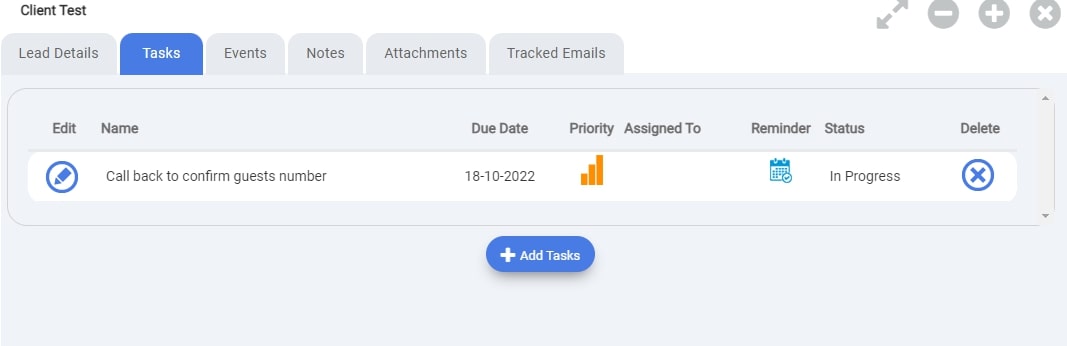
Repeat this process for each task regarding this lead.
C) EVENT TAB
This section is usually used if you need to set up a meeting with your prospect regarding a certain topic.
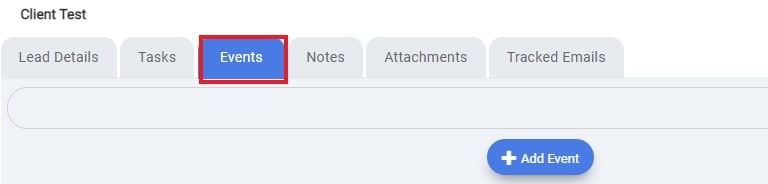
To schedule a new meeting with your lead contact, click on the 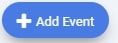
A new page opens:
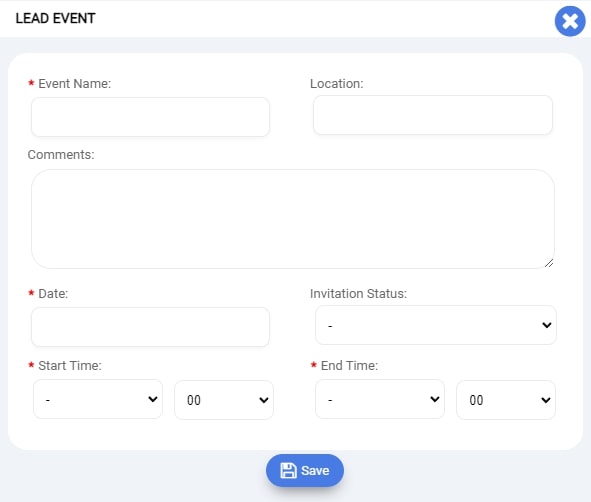
Fill the differents field and Save to finalize your meeting with your lead.
Ex:
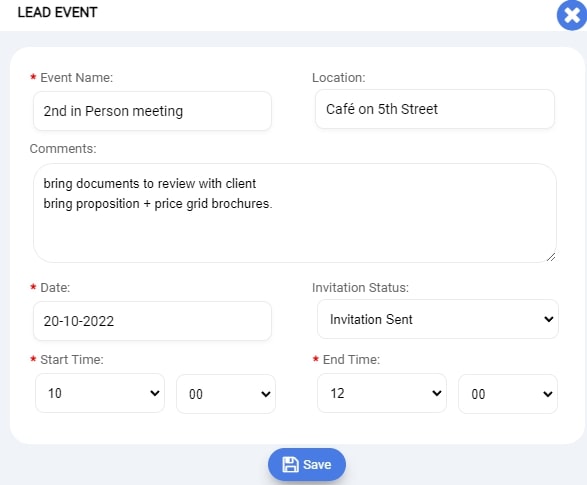
This serves as an organizing tool for you and will not show in the system event calendar.
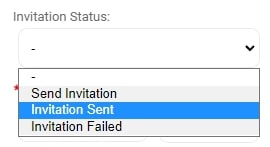
Note: in the invitation Status field, if you select Invitation sent, it will not send an email to your contact.
Once the event has been created, you will have the ability to add some Invitee to it, by simply selecting the Add Invitees button
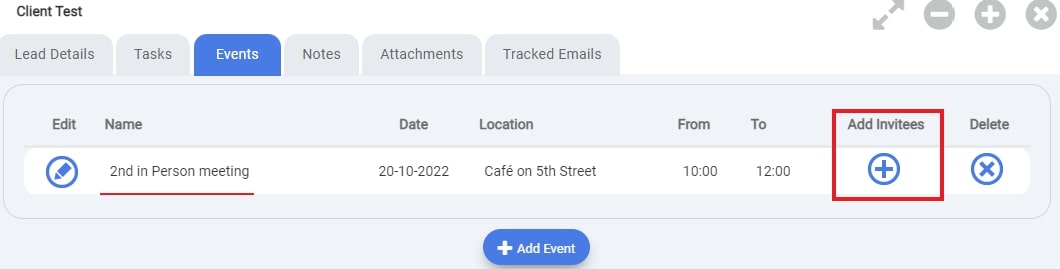
Here, simply start typing the name of the person you want to invite, a list will appear, select the contact you need and this person will then be invited to your event by email.


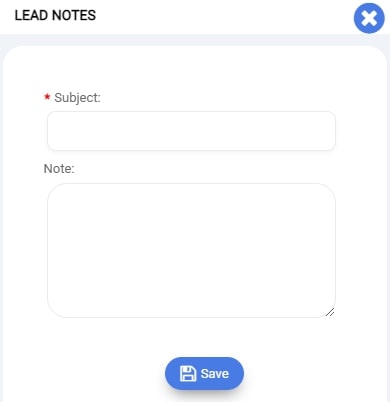
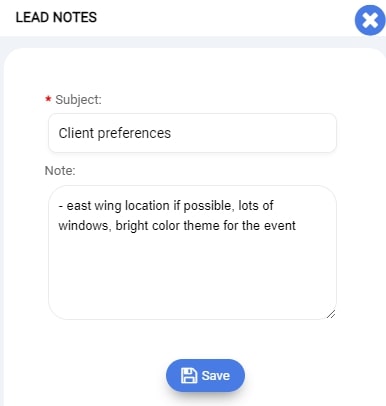
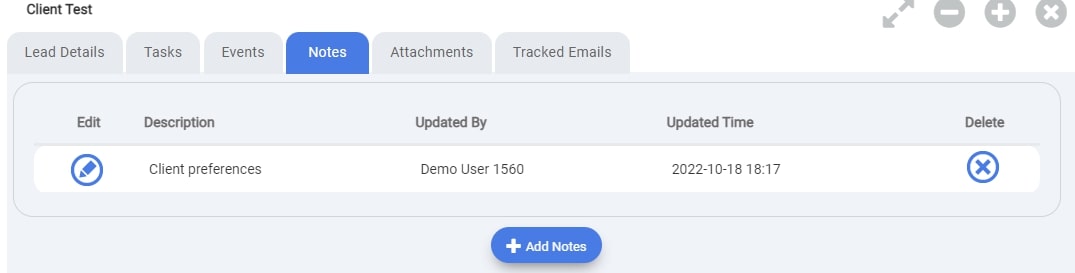
D) NOTES TAB
In this section, you will be able to add additionnal details to your lead,
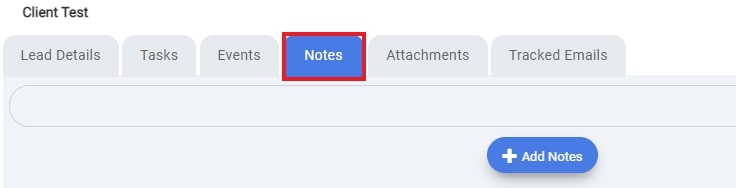
Simply click on the Add Notes button and create as many notes as you need for this lead.
Ex
E) ATTACHEMENT TAB
This section allows you to share document with you client and to keep track of those said document and everything the client has shared with you regarding their upcoming desitred event.

F) TRACKED EMAILS
This section allows you to send pre-configured email directly from Pxier to your lead contact.
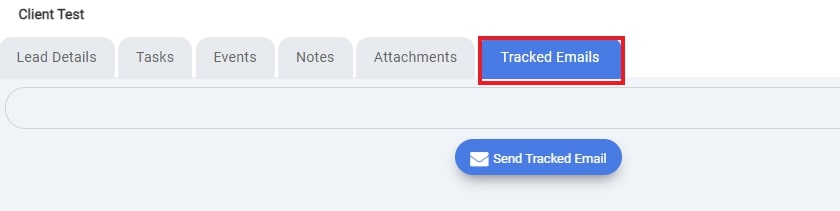
Click on the Send Tracked Email to configure the email.
The system will redirect you to this page :
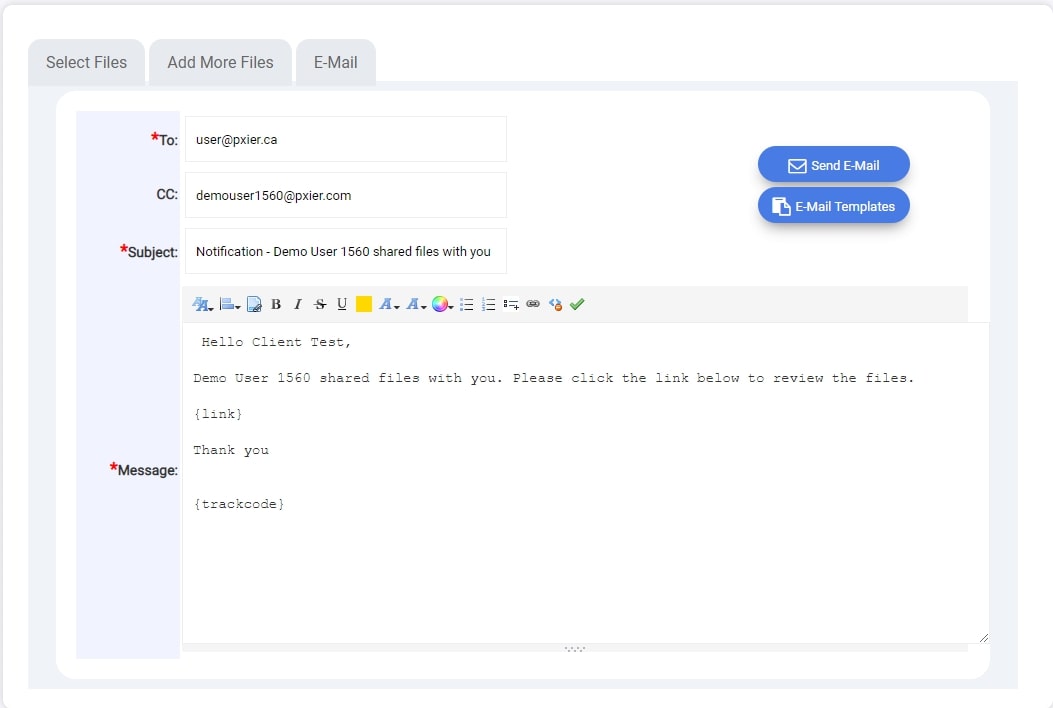
Where you can fully configure your message or import a pre-created email template from the system and even attach a document to it.
Click the Send Email button and the system will prompt you with a message confirming that the email has been sent :
Additionnally the Send Email button will turn green, indicating an email was sent.
Your contact will then receive the following email :
To come back tp the Lead section simply click on the  button.
Packages
Packages can be created directly in Pxier. These can consist of various items, such as menu items and services.
Packages allow you to sell a combination of menus and services at a discounted/negotiated price to your customers. The package price can either be charged at a total amount, or per person.
Steps to Create Packages in Pxier
STEP ONE – Package Content
You will need to first configure the package content. These are the menu items and services that will be included in the package price.
Please refer to Help Document: Creating Menus and Services.
STEP TWO – Update or Create Packages
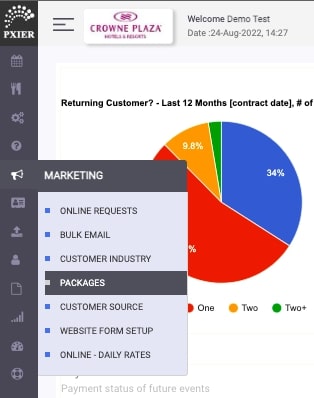
Under the Marketing Tab, go to “Packages” – see below screenshot
This will take you to the “Manage Packages” page. Here you will see your existing packages.
These packages can be edited by simply clicking on the pencil icon next to the package name
You can update the package details, such as the name, price and how it is charged
You can also update the package content.
**Note: Changes to the package will not affect events that have already been created. You will need to remove the package from the event and re-add the package.
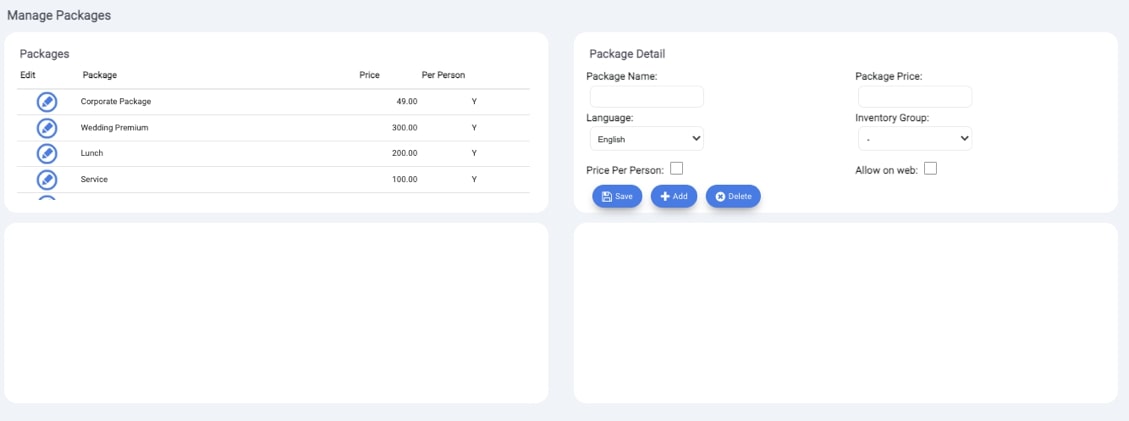
In the Package Details pane, click on the Add Button, to create a new Package. See Screenshot below

Package Name: Enter the name of the package, as you want it to appear on the contract/invoice
Language: Select the Language – Here you will need to create each package in the language you want it to appear in.
Price Per Person: This is a tick-box, if the price is dependent on the guest count, activate this tick-box.
Package Price: Enter the price you will charge for the package.
Inventory Group: If you have an integration to a PMS provider, you will need to select the revenue group the package revenue needs to go to. If you do not select one, Pxier will split the revenue by the package content. i.e the menu and services.
Allow on web: If you are using the Pxier Web Plugin for online event bookings, this determines if the packages are available online.
STEP THREE – Adding Package Content
After creating the package details, you will need to add the package content.
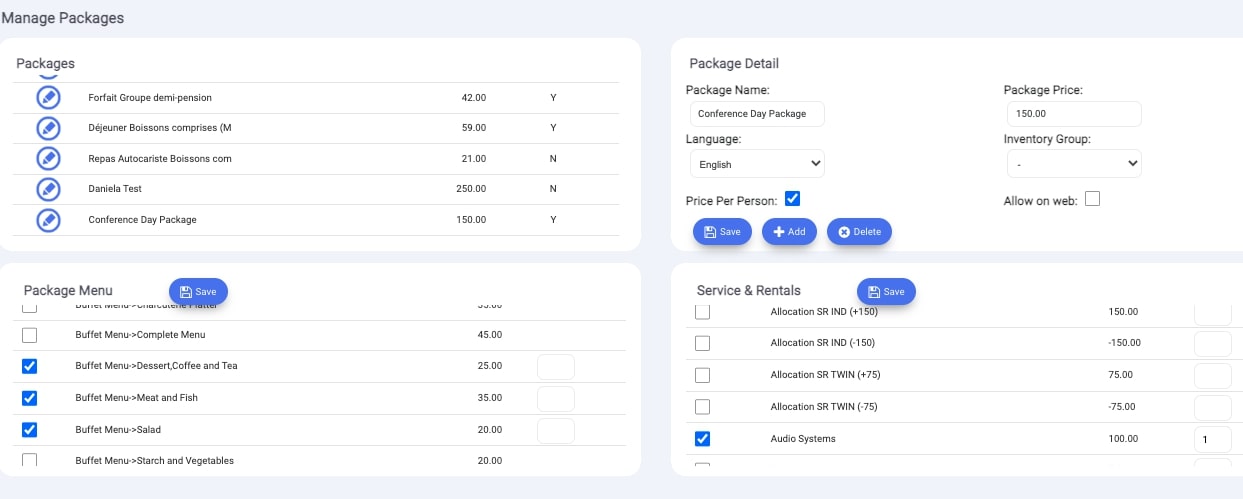
Under Package Menu, you will see all the menu items available. Click on the tick-box next to the item to add this to the package. You can select multiple items. Click on the Save Button in the Package Menu section to update the package.
Under the Service & Rentals section, you will find all the inventory items. Click on the tick-box next to the service you want to include in the package. Click on the Save Button in the Service & Rentals section to update the package.
Package Splits
Pxier automatically splits all revenue by the package content. This is done using the weighted average for each item in the package. See below explanation of the calculation.
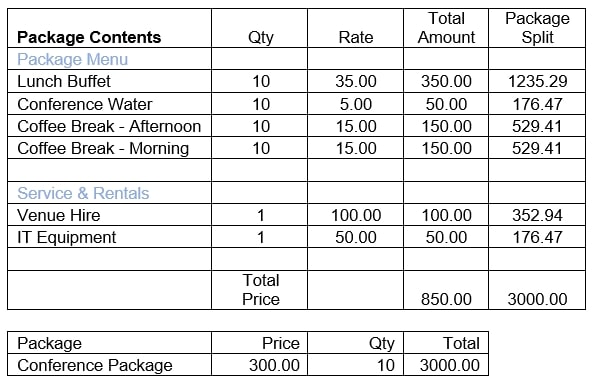
In the above example, we have a conference package that is sold at 300 per person.
The package includes the below
Lunch Buffet
Conference Water
2 x Coffee Breaks
Venue Hire
IT Equipment
Example: Menu Item
10 Lunch Buffets are required (10*35) =350
Weighted Average 350/850 * 3000 = 1 235.29
Example: Service and Rental
Venue Hire is charged once for the event = 100
Weighted Average 100/850 * 3000 = 352.94
**850 is the sum of items in package content
STEP ONE: Creating Inventory Groups
Inventory – Inventory Group
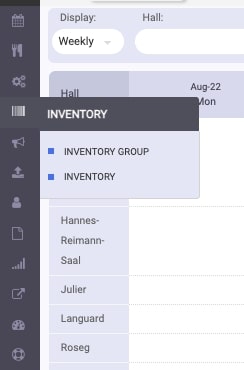
This will show you your existing Inventory Groups. If you have an integration to a PMS provider, please do not make changes to the Inventory Groups. As these inventory groups are synched from your PMS provider to PXIER. i.e these revenue groups are created automatically based on your configuration in the PMS.
To create a new Inventory Group, click on the Add Item button.
Description: Enter the name of the Inventory Group.
Sync Products: This is used if you have an integration to a PMS.
STEP TWO: Creating Inventory Items
Now that you have created an Inventory Group, you can assign new Inventory items to this Group.
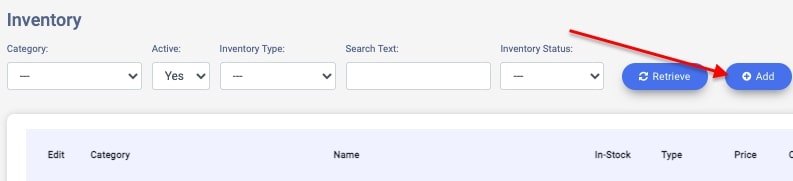
Inventory – Inventory
Here you will find all the inventory items you have configured in your account. Pxier allows you to filter your inventory items by the category, Active, Inventory Type or Inventory Status. This makes it easier to view specific Inventory Items.
To create a new inventory item, click on the Add button at the top of the screen.
Enter the details of the new Inventory Item in the fields provided and click on the Save and Close button.
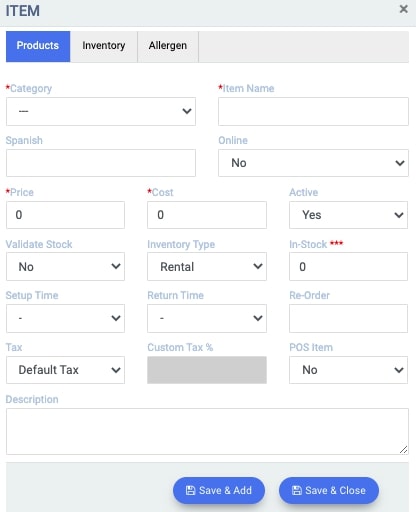
Category: Select the Inventory Group you want the Menu Item to be created in
Item Name: Enter the name of the inventory item, as you want it to appear on the contract/invoice
Spanish: Enter the translation – depending on your 2nd language, in this demo account we have Spanish
Online: If you are using the Pxier Web Plugin for online event bookings, this determines if the Inventory Items are available online.
Price: Enter the selling price, as you want it to appear on the invoice.
Cost: Enter the cost to purchase or rent the inventory item
Active: Select if the inventory item is active or should not be available
Validate Stock: This allows you to use Pxier’s Inventory Control, you can choose if you want to receive a warning, or if the system should not allow you to overbook the inventory item.
Inventory Type: Select if the Inventory item is a rental item or consumable
In-Stock: Enter the number you have in stock
Setup Time: Enter the time it takes to setup/configure
Return Time: Enter the time it takes to disassemble
Re-order: Not applicable for events
Tax: Select the Tax Type. If you select custom, you will need to enter the tax percentage
Custom Tax: Enter the custom tax percentage
POS Item: Not applicable for Events
Description: Enter the description of the inventory item, this will appear online
Using Event Planner
Create a new Customer
Create a Contract
Create an Event
Add a Menu to an event
Add Services to an Event
Manage Payments
Add a files to an event
Create a BEO
The Audit tab
Managing The Pack List
How to Assign Task for an Event
Adding a package to an Event
Establishing a timeline for The BEO
Making a Room Available Online
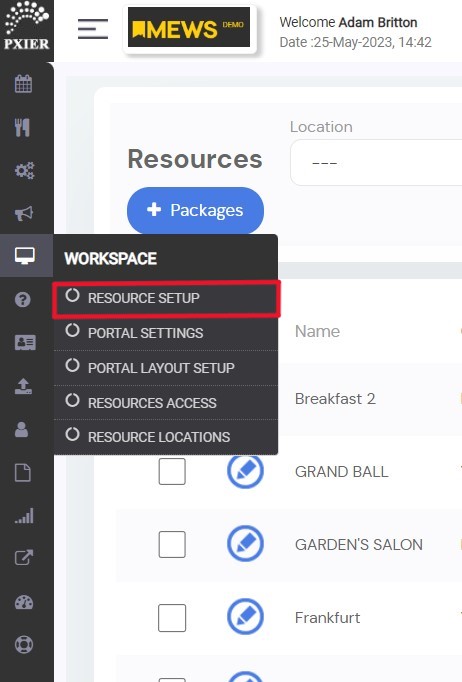
Go to Ressource Setup
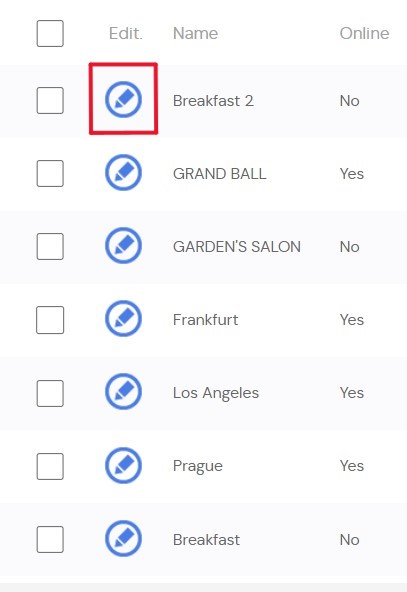
Choose any room you want and click their Edit button
This is going to take you to the page as seen below
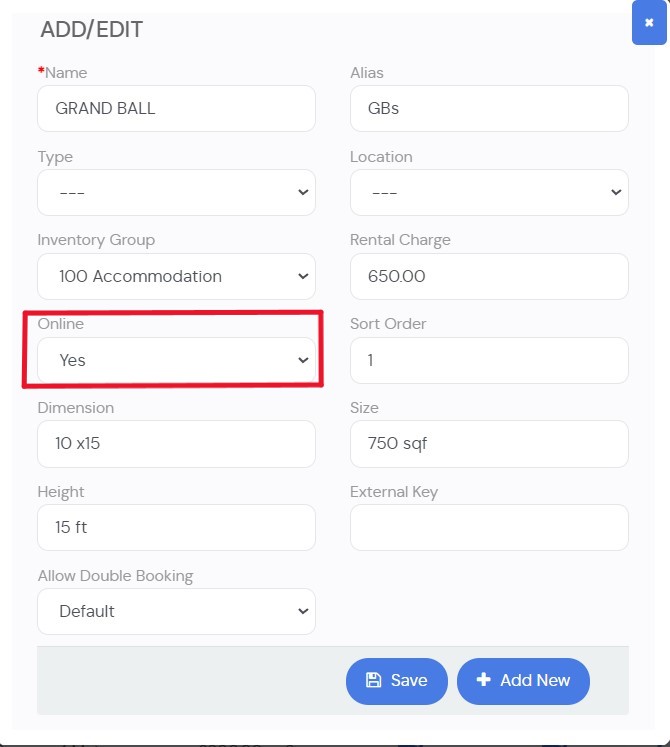
Here in the Online section you can toggle between [Yes] or [No]
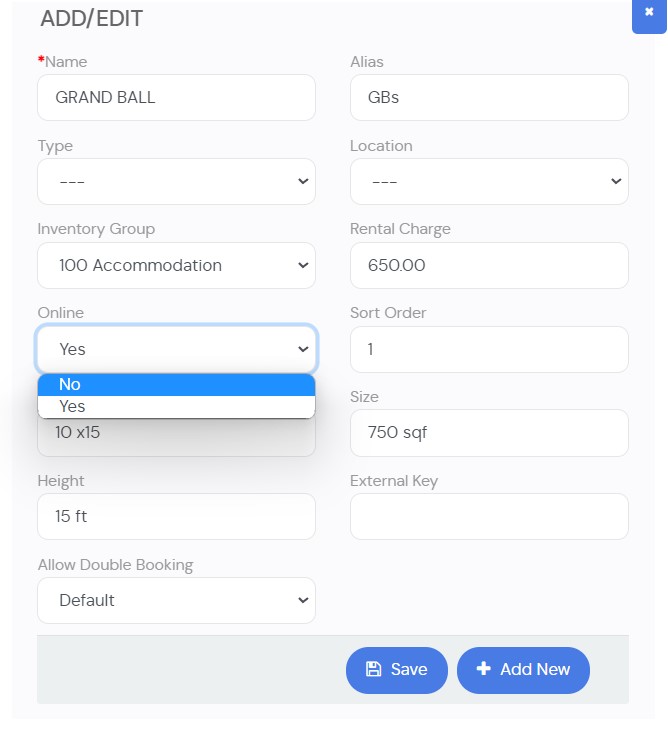
If it is selected as [Yes] the room selected will show up in the Booking Engine.
If it is selected as [No] the room selected will not show up in the Booking Engine.
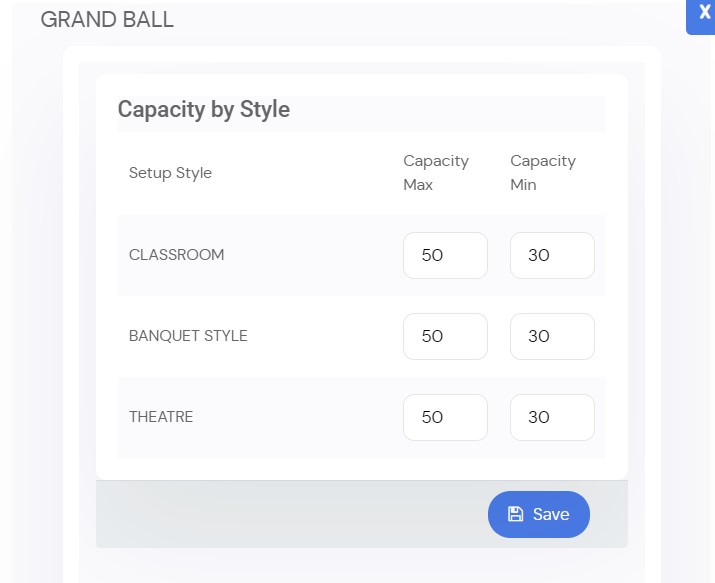
Define Capacity
In Ressource Setup click the edit capacity button

It will take you to the page as seen below where you can manually input the Maximum and Minimum capacity of each Setup Style
To add and remove Setup Styles from the room you desire you must go to Master Setup

And then click on Hall Setup Styles

Click any of the edit button of any of the Setup Style you want to include or not on the website list
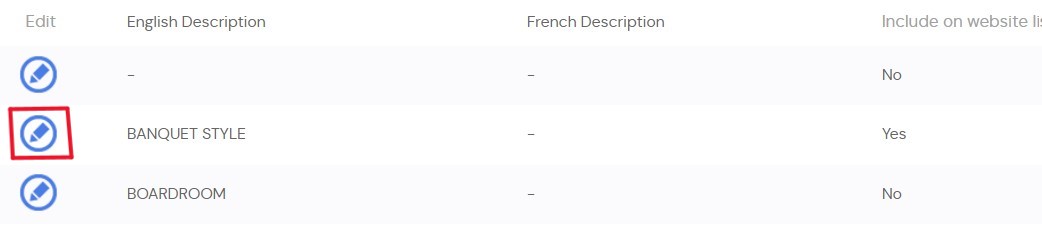
Here in the Include on website list section you can toggle between Yes or No

If it is selected as Yes the Setup Style selected will show up on the website list.
If it is selected as No the Setup Style selected will not show up on the website list.
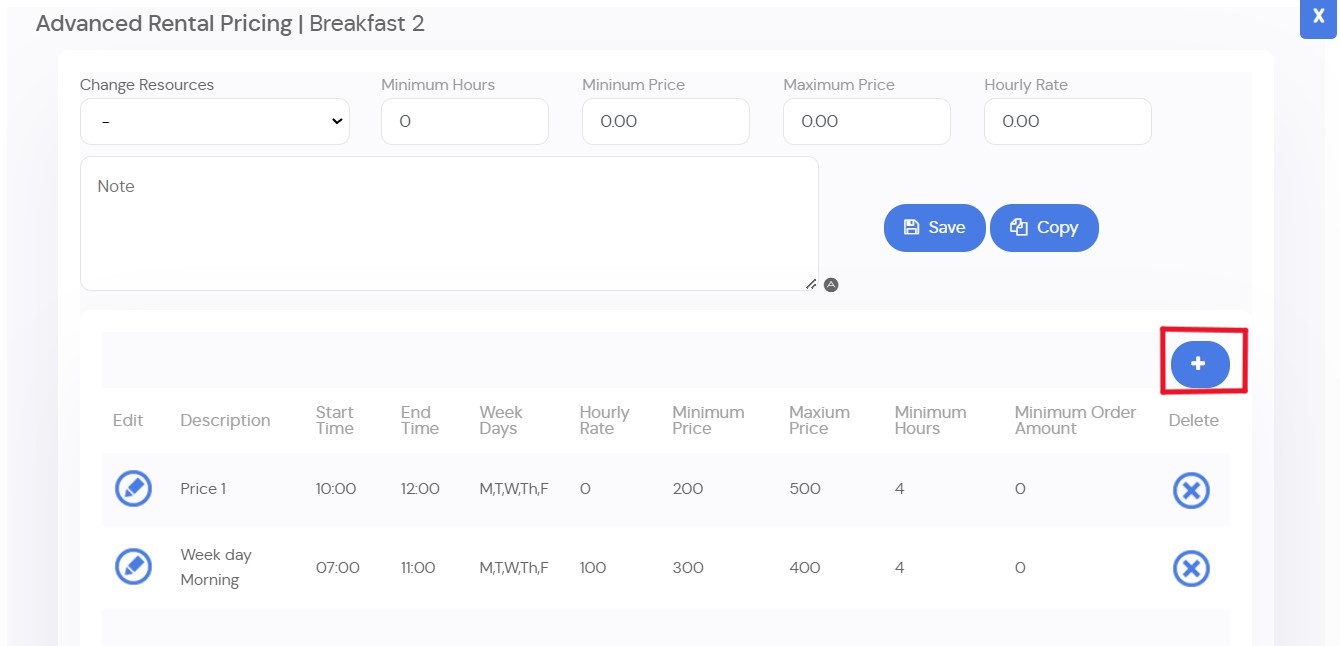
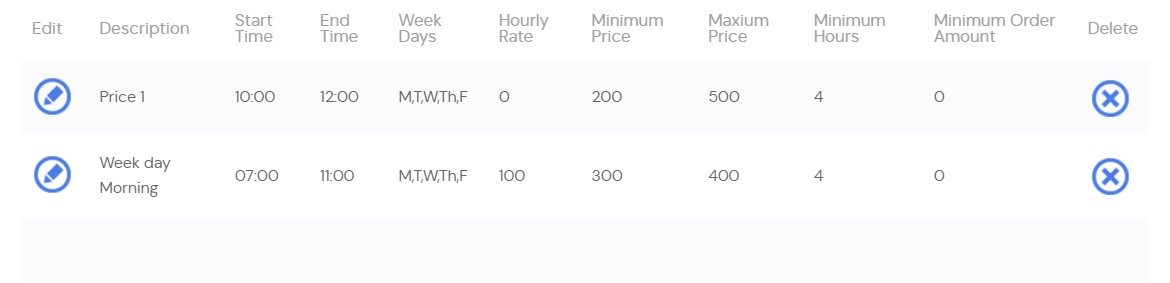
Managing Pricing and availability
In Ressource Setup click the edit Extended Price button

It will take you to the page as seen below where you can manually input the Minimum and Maximum Price, the Minimum Hours necessary to reserve the room and the Hourly Rate of the room
The notes section can be used to specify the features of the room and/or some pricing exceptions

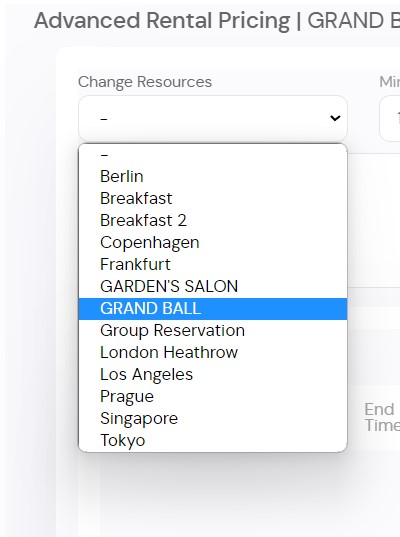
The Change Ressources is a feature that allows you to switch between rooms whitout having the need to switch rooms from the main Ressource Setup page
If there are some days that the rooms are not available, there is a specific time when the room is unavailable during the day or you want to make pricing options for the room
Click the + button to configure these pricing options
After clicking the + button it should take you to this page
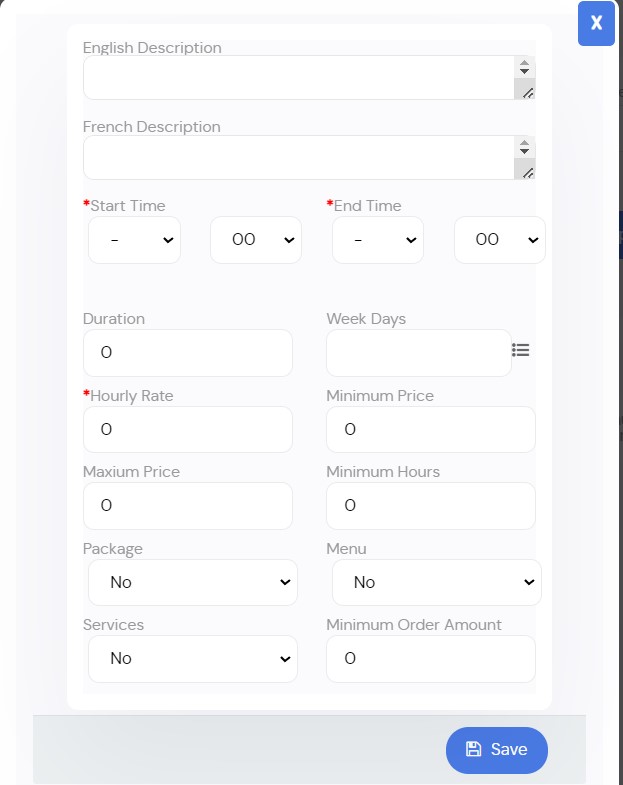
On this page the description will be its pricing option name
You have to give the pricing option a Start Time and End Time to determine when it will available during the day
In the duration field you write how many hours the pricing option is going to take
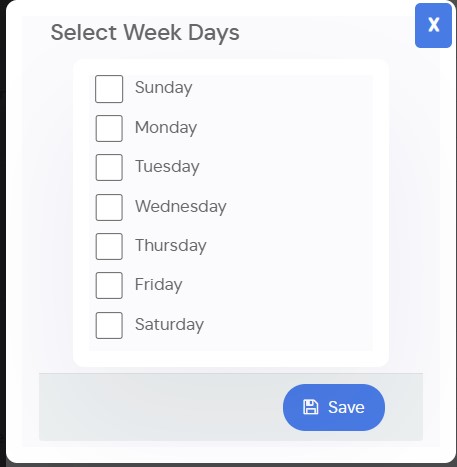
In the Week Days field you select which days the pricing option will be available by clicking the button on the right
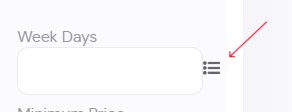
After clicking the button it should take you to this page where you can select the days you want the pricing option to be available
You can also decide whether or not you want Packages, Menus or Services to be included as add ons in the pricing option
With the minimum order amount you can use it to decide the amount of orders necessary to be able to use a package
Once you have finished setting up the pricing option press the save button to finish up and the pricing option should show up as shown below.
Setting up options for rooms
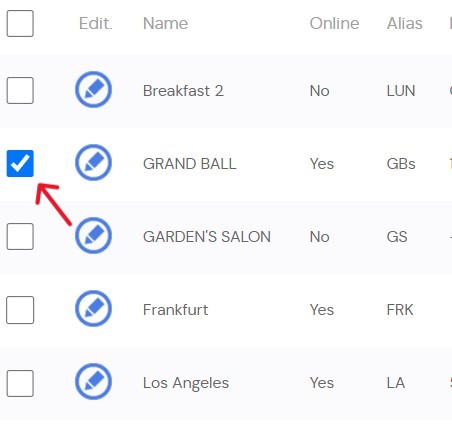
In Ressource Setup you can add both packages and exceptions for each of you rooms

To be able to add the packages and exceptions you must first select which room you want to modify
Once selected click + Packages and a page will open where you can select any of the packages created and select or unselect whichever you need
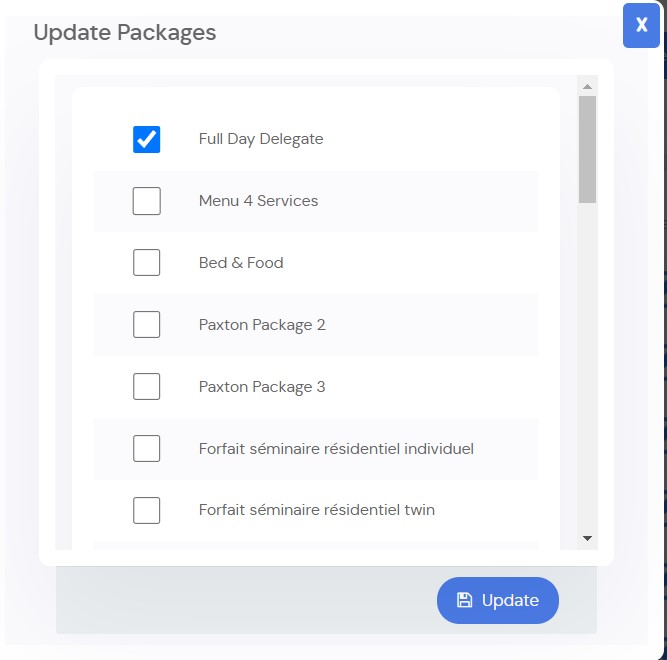
Once you press update every room selected will have the packages selected available as an add on to the room
For the exceptions, once the rooms are selected, click the + exception and this page will appear:
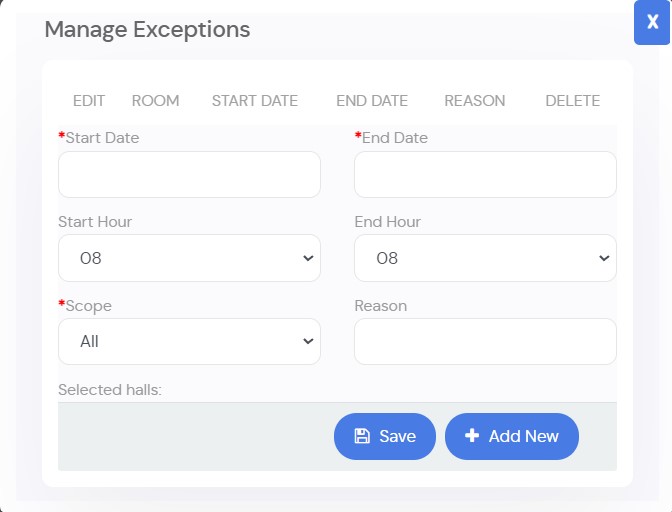
You have to give the exception a Start Date and End Date to specify when the exception will take place
You have to give the exception a Start Hour and End Hour to specify when the exception happens during the day
In the Scope field it refers to who this exception applies to so if its admin it refers to the staff, if its online it refers to the clients and all means it applies to staff and clients
In the Reason field you can write why there is an exception
Once finished click the save button and the exception will be applied to every room you have selected.
Uploading Images
In Ressource Setup you can add pictures to the rooms so you can see how the rooms looks like
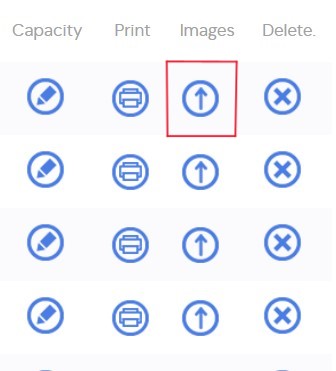
Once you've clicked the button it should have opened up a page like below
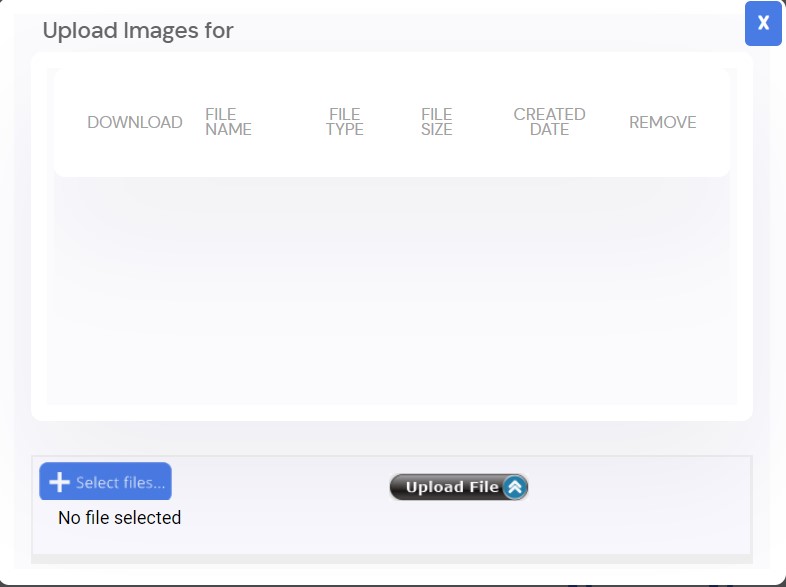
Then click the Select Files button to choose a picture saved in you local files
Once you have chosen your picture double-click on the file and then the page shoulld look something like this :

Now that you have chosen your file click the button Upload File and it will show up like this:
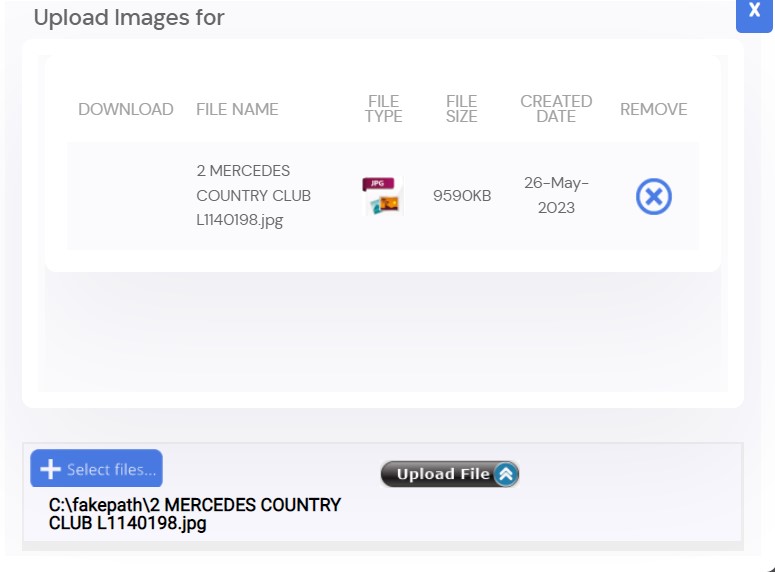
Once you have finished uploading the image should have been uploaded to the Online Booking Engine in the room you have selected
If you want to add more picture just repeat the process for the other pictures
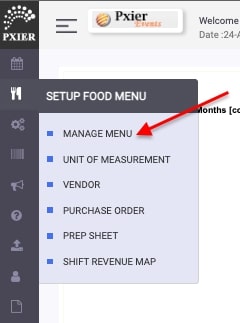
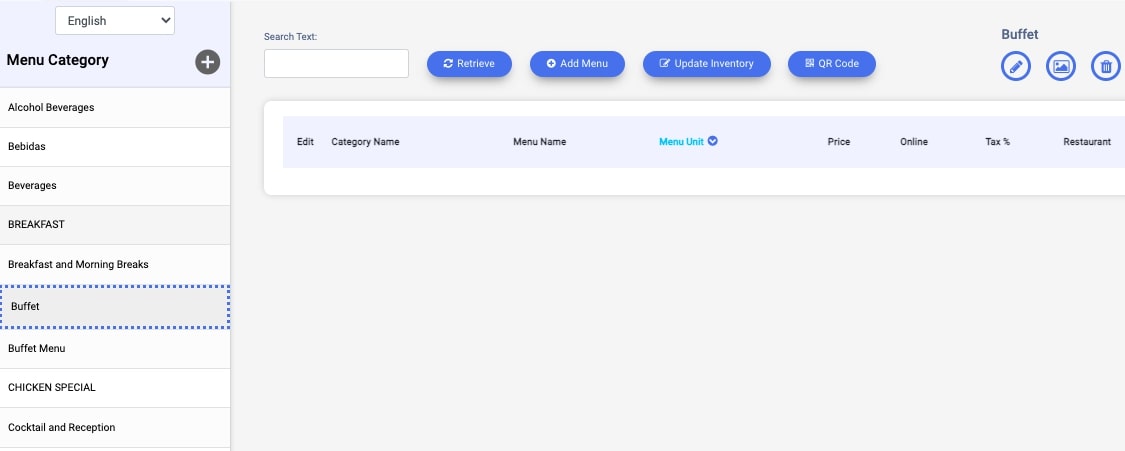
Creating a Menu Category
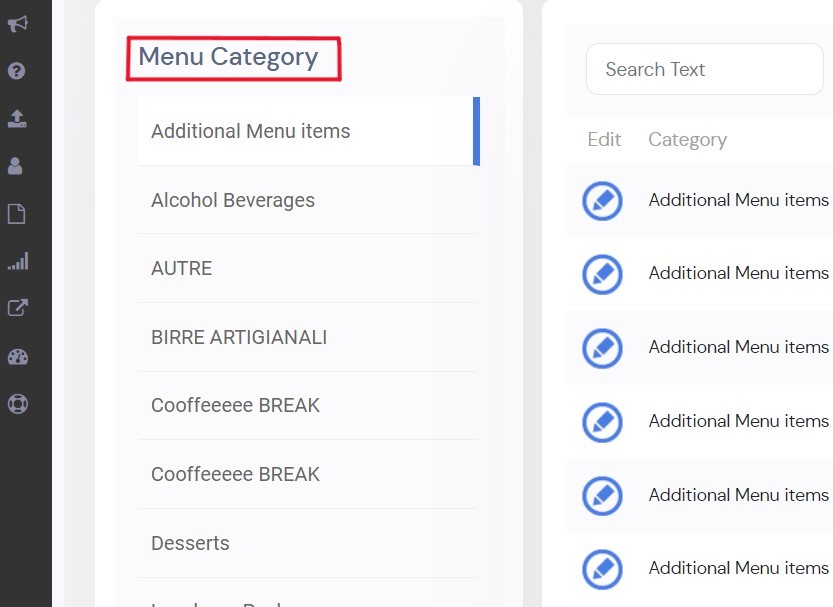
Setup Food Menu – Manage Menu
This will take you to your menu configuration page. Here you can see your existing Menu Categories and Menu Items.
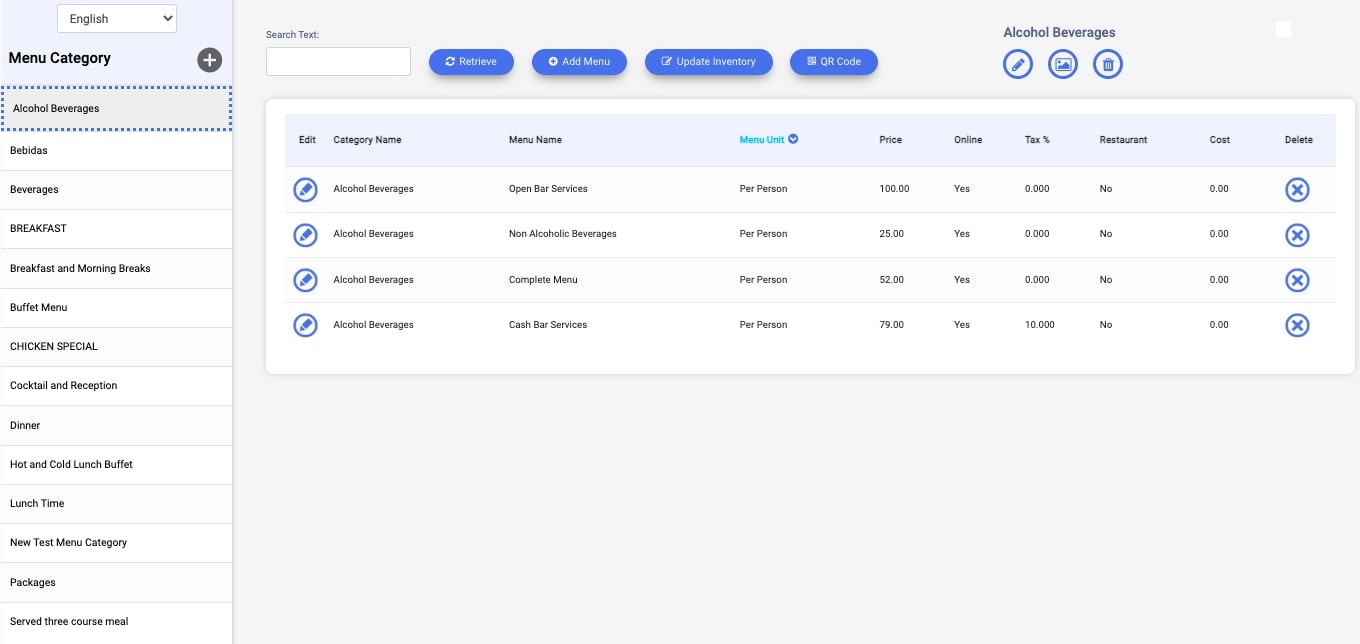
At the top left of the screen, you have a language selector. If you are using more than one language, please toggle to the language you want to add the menu for.
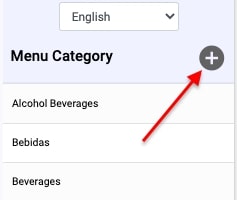
To create a new Menu Category, click on the Plus icon next to Menu Category.
Enter the details in each field and click Submit to create the new Menu Category.
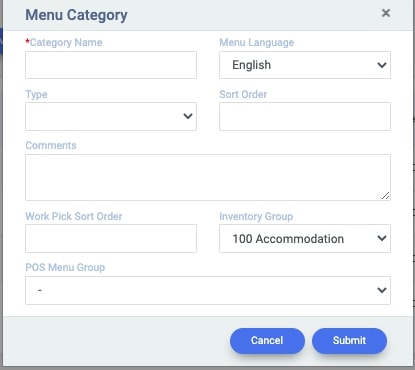
Menu Category: Enter the name of the Menu Category
Menu Language: Select the language of the new Menu Category
Type: Not applicable for Events
Sort Order: Enter the sort order
Comments: Not applicable for Events
Work Pick Sort Order: Not applicable for Events
Inventory Group: If you have an integration to a PMS provider, you will need to select the revenue group the Menu Category needs to go to. If you do not have a PMS Integration, this is not required.
POS Menu Group: Not applicable for Events
After you have added the details, click on the Submit Button to save the new Menu Category. You can see the new category on the left.
Creating a Menu Unit
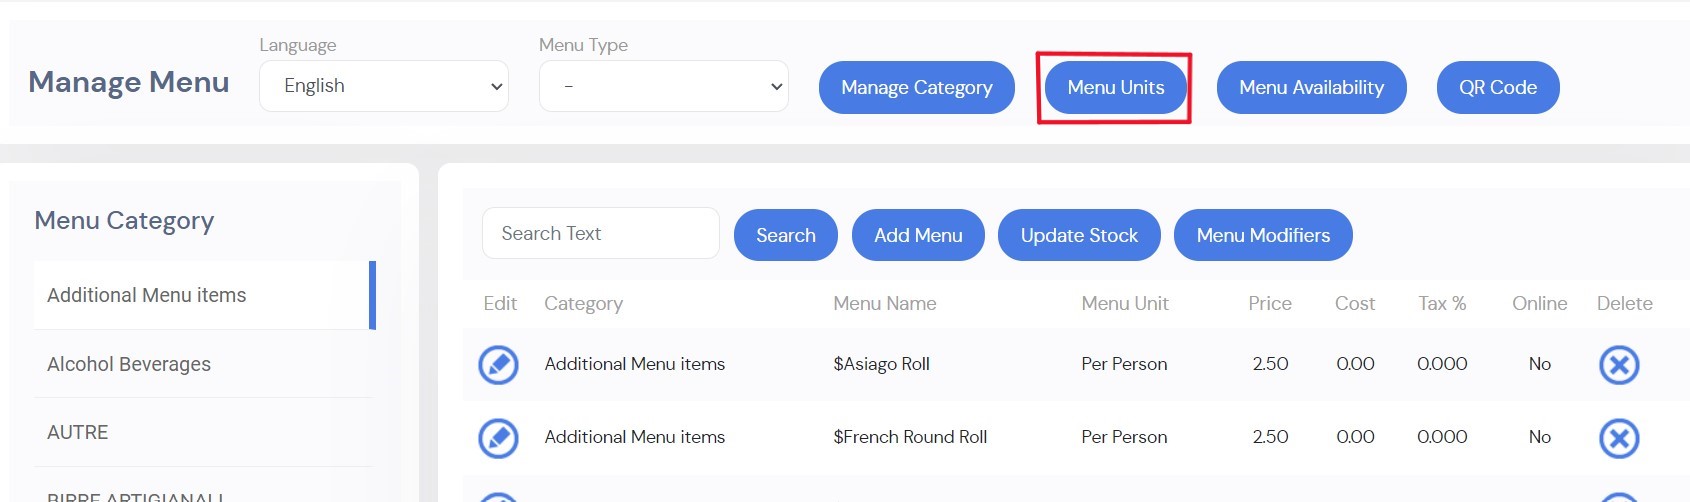
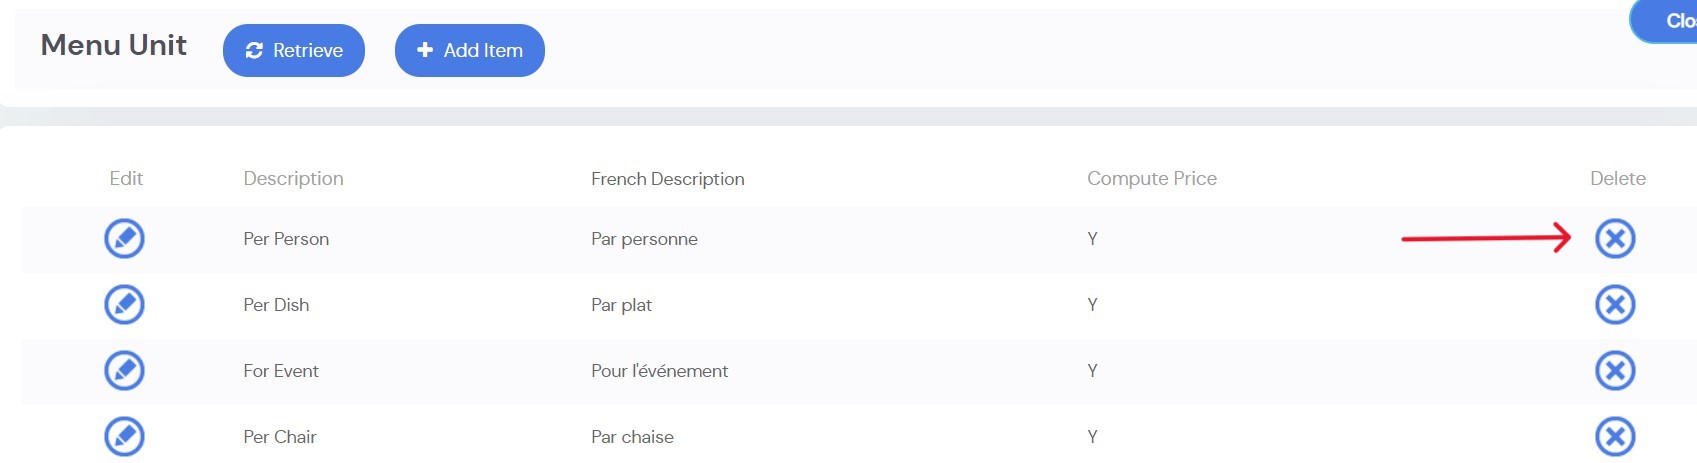
In the Manage Menu page there is a button called Menu Units
This will take you to the Menu Unit page where you can add or remove units from your Menu, to delete a Unit press on the [X] button to delete it
To add a Menu Unit Click on the button on the top-left [+ Add Item]
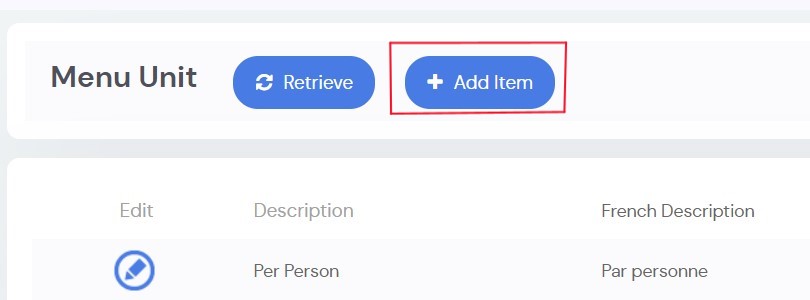
Enter the details in each field and click Save to create the new Menu Unit.
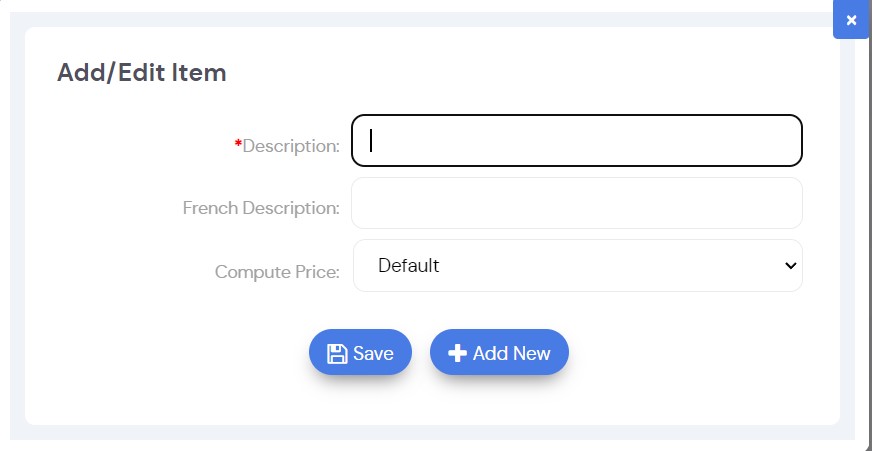
Description: Enter the name of the Unit
French Description: Enter the name of the Unit in french
Compute Price:[Default] is the amount of guests for an event, [Single] is only one, [Zero] is none
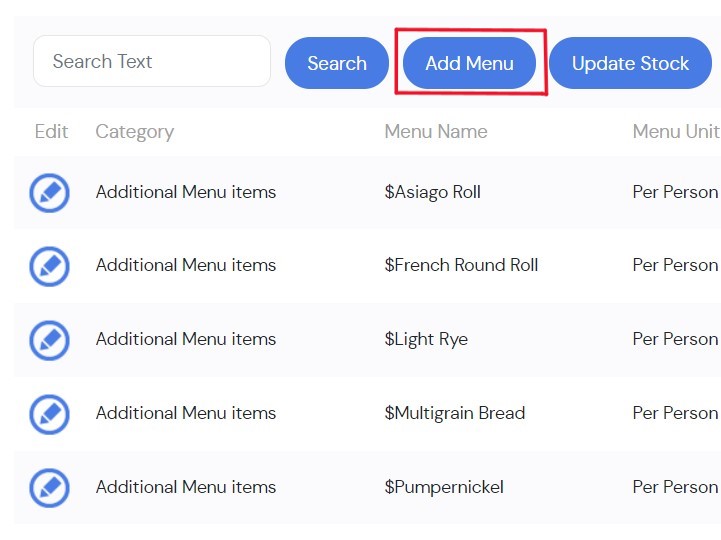
Creating Menu Items
In the Manage Menu page select any of the Menu categories on the left
Once a category is selected press on [Add Menu]
After pressing the button it's going to take you to this page :
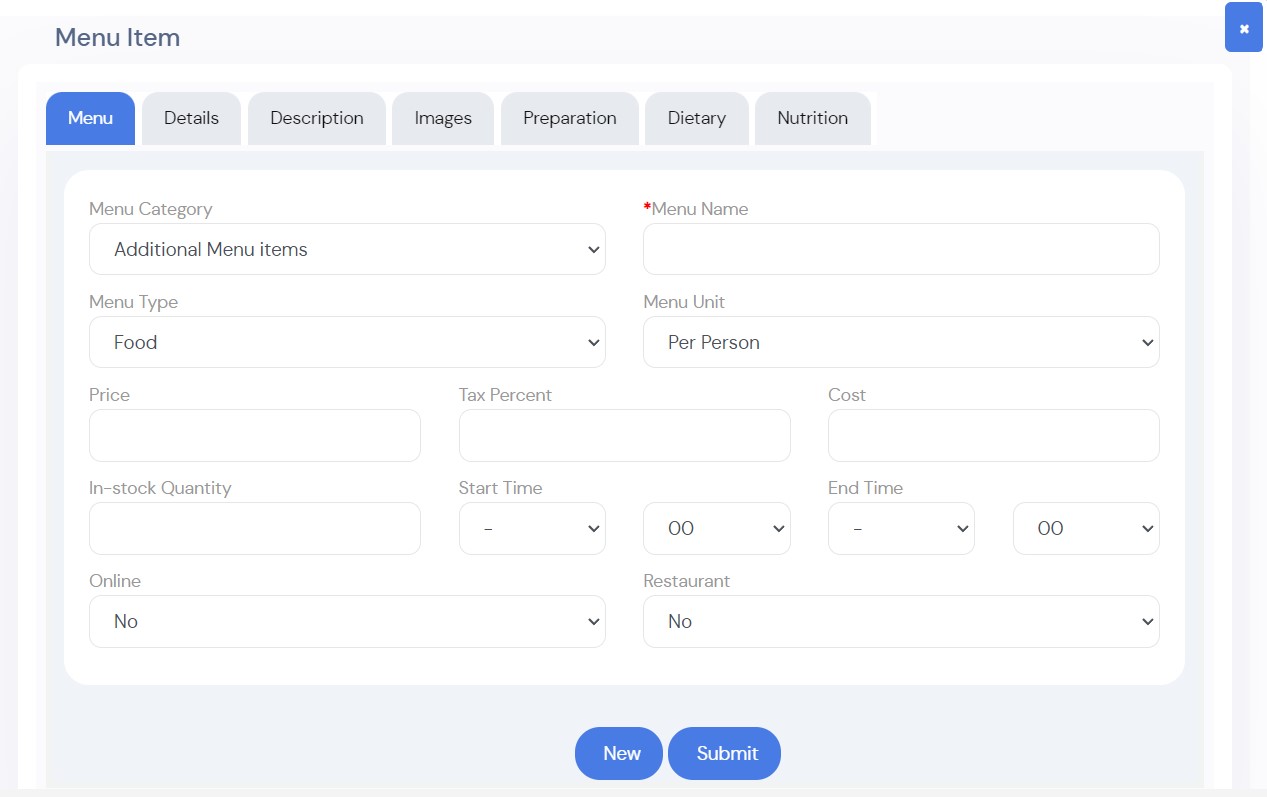
Enter the details in each field in the Menu tab:
- The Menu Category will automatically select the Category you selected earlier but you can still switch Category with the Dropdown Menu
- The Menu Name field will be the name chosen for the Menu Item
- The Menu Type field will tell what kind of Menu it will be, there are three choices, Food, Bar or Optional
- The Menu Unit will decide how the Menu Items are counted(Per glass, per person, Per Dish, etc.)
- The Price field will be the cost of the Menu Item without Tax
- The Tax Percent field will be the percentage of Tax the Menu Item will have
- The Cost field will be the cost it took to have the Menu Item
- The In-stock Quantity field is the number of stock you have of this Menu Item
- The Start and End Time will determine ehn the Menu Item will be available during the day
- The Menu Name field will be the name chosen for the Menu Item
- The Online field lets you decide if you want the Menu Item to show up online or not
- The Restaurant field il will appear in the Restaurent POS
Once finished to Setup the Menu Item click the save button and close the page, the item should appear in the Menu Category you chose.
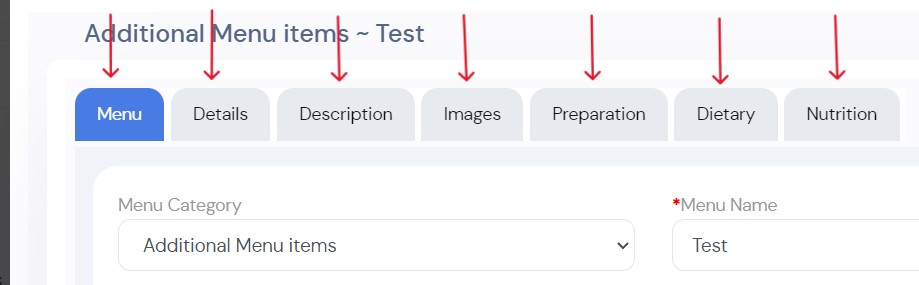
After saving the item you should have access to the other tabs including [Details],[Description],[Images],[Preparation],[Dietary] & [Nutrition]
To go and edit those click on the edit button of the Menu Item you desire
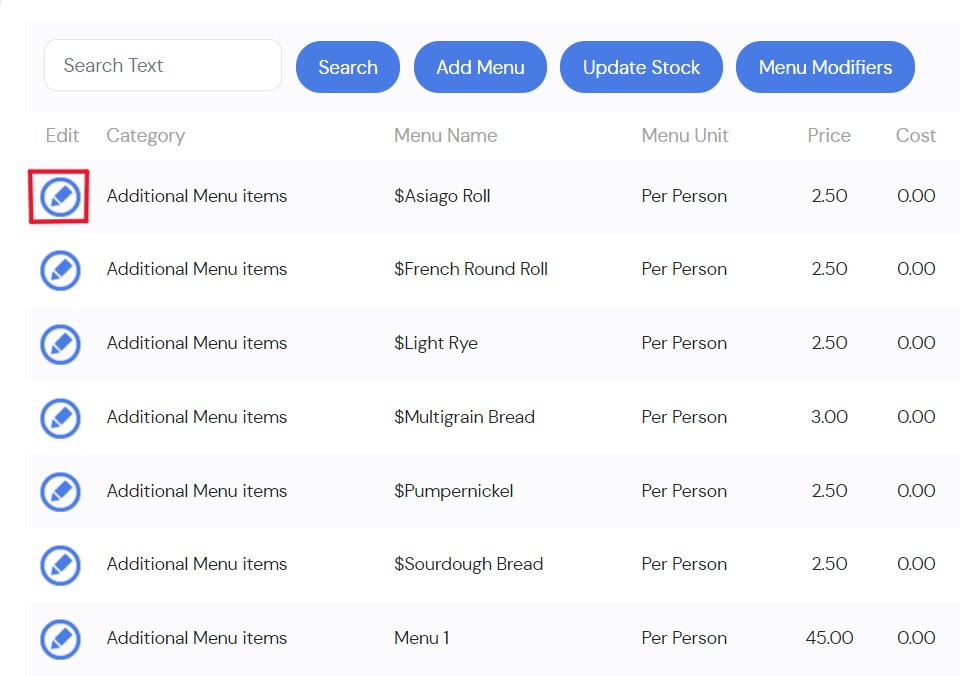
Once the page opens it will bring you back to the main Menu Page
You can switch tabs by clicking on the headers on top of the page
In the [Details] tab you can add a few lines that will show up in the BEO along with the Menu
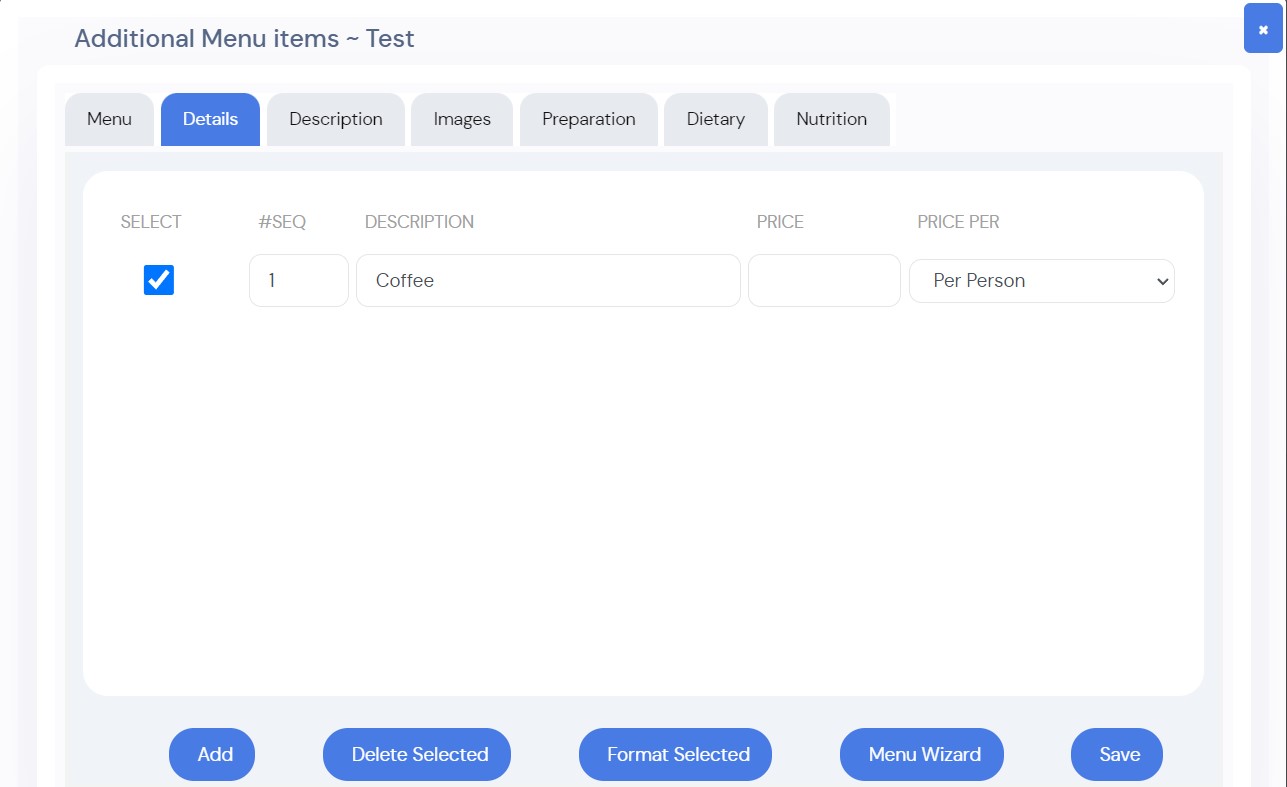
The [Add] button is to add a Line
The [Delete Selected] button will delete any line you have selected with a check mark
The [Format Selected] lets you Style your text with Italic, Bold and/or Highlight
To learn how to use the Wizard Software go to this page :The Wizard Feature
The [Save] button once clicked all remaining lines will show up in the BEO
In the description tab you can add a description to the menu that will not show up in the BEO
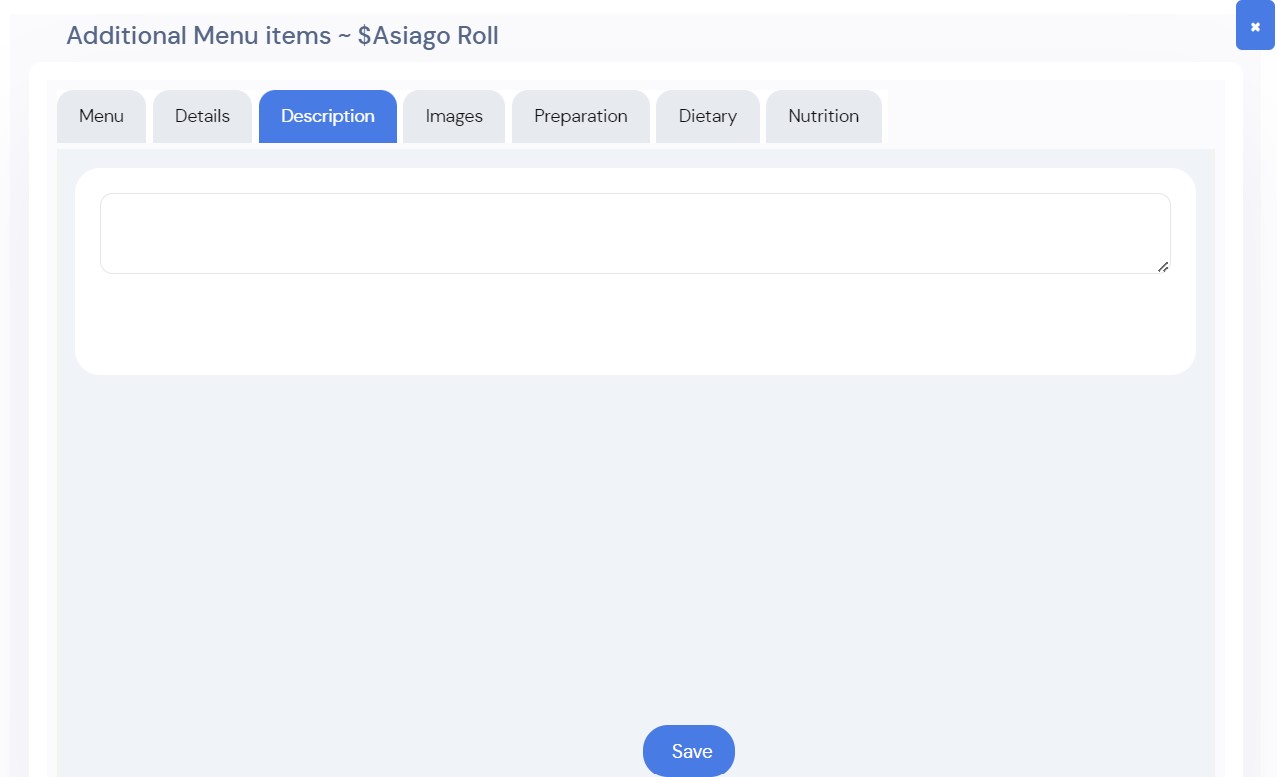
The blank space is where you can add the description
The [Save] will save the description for the Menu Item
In the Images tab you can upload one or many pictures for the menu items that will show up in the online booking
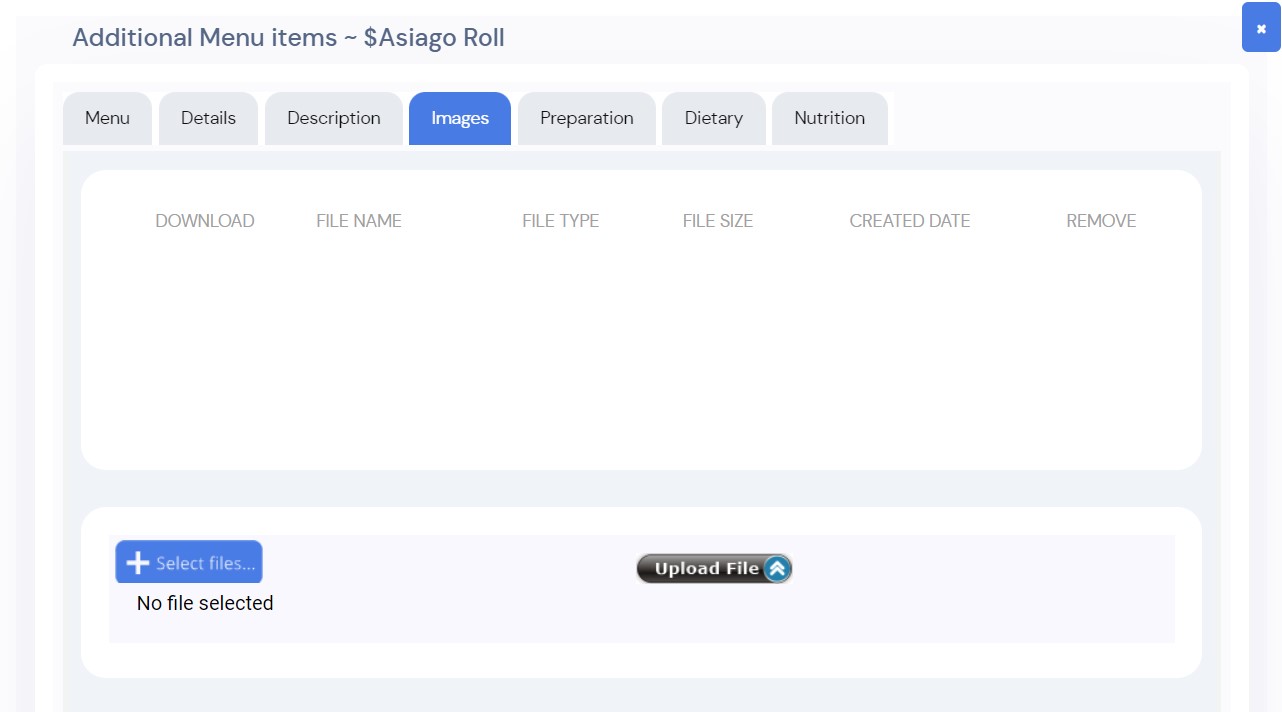
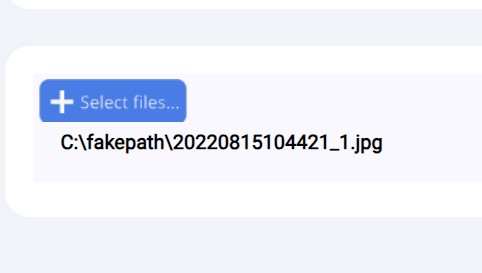
Then click the Select Files button to choose a picture saved in you local files
Once you have chosen your picture double-click on the file and then the page shoulld look something like this :
Now that you have chosen your file click the button Upload File and it will show up like this:
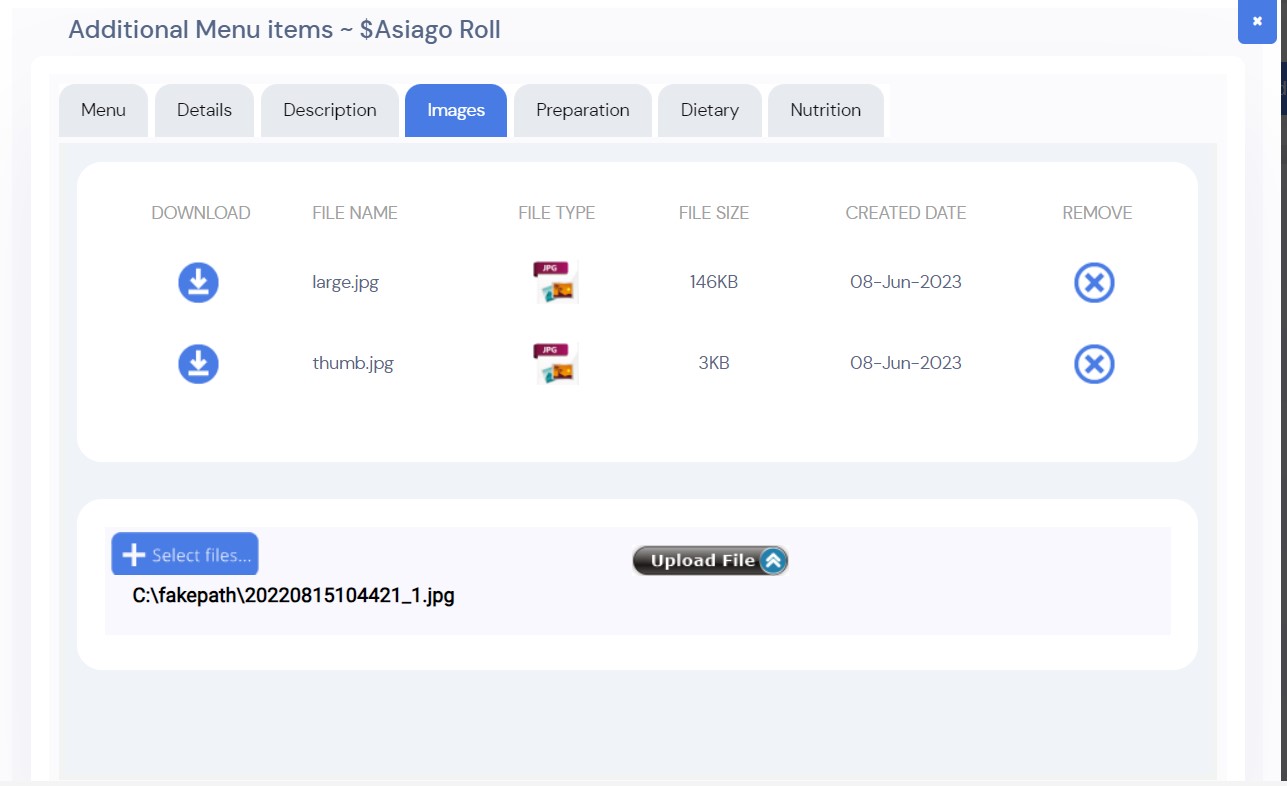
Once you have finished uploading the image should have been uploaded to the Online Booking Engine
If you want to add more picture just repeat the process for the other pictures
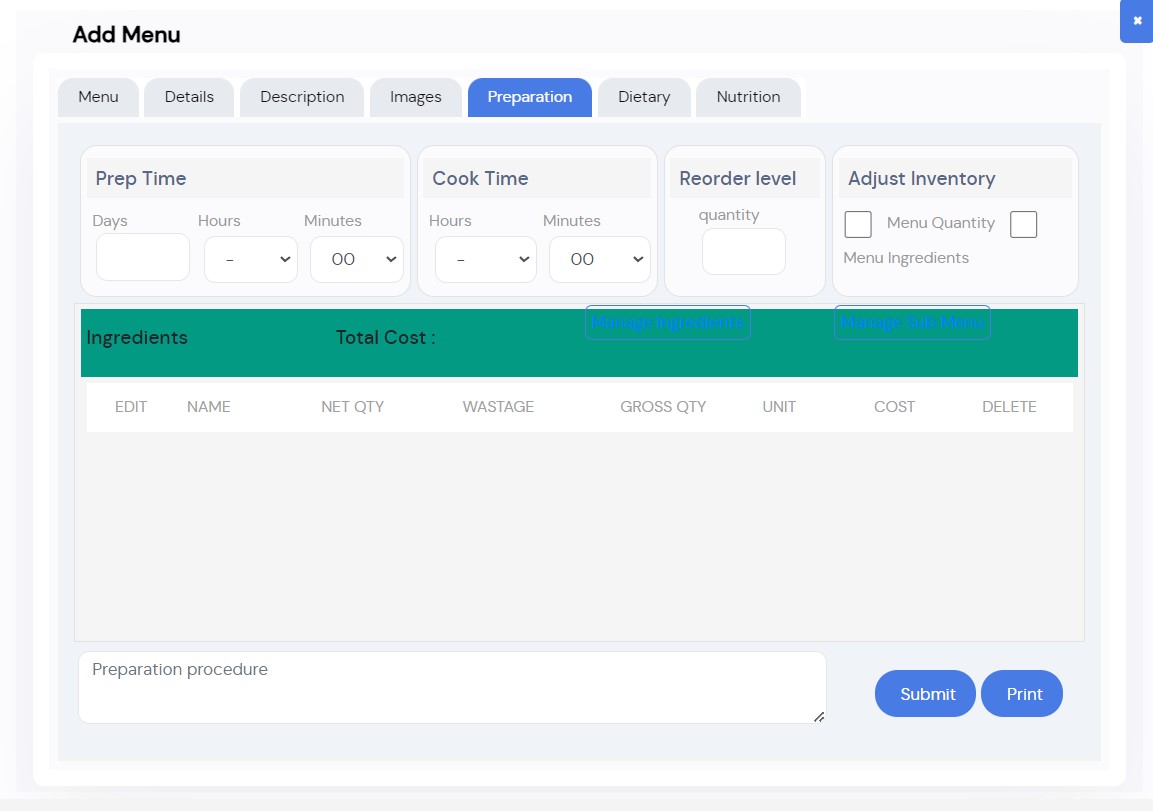
In the Prepartion tab
In the Dietary tab you can select Diets that are included in the Menu Item
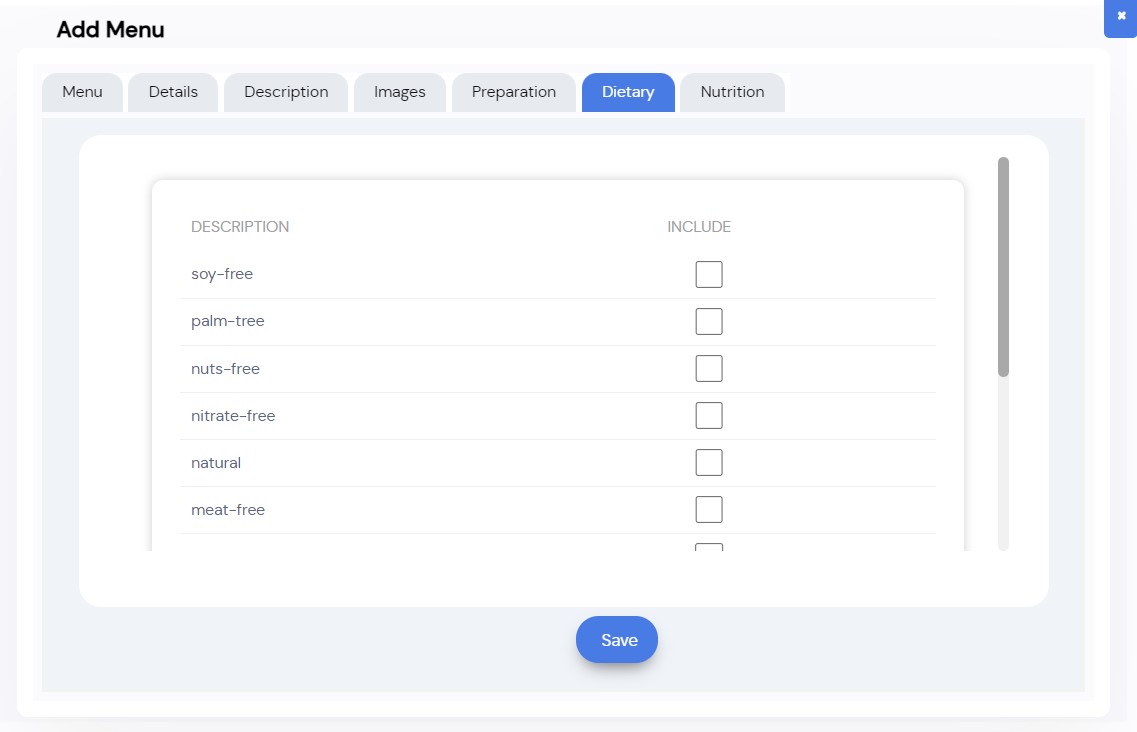
To select the diets check the boxes on the right to include them with the Menu Item, once finished press the save button to keep all of your changes
In the Nutrition tab you can add in text in the description field the nutrition the Menu Item has
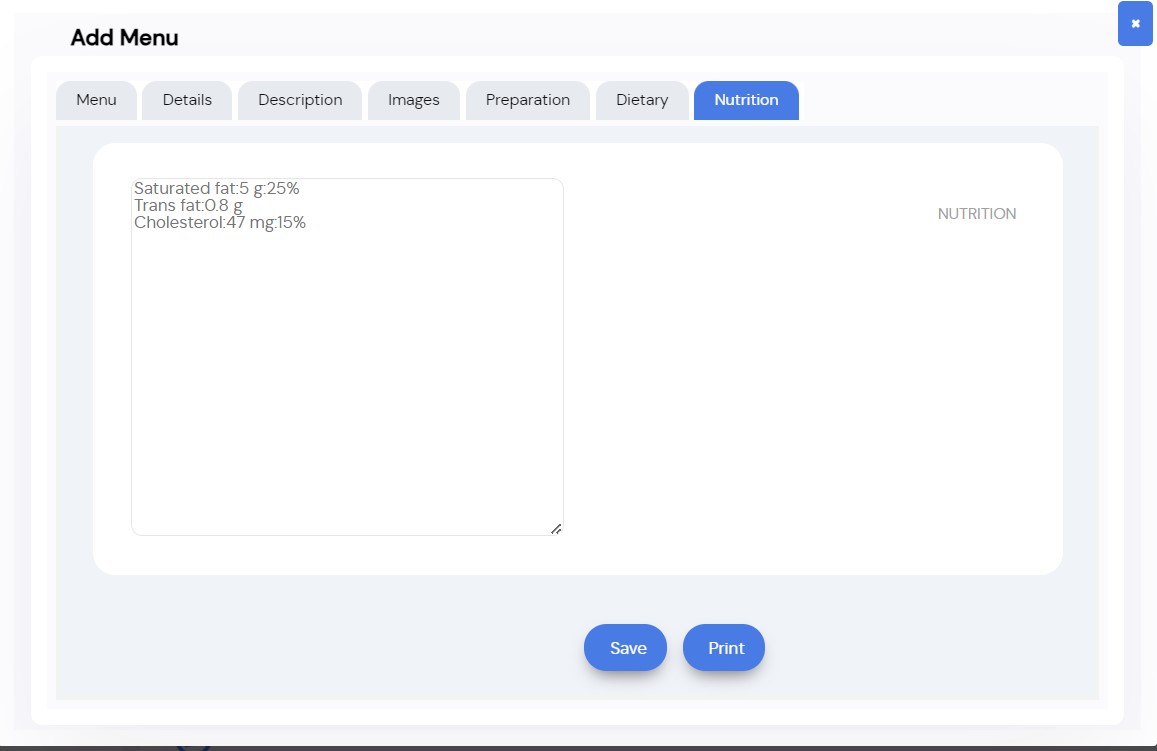
Once finished writing the Nutrition press Save to keep your changes, you can also print the Nutrition description
Updating Stock
In the Manage Menu page there is a button called [Update Stock]
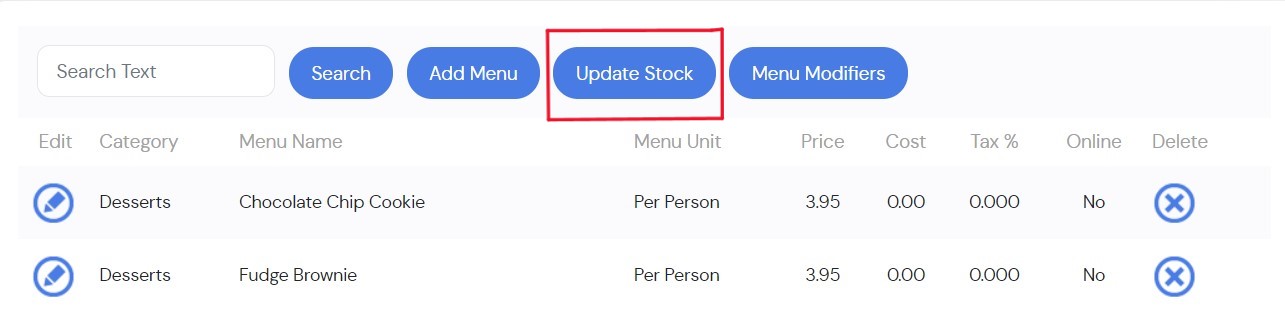
This will take you to the Inventory Update page where you can modify the Quantity of the Inventory
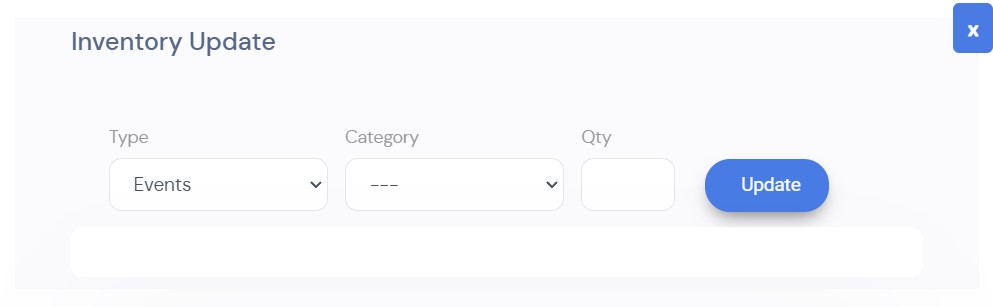
Select the Type of Event you want to modify (ex: for POS, Events, Delivery and Takeout or Catering)
Select the Menu Category you wish to modify you have created
Once the Type and Category have been chosen write the Qty you want to Update for the catgory and events
Menu Modifiers(Only applicable to Takeout & Delivery or POS)
In the Manage Menu page there is a button called [Menu Modifiers]

Once you press the button it should take you to this page :
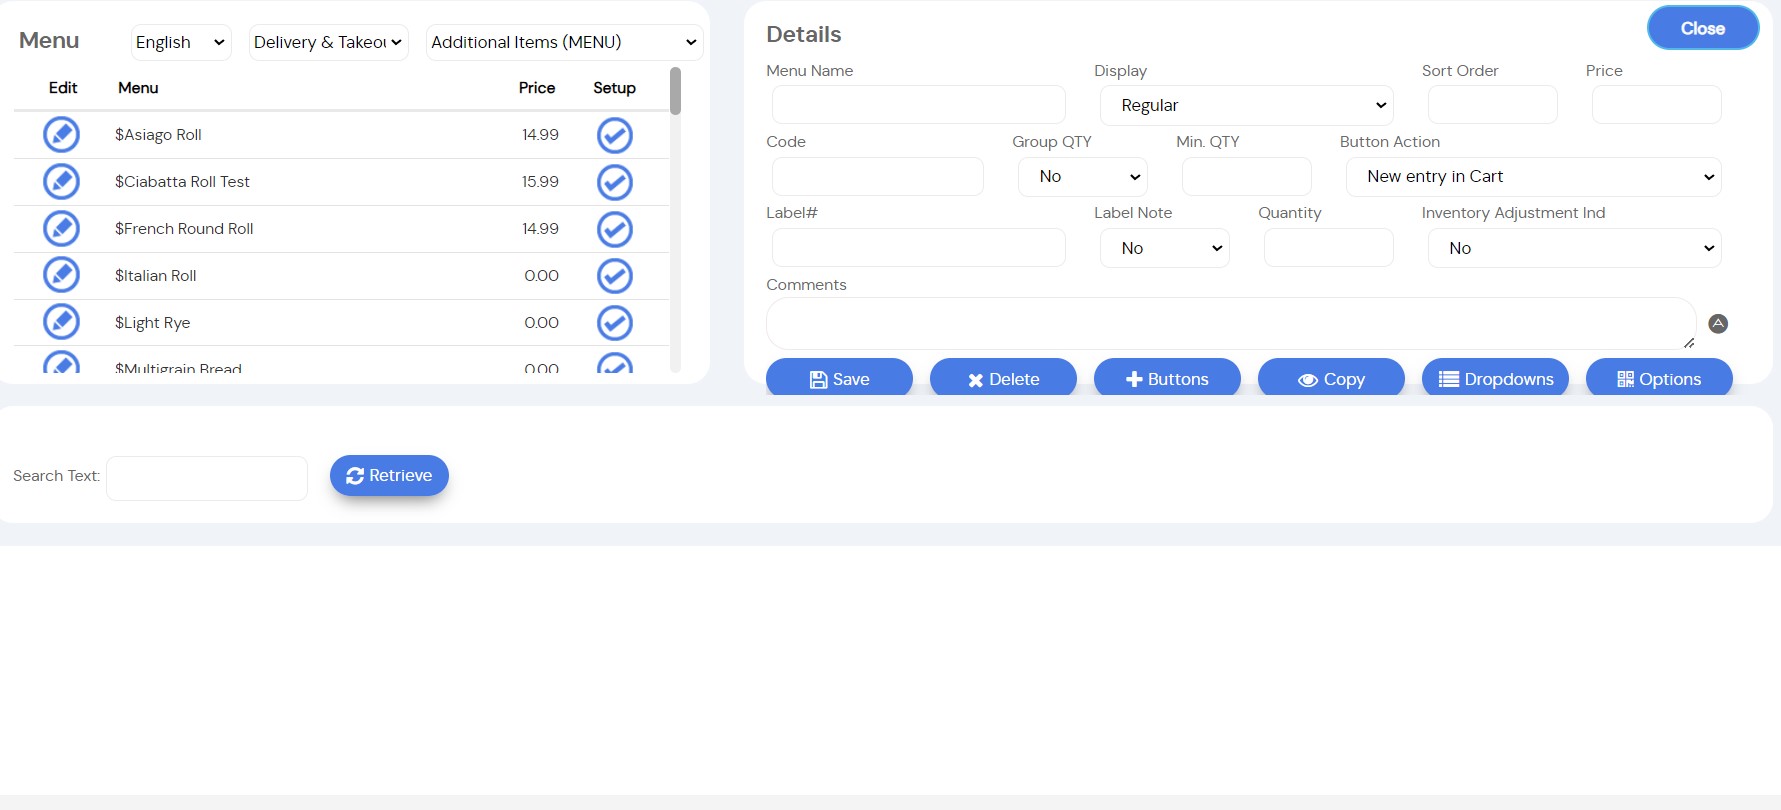
On the top left of the screen Select the Type and the Category of the Menu
Then Select the Menu Item of your choice to begin adding or removing options
Once Selected, the Details page on the right should have filled out automatically some fields as seen below:
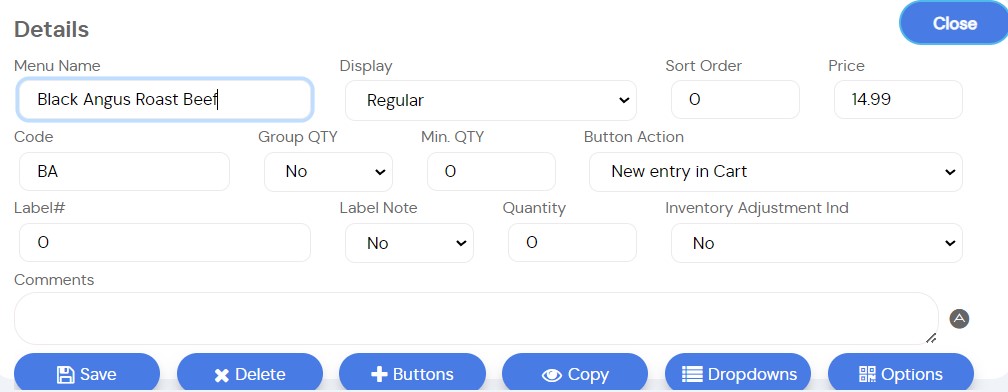
On the bottom of the picture you can see there are many buttons:
- The Save Button is to save the details you have entered for the Menu Item you have selected
- The Delete Button will delete the Menu Item you have selected
- The [+Buttons] is to add more Buttons that can hold Menu Options online
- The copy button lets you overwrite the Menu Item you have selected by replacing it with another Menu Item from the same Menu Category
- The dropdowns button are the dropdowns you can add online next to a Menu Option you can add or remove them from the Menu Options in Item Listing
- The options Button lets you decide when the Menu Items are available during the week you specify the Order Type with all, Pickup or Delivery
The bottom of the page should have also updated with many Optional Menu added from the Manage Menu page
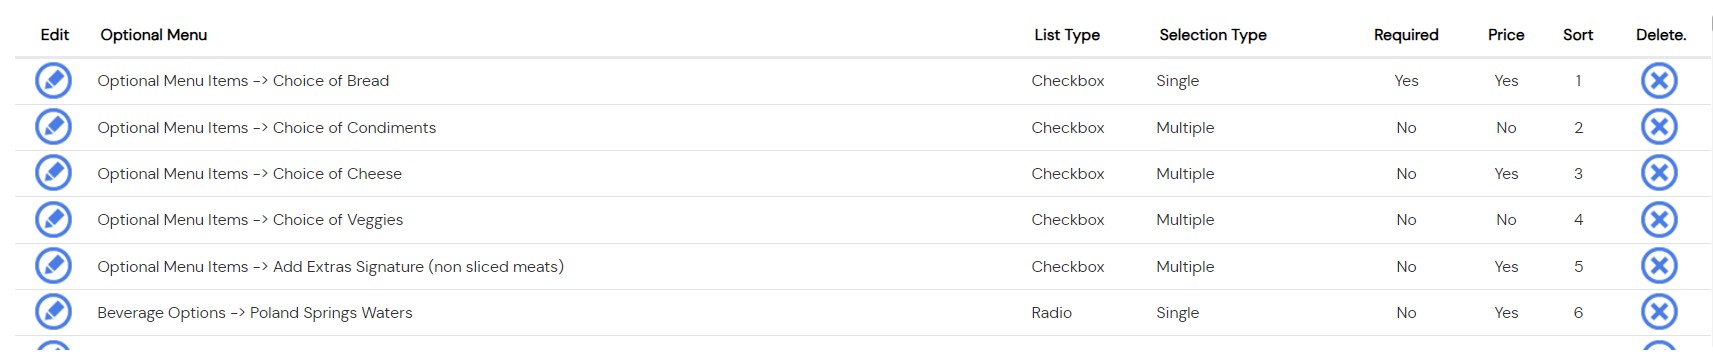
There is where you can add or remove options to modify the Menu Item you have selected
Click on the [Edit] Optional Menu Items button to configure the Menu Option
The page of the Menu Option should look like this :
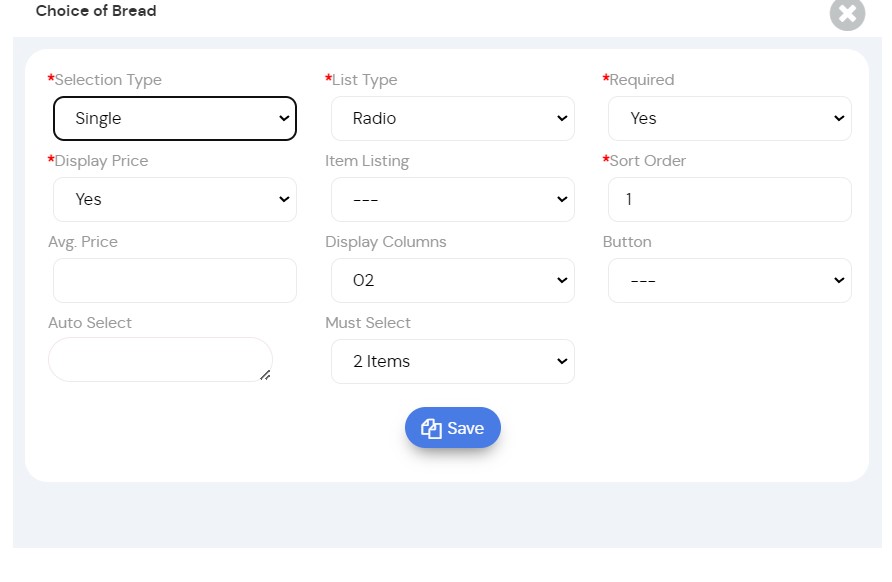
- The Selection Type field has two choices, Single means you only have one option and Multiple means you have many options
- The List Type field is how you want to list the options online, Radio you can choose one by pressing a Radio Button and Dropdown will create a dropdown with a list where you can select the Menu Option
- The Required field allows you to decide if choosing this option is necessary to complete the order you can choose with [Yes] or [No]
- The Display Price field gives you the choice if you want the price to show up online you can choose with [Yes] or [No]
- The Item Listing field can add dropdowns Next to a Menu Option online, for example QTY can be used to select the quantity to be ordered with a dropdown
- The Sort Order field is to sort the Menu options with numbers and each number will represent the order the Menu Options will show up
- The Display Columns allows you to decide how you want to show the Menu Options, 01 means they are all on seperate lines and 02 means there are two Menu Options on one line
- The Button field allows you to put the menu option under a button online, for example:
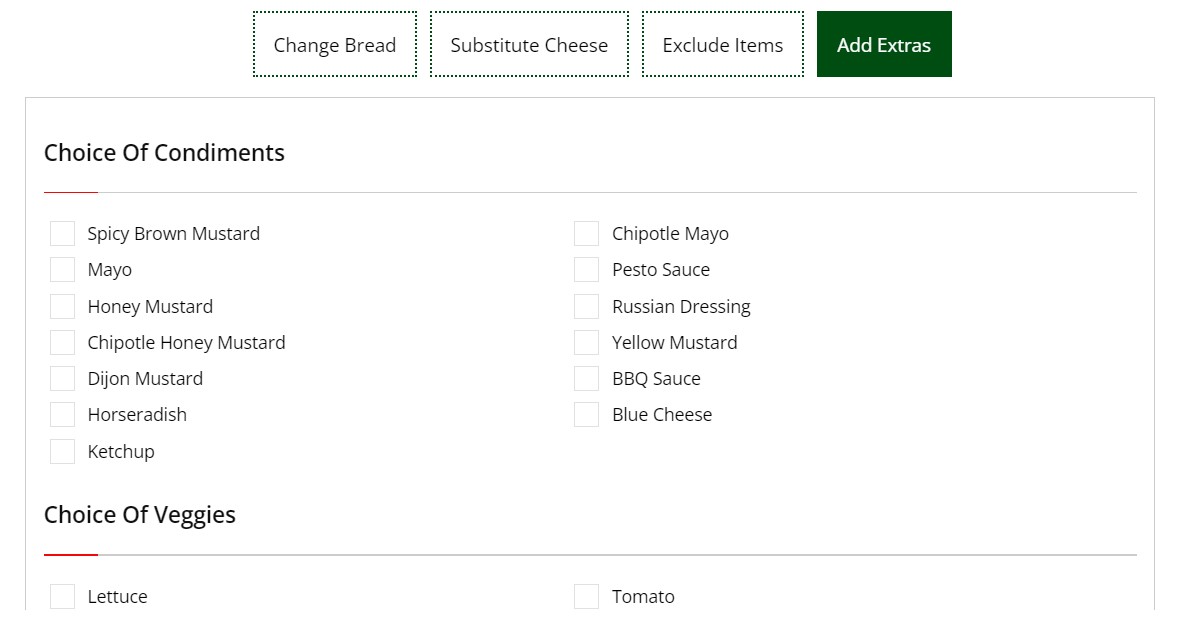
- The Auto Select field will select automatically the Menu Options you have chosen, the client can unselect them and choose another option if they desire it
- The Must Select field is the number of options you need to choose to be able to complete the order
When satisfied with all the your choices, press [Save] and all of your changes in the menu option should show up
Menu Availability
In the Manage Menu page there is a button called [Menu Availability]

This will take you to the Menu Availability Rules page where you can see all rules created for the menu
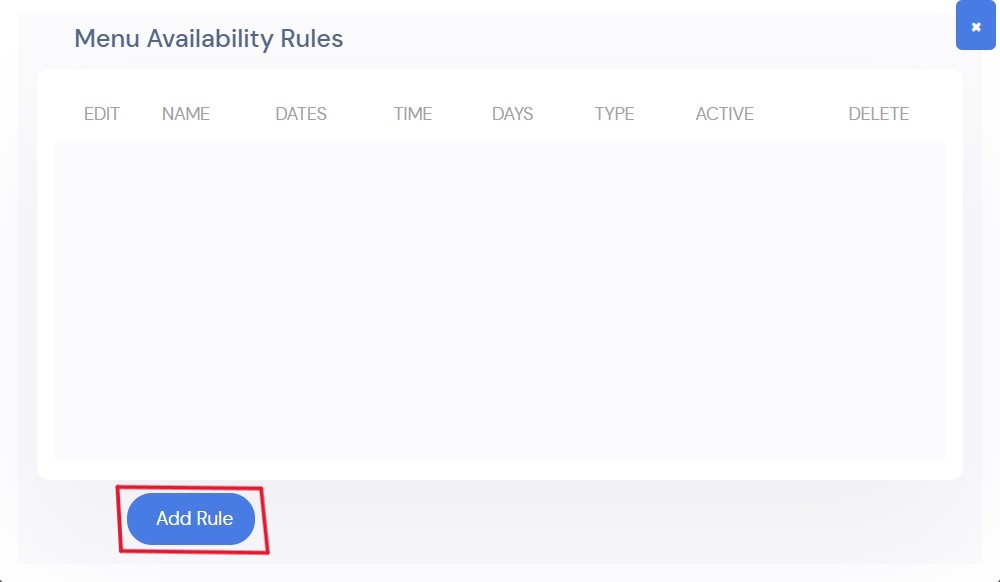
To add another rule click the [Add Rule] button
Once clicked another page will open with many fields
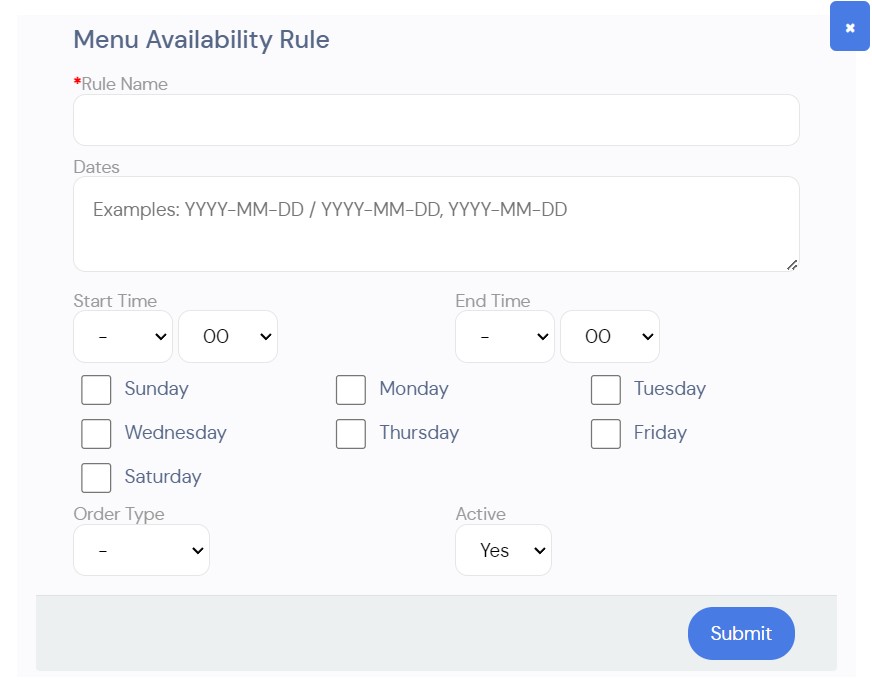
- The Rule name field is necessary and obligatory to make the rule
- The Dates field will the determine The Start Date and the End Date for the Rule to take place
- The Start Time and End Time will determine which part of the day the Rule will take place
- The Weekdays field will determine which day of the week the Rule will take place
- The Order Type field will determine if the rule only applies to [Pickup] or [Delivery]
- The Active field will determine if the Rule still applies currently if [Yes] it does if [No] it does not
When satisfied with all of the fields, press [Submit] and the Rule will show up on the previous page
Interface
Now you have completed your event and added both menus and services, you can now select the Payment tab to view the invoice the system has generated for this event.
In this window, you can see the total bill for your event.

Firstly, from here you can choose your invoice template.

Our system offers a default invoice template that will look like this:
However, if you are used to a certain type of invoice, our technical team can create custom template that will match your existing invoices.
By browsing your invoice, you can then see that all the charges added before, the room price, the menu items and even the services appear distinctively.
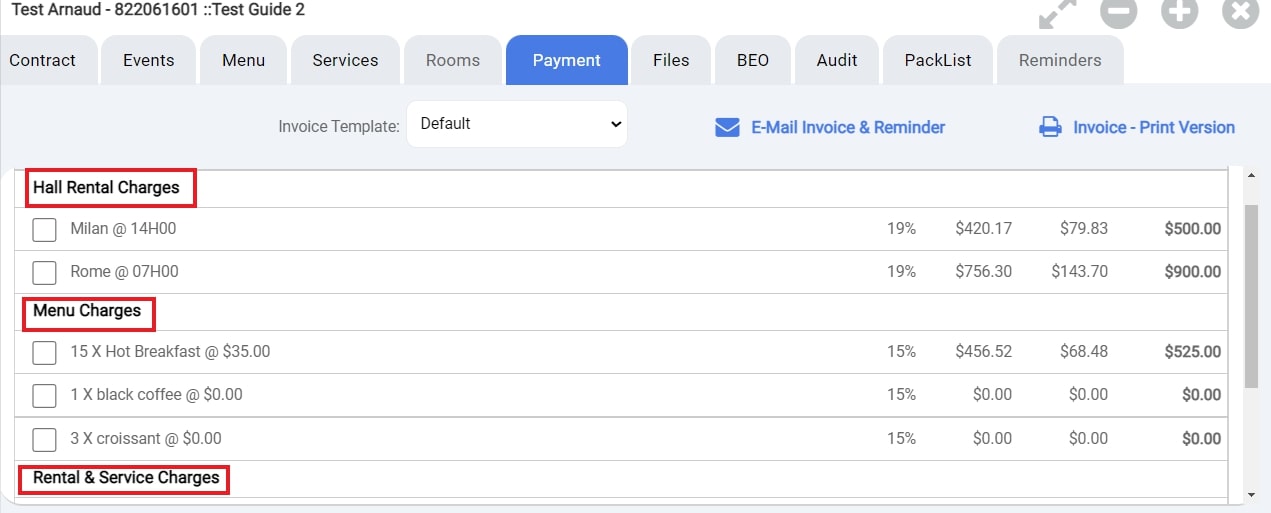
In this window you could also see the tax percentage as well as the cost before and after taxes for each of those item.
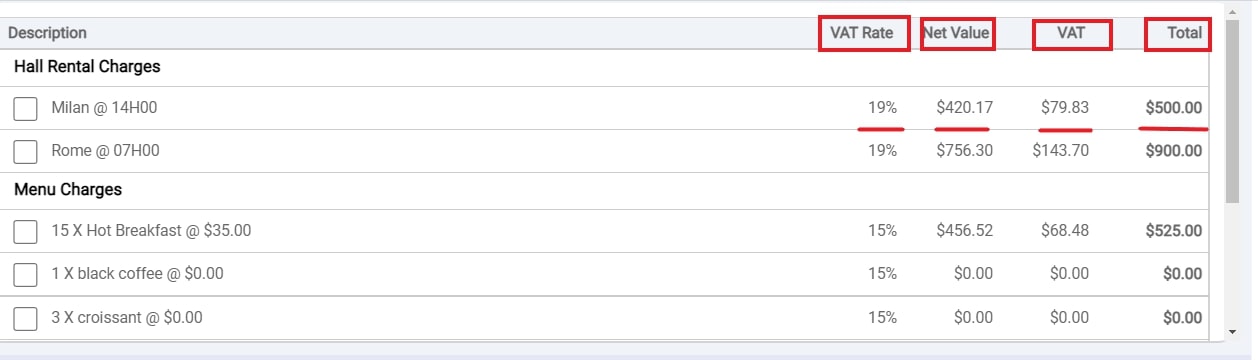
If one of the item included in this event is not taxable, it will appear as such:

With a simplified invoice template, the bottom of this window is where you will find your remaining balance
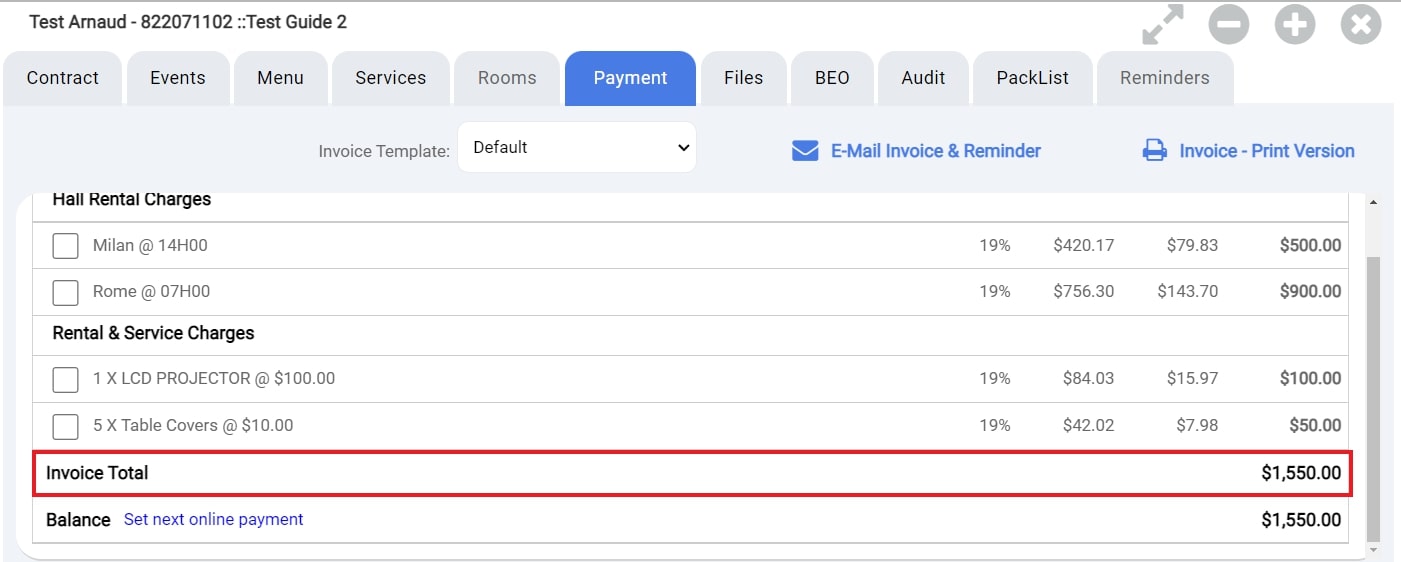
Note: Depending on your preferences and the level of detail you wish to have shown on your invoice, our team can tailor an invoice that displays more information such as a subtotal without taxes, a total of taxes and a final total including taxes for example.